Search This Blog

Sunday, September 30, 2012

No Knead Sticky Buns

      It has been a long weekend for me. After giving birth to my son a few months back, I found a lump in my abdomen. I attributed it to my body trying to get back to normal but it has yet to go away. Needless to say, after a doctor visit and a CT scan, I discovered that I have a hernia as well as gallstones! YAY ME! Sigh! Not sure when I will find time to fit that in but..whatever. I have decided the children owe me big time when they are older :) At any rate..on to the food...   
      Because I have an obsession with searching for recipes....many many recipes, I have stumbled on many beautiful food blogs and websites. Last night was no exception. The photographs were amazing. The recipes sounded divine. The only problem I had was deciding which one to share. I decided on something sweet because those seem to be the most popular. Also, if I could have afforded to go to school to be a pastry chef, I think I would have. These wonderful photo and recipe comes from a beautiful website called merelymarie. It is a beautiful site and these look absolutely sinful. Yummy! Best part...no kneading. All of the gooeyness and a lot less work! It is a win win! Have a great week friends!


No Knead Sticky Buns
DOUGH
6 3/4 cups or 7 3/4 cups Unbleached All-Purpose Flour
1 tablespoon + 1/2 teaspoon salt
1 1/2 tablespoons instant yeast
1 3/4 cups lukewarm water
4 large eggs
1/2 cup honey
1/2 cup melted butter
FILLING
2/3 cup granulated sugar
1 tablespoon ground cinnamon
TOPPING
3 tablespoons butter, melted
2 tablespoons honey
1/3 cup + 3 tablespoons of brown sugar
2/3 cup pecan halves or coarsely chopped pecans
1) The flour/liquid ratio is important in this recipe. If you measure flour by sprinkling it into your measuring cup, then gently sweeping off the excess, use 7 3/4 cups. If you measure flour by dipping your cup into the canister, then sweeping off the excess, use 6 3/4 cups. Most accurate of all, and guaranteed to give you the best results, if you measure flour by weight, use 33 ounces.
2) To make the dough: Combine all of the dough ingredients, in the order written, in a very large bowl (at least 6 quarts). Stir to make a sticky dough. You can do this in a stand mixer and then transfer to a larger bowl; or simply use a big bowl and spoon (or dough whisk).
3) Cover the bowl, and let the dough rise for 2 hours at cool room temperature.
4) Refrigerate the dough for at least several hours, to chill it and make it easier to work with. It can be refrigerated for up to 3 days before using.
5) When you’re ready to make sticky buns, make the filling. Combine the sugar & cinnamon. Set aside.
6) To make the topping: Spread the melted butter and honey in a lightly greased 9″ round cake pan. Sprinkle the sugar atop the butter, then scatter the nuts atop the sugar. Set aside.
7) To make sticky buns: Spray your hand with non-stick vegetable oil spray, and dip it into the dough in the bucket. Pinch off/pull out 1/3 of the dough; this is about the size of a large softball or a large grapefruit, a scant 22 ounces. For best accuracy, weigh on a scale. Place the remaining dough back in the refrigerator, to use another time. Or wrap and store in the freezer. This dough recipe is enough to make three 8″ or 9″ round pans of sticky buns.
8) Transfer the dough to a floured work surface, and roll it into a rectangle approximately 15″ x 10″.
9) Spread the filling over the dough, leaving a narrow margin around the edges uncovered.
10) Starting with a long edge, gently roll the dough into a log. Don’t roll it too tightly; if you do, the centers of the buns will pop up as they bake.
11) Cut the log into 8 pieces. (I usually cut it into 12 pieces, to fit my 9 by 13 inch baking pan)
12) Space the buns in the pan. Lightly press each down till they’re touching one another.
13) Cover the pan, and allow the buns to rise till they’re quite puffy, about 1 hour. Towards the end of the rising time, preheat the oven to 350°F.
14) Uncover the pan, and bake the buns for 40 to 45 minutes, till they’re a deep golden brown.
15) Remove the pan from the oven, and turn it over onto a piece of parchment, or onto a cooling rack set over a piece of parchment or waxed paper (to catch any drips).
16) Lift off the pan, and scrape any nuts or sugar in the pan onto the buns. Then, allow to cool for a few minutes.
Devour! Immediately.
Tuesday, September 25, 2012

Salted Caramel Rice Krispie Treats

             I had time to write a quick personal post today but wanted to get at least one recipe up for the week. Rice Krispie Treats...What can I say about them? Besides that they are delicious. Salted Caramel...what can I say about salted caramel? LOVE IT! Combine the two and you have got one slice of heaven let me tell you! Pots and Pins had this beautiful picture and this divine recipe. I stumbled on her lovely website and was immediately smitten with this recipe. The key here is to cook the caramel until it gets to the right temperature or it will be runny...delicious but runny. Yeah you could use store bought sauce but why? Homemade caramel is a snap, if you follow the directions. Thank you for killing my post baby weight loss Pots and Pins :) Oh well...tomorrow is another day!  If you get a chance stop by and visit her website. Both the photo and recipe are from her site. www.potsandpins.com


DSCN3379

Salted Caramel Rice Krispie Treats
(You could also add chocolate or butterscotch chips to the Rice Krispies Treats, or sprinkle chocolate chips on top of the hot caramel before sprinkling with salt...fancy them up all you want, they are dang good...five dangs on the ol' meter!!)
Rice Krispies Treats:
3 tablespoons butter1 package (10 oz.) regular marshmallows or 4 cups of mini-marshmallows
*6 cups Rice Krispies
Caramel:
2 cups white sugar
1 1/2 cups corn syrup
2 cups heavy cream
1 cup butter
1 teaspoon vanilla extract
Coarse Sea Salt for sprinkling on top
              Butter a 9x13-inch baking dish. In a large pan, over medium-low heat, melt butter. Add marshmallows and stir until completely melted. Pour in Rice Krispies and stir until evenly coated. Scoop Rice Krispies mixture into prepared baking dish and using a lightly buttered spatula or buttered fingers, press Rice Krispies down firmly into baking dish.
             Make Caramel: In a large (mixture will bubble up so use a large pan!), heavy-bottomed pan, combine sugar, corn syrup, 1 cup of cream and butter. Stirring often, bring to a boil, over medium heat, then pour in remaining cup of cream. Heat, without stirring to 242 degrees (soft ball stage) or until a small abount of syrup dropped into cold water forms a firm but pliable ball when removed from water. (Using a candy thermometer is a really good idea, but if you don't have one, make sure to do the cold water test and the "ball" needs to hold it's shape but still be pliable for the caramel to set up right.) This will take about 20 minutes or so, watch so it doesn't boil over. Remove from heat, stir in vanilla. Immediately pour over Rice Krispies. Some of the Rice Krispies will float to the top and some bubbles will appear, just pop with a fork. Let caramel set for about 3 minutes then sprinkle with coarse sea salt. Allow caramel to cool completely, then cut into bars, squares or however big or small you want. I cut mine into 3-inch squares, wrapped them individually in waxed paper and tied them with a string, all in an attempt to make them harder for me to eat...didn't slow me down one bit!
*For your chocolate lovers out there, substitute Cocoa Krispies or make a batch that's half and half...dang good!

Where, O where has my privacy gone?!


        I am writing today about something that I have lost...no, not my marbles (everyone knows they have been gone for years). PRIVACY! Yep! I have none! Zilch! NADA! Remember the days that going to the bathroom was a personal matter? Well...that my friends, is long gone! Going to a public restroom gives me more privacy than my own home and if you are a mom..you can relate. Look, I will give you an example. Just today, I had dropped my Kindergartner off to school, the older two were still in school. That left the 3 year old and the baby. Not that difficult right?! Well... I was finally able to get into the tub. Now I wasn't expecting a Calgon bath, a nice relaxing 2 minute scrub was all I asked for. What did I get? A 4 month old SCREAMING in his car seat at the top of his lungs in the door way and the three year old standing next to the tub throwing in his tub toys while playing with his latest Happy Meal toy that spins around and flies off the base, which by the way. also became a tub toy.
         It's not just bath time either, using the restroom is exactly the same. I can pinpoint the exact moment I lost privacy in this area. Lets see we adopted Marisa almost 9 years ago...IT HAS BEEN NINE YEARS since I have been able to take care of "paperwork" without an audience. It never fails.I go into the bathroom and before I even undo my pants....someone is at the door. "Can you brush my hair, sign this paper, give me a hug, wipe my nose, paint my nails, put the lid on my cup, grade my homework, answer the phone, and my favorite.. make a sandwich, I brought you the stuff.".. because the bathroom is a great place to make a sandwich ?!? Really? None of this could wait until I finished? I should have known, considering after I gave birth to Grace I had nurses and doctors down in an area that I preferred to keep personal and private. That my friends was just a precursor of things to come. It was preparing me for life as a mother.NOTHING is sacred or private. I may as well have my bathroom in a fish bowl. I what you all are thinking..lock the door. My older children can pick the lock and the younger...well they just sit outside the door pushing their little fingers under the door trying to peek inside. I know all of the optimists will say that one day the house will be quiet, I will soon wonder where everyone is....yes I know... but until then, I will continue to dream of a peaceful and serene bathroom or at least an out house where I can have a moments peace. A place where I can have a 3 MINUTE bath and quite possibly be able to sit on the commode and finish without being interrupted. Hey...A girl can dream can't she?!

Monday, September 17, 2012

Chicken Tinga

            I am always on the look out for new recipes. My husband LOVES Mexican food. So when I stumbled on this recipe...I knew I HAD to make it. A friend told me of a neighbor that had made Chicken Tinga for her but I had never heard of it. I researched it a little and found this recipe. Now, this isn't the recipe that my friend spoke of but man oh man....yumm! The recipe and photo are from Muy Bueno Cookbook. My eternal thanks to her. Yumm! If you think that it would be too spicy with a full can of chipotle peppers you can use half. Really though...the tomatoes DO balance it out. Did I say Yumm before?! Have a great week my friends! Enjoy!


Chicken Tinga
Yield: 10 to 12 servings

Ingredients:

6 cups water
2 pounds skinless/boneless chicken breast
4 teaspoons salt, divided
1 clove garlic
1 medium yellow onion, quartered
1 large vine ripened tomato, quartered
1 (7-ounce) can chipotle peppers in adobo sauce
1/4 cup canola oil
1 large yellow onion, chopped
3 large vine ripened tomatoes, chopped
1 clove garlic, chopped
12 Flat tostada shells, packaged or corn tortillas
Toppings (optional)
1 iceberg lettuce, finely shredded
3 avocados, pitted, peeled, and sliced
2 cups crema Mexicana or sour cream
2 cups queso fresco or Cotija, crumbled
2 cups salsa of your choice
6 radishes, sliced

Directions:

In a large stockpot, over medium to high heat, add water, chicken, 2 teaspoons salt, 1 clove garlic, and quartered onion. Cover and simmer for about 30 minutes. Reserve.
Remove the chicken and allow it to cool. After the chicken cools off shred it. Reserve.
In a blender add the boiled onion and garlic clove, quartered tomato, chipotle peppers including adobo sauce, 2 teaspoons salt, and enough chicken broth to fill the blender half way. Puree until smooth.
Heat the oil in a large and deep pan over medium heat.
Once it is hot but not smoking, stir in the chopped onion and cook until soft and translucent, about 2 minutes.
Add chopped tomatoes and chopped garlic and cook for an additional 2 minutes.
Add the cooked shredded chicken, the chipotle sauce from the blender and more chicken broth if it is too dry. Bring to a boil, reduce heat and simmer for 10 minutes.
Add salt to taste.
Tostadas
In a heavy skillet heat one-quarter inch of oil. Drop tortillas carefully into hot oil, one at a time, for 20 to 40 seconds on each side or until crisp and golden. Drain on paper towels. Store bought tostadas can also be used.
Assemble
To assemble, place a tostada (fried tortilla) on a serving plate; spoon on Chicken Tinga, lettuce (optional), 1 or 2 slices of ripe avocado, crumbled queso fresco, and top with crema Mexicana or sour cream.
Garnish tostada with toppings of your choice
Monday, September 10, 2012

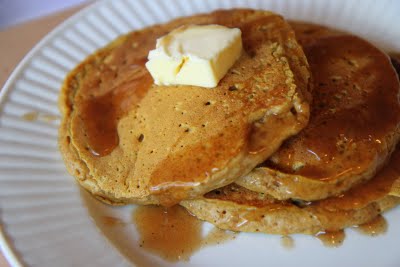
Light and Fluffy Pumpkin Pancakes

         For some reason my backgrounds are having a difficult time loading. I am sorry. Not sure where the problem lies. Hopefully it gets fixed soon.
        Seems like I am struggling just as much with the kids in school as I was with them all home. I just can't find my free time to get my blog updated and I was doing so good too. I guess a new baby does that. I am hoping that it will all begin to mellow out soon and that I will get myself back on a schedule. Of course it didn't help that my entire family had a cold already cycle through the house..including the baby. I am always running between here and the school and my sweet husbands schedule or lack thereof at his new job doesn't help either. I promise I will try and be better.
           With Fall just around the corner I love to fill my house with the smells of simmering soups and slow cooked meals. Autumn is my favorite season. The crisp nights and all of the beautiful colors that surround us. Pumpkin is one smell that just screams Fall to me. My hubby really isn't a fan of anything pumpkin except for maybe a sliver of pumpkin pie on Thanksgiving but that is it. I know..he is some sort of mutant.  I try and stock up on canned pumpkin before it becomes scarce in the store. Which happens pretty soon around here. I found this recipe for light and fluffy pumpkin pancakes. With a drizzle of maple syrup this would be divine on an Autumn morning. Maybe even throw in some mini chocolate chips. DELICIOUS! The recipe and photo are from momadvice.

Light and Fluffy Pumpkin Pancakes
1 1/4 cups all-purpose flour
2 tablespoons sugar
2 teaspoons baking powder
1/2 teaspoon cinnamon
1/2 teaspoon ginger
1/2 teaspoon nutmeg
1/2 teaspoon salt
1 pinch clove
1 1/4 cup low-fat milk
1/3 cup canned pumpkin puree
2 tablespoons melted butter
1 egg
mini chocolate chips (as per my addition)
        Whisk flour, sugar, baking powder, spices and salt in a bowl. In a separate bowl whisk together milk, pumpkin, melted butter, and egg. Fold mixture into dry ingredients. Spray or grease a skillet and heat over medium heat: pour in 1/4 cup batter for each pancake. Cook pancakes about 3 minutes per side. This recipe makes six 6-inch pancakes.

***Side Note- This can easily be doubled and frozen or stored in the refrigerator for a great breakfast later in the week.
Thursday, September 6, 2012

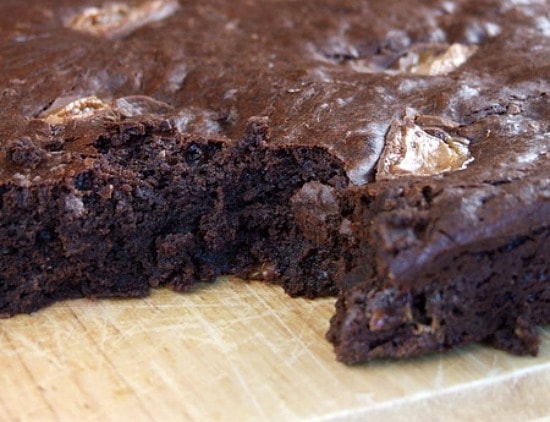
Milky Way Brownies

            So here's the thing...I could eat my weight in Milky Way candy bars...every day. I love the things. Especially when they are right out of the fridge or freezer. Yummm! I never crave any junk food while I am pregnant. Just ice. I had my baby just 3 months ago and just like the previous three postpartum times... I crave CHOCOLATE! Normally, I don't eat a lot of chocolate. For some reason, after a baby.... I CANNOT get enough of the stuff. While looking for new ways to feed my love/hate relationship with chocolate, I stumbled on these Milky Way Brownies by recipe girl. The photo and recipe are from her beautiful site. Can you imagine the possibilities? You could chop up any candy bar and create your own dessert. But, to be honest, she had me at Milky Way. MmmMMmmm! I wouldn't have the patience to put them in the fridge and wait. I would want them gooey with a scoop of ice cream.


Milky Way Brownies
1 pound (4 sticks) unsalted butter, cut into pieces
1 pound semi-sweet chocolate chips (or chopped chocolate)
6 ounces unsweetened chocolate, chopped
2 Tablespoons instant espresso powder
7 large eggs
2 Tablespoons vanilla extract
2 1/4 cups granulated white sugar
1 1/4 cups all-purpose flour
1 Tablespoon baking powder
1 teaspoon salt
12 ounces miniature Milky Way Bars, chopped
1 full-size Milky Way Bar, sliced thinly

Directions:

1. Preheat oven to 350°F. Butter and flour 12x18x1-inch pan. Line with foil or parchment that hangs over the sides for ease in getting them out (butter the foil/parchment).
2. In a heatproof, medium-bowl set over a saucepan of simmering water, heat butter, and chocolates until melted and smooth; cool slightly.
3. In a large bowl, whisk together the eggs, espresso powder, vanilla and sugar. Stir the egg mixture into the slightly cooled chocolate mixture. Cool to room temperature.
4. In a medium bowl, sift together flour, baking powder, and salt, then add to batter. Stir chopped mini Milky Way bars into chocolate mixture. Then pour into prepared baking pan and smooth top with a rubber spatula. Place slices of the full-size Milky Way Bar onto the top of the brownie batter.
5. Bake for 25 to 35 minutes, or until toothpick inserted in center comes out clean with a few crumbs attached; do not overbake! Let cool completely, then cover tightly and chill overnight. Chilled brownies are easier to cut.

Tips:

*These taste better the second day.
*If it's a warm day inside your house, you might consider chilling the Milky Way bars before you try to cut them.

Monday, August 27, 2012

Frozen Strawberry Lemonade

          I wish I would have taken a picture of my frozen concoction yesterday but they were devoured before I could get the camera out. I will make them again soon and take some pictures...until then you all will have to use your imaginations on what it looks like. It was a simple frozen lemonade recipe from my grandmother that I tweaked just a little. I used some fresh strawberries that I had frozen awhile back. You could use raspberries, blueberries or whatever else you could think of. You have to try this. The strawberries added an added sweetness that can't be beat. I got my lemons from Costco, so they were large lemons. Here's a picture.....as you can tell...I am not a photographer. :)


Frozen Strawberry Lemonade
Juice of 4 lemons (mine were fairly large lemons)
1 1/2 c to 2 cups sugar (start with less and adjust if necessary)
ice
water
frozen strawberries (I used about 5 berries)
      Juice the lemons and add to blender. Add in your sugar. Fill lender with ice then add enough water to fill blender. Blend until ice is slushy. Add in your berries and pulse until blended. This made four 12 oz glasses. This drink is great with out the berries as well. So refreshing on a hot summer day.

Followers