Search This Blog

Thursday, December 29, 2011

Cheesy Buffalo Chicken Dip

           Still looking for something to have at your New Years Party? If you like buffalo chicken, you will love this dip. Comes together in a snap. The photo and recipe are from Deals to Meals. She even included a few substitutions. For instance, my hubby is not a fan of Blue Cheese AT ALL...substitute Feta. Whatever you plan on doing, Please DO NOT DRINK AND DRIVE or GET INTO A CAR WITH SOMEONE THAT HAS BEEN DRINKING. There are many programs out there offering a free ride home. Tipsy Toe from AAA is one of them. Their # is 1-800-222-4357. Write the number down and keep it handy. Wishing you and yours a safe and healthy New Year.


Buffalo Chicken Dip
8 oz. cream cheese, softened
1/2 c. mozzarella cheese, shredded
1/2 c. blue cheese or feta (If you don't like blue cheese use feta..it is delicious with both types of cheese)
1/2 c. ranch dressing
1/2 c. franks hot sauce
1/2 c. green onions, sliced
1/4 c. cheddar cheese, shredded
2 chicken breasts, cooked and cubed/shredded
Crackers, chips or celery
        Cook the chicken until no longer pink and shred for later--I used cooked and shredded chicken I had from my freezer. Set the chicken aside. In a microwave safe bowl, heat the cream cheese in the microwave until soft. Add the remaining ingredients and stir until combined. Add the chicken to the dip. Place the dip in a 8x8 or 9x13 pan that has been sprayed with cooking spray. Bake at 350 for 15-20 minutes, or until the dip is slightly golden brown. If you don't have a lot of time you can also broil the dip for 2-3 minutes, watching carefully that the dip doesn't burn. Serve the warm dip with crackers, pieces of bread, slices or celery or tortilla chips.
Wednesday, December 28, 2011

Mexican Hot Chocolate

            My beautiful sister in law is from Cancun. When she married my brother we were introduced to a few different things. Mexican Hot Chocolate is one of them. Have you ever had it? The flavor is so rich and complex. It's no too sweet either.If you haven't had cinnamon in your hot chocolate..you have been missing out. It is one of my favorite ways to change up basic hot cocoa. It only has a few additions but the flavor can't be beat. If you are feeling a little more adventurous, some recipes call for a pinch or two of cayenne. You could just by the over the counter mix but really this is super simple. This recipe and photo come from Taste of Home. You have to try this one.


Mexican Hot Chocolate
1/4 cup baking cocoa
2 tablespoons brown sugar
1 cup boiling water
Dash ground cloves or nutmeg
1/4 teaspoon ground cinnamon
3 cups milk
1 teaspoon Spice Islands® pure vanilla extract
Whipped cream
Whole cinnamon sticks (optional)
        Combine cocoa and sugar in small saucepan; stir in water. Bring to boil; reduce heat and cook 2 minutes, stirring constantly. Add the cloves, cinnamon and milk. Simmer 5 minutes (do not boil). Whisk in vanilla. Pour hot chocolate into mugs; top with whipped cream. Use cinnamon sticks for stirrers. Yield: 4 servings.
Tuesday, December 27, 2011

Firecracker Wings

            It is hard to believe that the New Year is upon us. Do you plan on staying home or going out and painting the town? Are you  having a party or just an intimate gathering? My hubby and I usually never make it to midnight. Kids do that to you....especially small ones. I guess we could just celebrate midnight on the east coast.. That is 10 pm here. We may make it until then.
           If you are having a party these little wings would be a great appetizer or as an entree. One advantage that they have over regular buffalo wings is that they are dry, so no messy sauce. Of course you could serve with your favorite dipping sauces if desired. The heat comes from the pepper blend spice that you season the wings with. If you can't find the spice or don't have it on hand. There is a substitution at the bottom. Picture and recipe are from McCormick.


Firecracker Wings
Makes 6 (3-wing) servings.
Prep Time: 10 minutes
Cook Time: 30 minutes

1/2 cup plain bread crumbs
1 to 2 teaspoons McCormick® Hot Shot!® Black & Red Pepper Blend
1 teaspoon McCormick® Garlic Salt
2 pounds chicken wing pieces

      Preheat oven to 425 degrees F. Mix first 3 ingredients in large resealable plastic bag. Add chicken wings in batches; shake to coat well. Arrange chicken wings in single layer on large foil-lined shallow baking pan. Bake 30 minutes or until chicken is cooked through.

Substitution Tip: Prepare as directed, using 1 tablespoon McCormick® Chili Powder and 1/4 teaspoon each McCormick® Ground Black Pepper and Ground Red Pepper in place of the Pepper Blend.
Monday, December 19, 2011

Cheesy Bacon Potatoes

            Another side today. Cheesy Bacon Potatoes. Now, you can't tell me that just saying that recipe name  doesn't make your mouth water. I mean how could you go wrong. Creamy potatoes, gooey cheese and bacon. Doesn't bacon make EVERYTHING better? SO much better than the dried potatoes and powdered mix that comes in a box...and it is not very complicated. You deserve this.The recipe and photo came from just a pinch.

 Cheesy Bacon Potatoes

Cheesy Bacon Potatoes
6 potatoes, peeled and sliced
1/2 cup onion, diced
2 cups cheddar cheese, shredded
1 cup bacon, cooked and crumbled
2 cups milk
1/2 cup half and half
4 Tbs. butter
4 Tbs flour
salt and pepper
         Use a large pot. Saute chopped onions in butter till soft but not browned. In a small bowl, combine flour, salt and pepper. Stir flour mixture into onion mixture, add milk and half and half. Stir and cook over medium heat till mixture begins to thicken (about 3 minutes). Turn off heat.
Add 1 1/2 cups cheese to the sauce and stir till melted and smooth. Add sliced potatoes, bacon and stir well to combine. Pour mixture into a casserole dish sprayed with no stick spray. Cover with foil and bake at 350 for 35 minutes. Remove foil, sprinkle reserved cheese over top and return to oven to bake another 30 minutes or until potatoes are soft, cheese is melted and edges begin to brown. Let stand a few minutes before serving to allow sauce to thicken

Saturday, December 17, 2011

Sinas Hot Cocoa Mix

          What could be better on a cold winter day than a cup of Hot Cocoa? I have mentioned my sweet friend Sina before. This is one of her recipes. I thought that since I had posted Hot Chocolate Stirring Sticks yesterday, I would add a cocoa mix today. This would be great for a gift or for you just to have on hand. Sina said that if you store it in an airtight container, it would last six months. Keep in mind that this makes a lot but once you make homemade cocoa...the store bought stuff just won't do. You could vary the flavor a little by changing up the flavor of your non dairy creamer...cinnamon is the bomb. Thank you Sina!


Sinas Hot Cocoa Mix
10 2/3 cups instant nonfat dry milk
6 ounce jar powdered non dairy creamer
2 cups powdered sugar
16 ounce can instant chocolate drink mix

Combine all ingredients and mix well. Put in airtight container. Store in cool dry place for up to 6 months. 
        Now Sina didn't have prep instructions on her recipe. I added about 1/3 cup mix to a cup of boiling water. Make sure you give the dry mix a stir before scooping out your 1/3 cup. Of course you can add more or less depending on your taste.
Friday, December 16, 2011

Hot Chocolate Stirring Sticks

            Not really a recipe today but a very, very cute suggestion. Great for kids and a kid at heart. I love putting candy canes in my hot chocolate and this ide is super cute. The photos and recipe are from confessions of a cookbook queen. BTW her blog is hilarious! So, what are you waiting for?Get to it. You could make a ton of these in a short amount of time and be the rockstar of the neighborhood...well maybe not but you would be pretty cool.


Hot Chocolate Stirring Sticks
  1. Peppermint Candy Canes
  2. Marshmallows
  3. Chocolate Candy Coating
  4. Red and White Candy Coating
  5. Christmas Sprinkles
Gather up the goods. Unwrap the candy sticks and skewer two or three marshmallows on each. To make things easier, you can stick a knife through the marshmallows first, then push the candy through. Melt your chocolate according to package directions. (I like to put the chocolate in a mug or other small but deep container because it's easier for dipping.) Dip the marshmallow sticks in, and place on a wax paper lined baking sheet to set.Before the chocolate is set, melt the white and red candy and drizzle back and forth over the chocolate. Sprinkle immediately with Christmas sprinkles. To speed up the setting, you can place the Hot Chocolate Stir Sticks in the refrigerator.
Triple Decker Stir Sticks
Thursday, December 15, 2011

Pear Crunch Pie

            Pears are one of my most favorite fruits. Watching "The Chew" today, Clinton shared his grandmothers Pear Crunch Pie. HEAVEN! I may just have to bump the Dutch Apple Pie for Christmas and have this instead. sigh. I HAD to share it on here. Now, make sure if using canned pears that you use the best quality pears and preferably canned in pear juice not heavy syrup. Be prepared to oooh and ahhh your guests. Thank you to Clinton and his grandma! Mmmm!


Pear Crunch Pie
FOR THE CRUST:
1 stick of butter
¼ cup light brown sugar
1 cup flour
½ cup sweetened coconut
.FOR THE FILLING:
½ cup light brown sugar
1/3 cup flour
Hearty pinch of salt
¾ cup cup of pear juice (not pear nectar)
¾ cup whole milk
2 egg
½ teaspoon vanilla extract
2 tablespoon butter
.FOR THE WHIPPED CREAM:
8 ounce heavy cream
1 teaspoon confectioners sugar
dash of vanilla extract
.FOR THE GARNISH:
6 pear halves
cinnamon for dusting
           FOR THE CRUST: Combine all ingredients and bake at 350 degrees F on cookie sheet until golden brown (about 40-45 minutes). Check frequently to prevent edges from burning. When cool press into a pie plate. Crust should be crumbly when complete.     
            FOR THE FILLING: Combine all ingredients in (except eggs) a saucepan over medium heat and bring to a boil. In large bowl, beat 2 eggs. Add heated mixture to eggs, little by little to temper the eggs. Once eggs are tempered, transfer mixture back to saucepan. Add 2 tablespoons of butter and ½ teaspoon of vanilla extract and return to a boil (approximately 1 minute). Pour warm mixture into prepared pie shell and chill in the refrigerator.
           FOR THE WHIPPED CREAM: Whip the heavy cream with the confectioners sugar and vanilla until it stiffens to whipped cream. Before serving, top with the whipped cream.
           TO GARNISH: Top with 6 pear halves and dust with cinnamon. NOTE: If pears aren’t ripe enough, use canned pears or poach pears in a simple syrup of equal sugar and water.

Wednesday, December 14, 2011

Holiday Tree Brownies

            I am making these cute and easy Christmas Trees for Maddoxs' Preschool class. One pan will make enough for his entire class and they are SO cute. The recipe and photo are from Betty Crocker. Give these a try...If you didn't want to use a box you could of course use your own recipe from scratch. Just make sure they are a nice dense brownie to hold their shape. One reader suggested putting them in the freezer for an hour before cutting. Also the candy cane inserts easier if you use the side that wasn't against the pan while baking. Enjoy!
Holiday Tree Brownies

Holiday Tree Brownies
1  box (1 lb 2.4 oz) Betty Crocker® Original Supreme Premium brownie mix                 
Water, vegetable oil and egg called for on brownie mix box
2 or 3 drops green food color
2/3  cup Betty Crocker® Rich & Creamy vanilla frosting (16 oz. container)                                      
Betty Crocker® Decorating Decors red and green candy sprinkles or miniature candy-coated chocolate baking bits
Miniature candy canes (2 inch), unwrapped
                Heat oven to 350°F (325°F for dark or nonstick pan). Line 9-inch square pan with foil so foil extends about 2 inches over sides of pan. Grease bottom only of foil with cooking spray or shortening. Make and bake brownie mix as directed on box. Cool completely, about 1 1/2 hours. Remove brownie from pan by lifting foil; peel foil away. To cut brownie into triangles, cut into 3 rows. Cut each row into 5 triangles, see diagram. Save smaller pieces for snacking. Stir food color into frosting. Spoon frosting into small resealable food-storage plastic bag; partially seal bag. Cut off tiny bottom corner of bag. Squeeze bag to pipe frosting over brownies. Sprinkle with decors. Break off curved end of candy cane; insert straight piece into bottoms of triangles to make tree trunks.


Tuesday, December 13, 2011

Chocolate Chip Muffins

          My kids love chocolate chip muffins. Box mixes can get pricey unless you stock up while they are on sale. This recipe is about as quick as the box and tastes better. You could omit the nuts if you prefer. My kids just like plain old chocolate chip muffins. I have two muffin pans, the reason I tell you this is not for bragging rights..is there such a thing? Anyway, one is light colored and one is really dark non stick. On the box recipes it says to bake at 425. My dark pan burns the muffins in minutes. I have to decrease the temp. to 360 to get them to come out decent. The point I was making...is, if you have a dark pan you may need to decrease either the temp or the time to avoid burning your muffins and who wants burned muffins? Watch them closely. The recipe and photo came from Food.com
Chocolate Chip Muffins. Photo by Redsie

Chocolate Chip Muffins
2 cups all purpose flour
1/3 cup light brown sugar, packed
1/3 cup sugar 
2 teaspoons baking powder 
1/2 teaspoon salt
2/3 cup milk
1/2 cup butter, melted and cooled
2 eggs, lightly beaten
1 teaspoon vanilla 
1 (11 1/2 ounce) package milk chocolate chips
1/2 cup walnuts or 1/2 cup pecans, chopped
         Preheat oven to 400°F. (I decreased my temp to 360) remember that it all depends on your pan.  Grease twelve muffin cups or line with papers. In a large bowl, stir together flour, sugars, baking powder, and salt. In another bowl, stir together milk, eggs, butter, and vanilla until blended. Make a well in center of dry ingredients. Add milk mixture and stir just to combine.Stir in chocolate chips and nuts. Spoon batter into prepared muffin cups. Now bake for 15-20 minutes (mine was about 20 minutes) or until a cake tester inserted in center of one muffin comes out clean. Remove muffin tin to wire rack. Cool for 5 minutes. Remove from to tins to continue cooling. Serve warm or cold. These muffins freeze well.
Monday, December 12, 2011

Chicken Lick'n Pork Chops

            I promise to give you a reprieve from sweets...for a few days at least. I don't know about you but this is the busiest time of the year for me. My crock pot or slow cooker is my lifesaver for dinner. This recipe is both simple and delicious. I found it on Tasty Kitchen. Pork Chops are one of my fave things. I am always looking for a way to change thins  up a bit. I am not a fan of cream of chicken soup. It just tastes too salty to me. In it's place you could use cream of mushroom, celery,  potato, or even mix if you would like. The end result would change the flavor  a bit and let's face it, if you didn't use cream of chicken..the name would have to change as well : ) Your best bet is to use a cram soup that you like. It will turn out fantastic! The only change I would make if you have time...after breading the chops brown them in a hot pan to give them a nice crust. and beautiful brown color. My crock pot cooks very hot. I would need to use the low setting on mine and check to make sure it isn't burning.The recipe and photo are from miss hospitality. Thank you!


Chicken Lick'n Pork Chops
4 whole Boneless Pork Chops
½ cups Flour
1 Tablespoon Salt
½ teaspoons Garlic Powder
1-½ teaspoon Dry Mustard
2 cans (10.75 Oz. Can) Cream Of Chicken Soup
        Mix all dry ingredients together. Dredge pork chops in the dry ingredients. Place in a slow cooker. Top pork chops with cream of chicken soup.  Cook on low or high (depending on YOUR slow cooker) for 8 hours. Stir at least once while cooking if possible, but that’s not a must. Goes great with rice or potatoes
Saturday, December 10, 2011

Dressed Up White Chocolate Popcorn

            Welcome to my 531st recipe. WoW! I know, I know another Christmas treat, but you will thank me for this one! I would personally omit the peanuts..or maybe add some peanut M&M's. Totally up to you and totally addicting. Salty, Sweet..Buttery and Chocolaty. Found this on Tasty Kitchens by way of your home based mom. The photo is gorgeous. What a fantastic neighbor gift idea! Hope you are having a fantastic weekend and enjoying your holiday season.


Dressed Up White Chocolate Popcorn
2 bags (3.5 Oz. Bag) Microwave Popcorn, Butter Kind
¾ cups Holiday M &Ms
¾ cups Peanuts (Or Just Add More M& Ms)
1-½ cup Mini Marshmallows
1-½ cup Stick Pretzels
16 ounces, weight White Chocolate Or White Almond Bark
6 ounces, weight Dark Or Milk Chocolate, Melted
      Pop popcorn and remove unpopped kernels. Put popcorn in a big bowl along with M & Ms, peanuts, marshmallows and pretzels. Pour melted white chocolate over the mixture and stir until well coated. Spread onto two jelly roll pans or cookie sheets.
Drizzle with melted dark or milk chocolate. Refrigerate for 10 minutes or longer, until chocolate has hardened and popcorn breaks apart in pieces. Store in an airtight container
Thursday, December 8, 2011

Cinnamon Rock Candy

           I don't know why I am continuing my deluge of sweet thing here but I stumbled across this recipe on Tasty Kitchens. My husbands favorite gum, candy and sweet treat is cinnamon. This looks SO good and it is easy. You will need a candy thermometer though..unless you are like my grandmother that can dip a spoon into the molten hot syrup and then drip the syrup in cold water and tell what stage it is in that way. I cannot. I must rely on a candy thermometer. A word of caution..when preparing candy the syrup is VERY hot and VERY sticky. If you get it on your skin it can cause a severe burn. Be mindful of small children in the kitchen as well. I would use a large pot. That way you lessen the chance of bubbling over. Cinnamon oil can be found at most grocery stores and craft stores. The recipe and beautiful photo comes from Tasty Kitchens by way of SerenaBakes. My goodness this is a must try. Beautiful for Christmas or for Valentines day!


Cinnamon Rock Candy
1 cup Water
3-¾ cups Sugar
1-¼ cup Light Corn Syrup
1 teaspoon Food Coloring (optional)
1 teaspoon Cinnamon Oil (2 Teaspoons For Spicy)
1-½ cup Powdered Sugar
Butter, For Greasing Your Surfaces
           Butter a 15 inch x 10 inch x 1 inch sheet cake pan. Line the pan with parchment paper and butter the parchment paper, making sure the edges of the parchment paper are well buttered to prevent the candy from seeping underneath.
           In a large deep sauce pan combine water, sugar, corn syrup and food coloring. Mix over medium high heat until sugar starts to dissolve. Attach a candy thermometer to the side of the pan making sure it does not touch the bottom of pan for an accurate temperature. Continue to boil until sugar mixture reaches 300 degrees F (hard crack stage) – about 20 minutes. Watch closely, if mixture starts to boil too close to the edge of pan remove pan from heat and stir until bubbles subside and then return to medium high heat.
           Once mixture reaches 300 degrees F remove pan from heat and stir in the cinnamon oil, working quickly. Keep your face away from the mixture as it is strong like onions and keep the work area well ventilated. Pour immediately into prepared pan. Allow to cool for 4 hours.
After 4 hours dust the top of the candy with powdered sugar. Flip candy over onto a large cutting board or cookie sheet and remove parchment paper. Return candy to the pan and use the tip of a sharp knife to break candy into bite size pieces. Dust with more powdered sugar and store in a airtight container.
Tuesday, December 6, 2011

What a Beautiful Ride

Life Ain't Always Beautiful
by Gary Allan
  
 Life ain't always beautiful
Sometimes it's just plain hard
Life can knock you down, it can break your heart

Life ain't always beautiful
You think you're on your way
And it's just a dead end road at the end of the day

But the struggles makes you stronger
And the changes make you wise
And happiness has its own way of takin' it sweet time

[chorus]
No,life ain't always beautiful
Tears will fall sometimes
Life ain't always beautiful
But it's a beautiful ride

Life ain't always beautiful
Some days I miss your smile
I get tired of walkin' all these lonely miles

And I wish for just one minute
I could see your pretty face
Guess I can dream, but life don't work that way


But the struggles makes me stronger
And the changes make me wise
And happiness has its own way of takin' its sweet time

No, life ain't always beautiful
But I know I'll be fine
Hey, life ain't always beautiful
But its a beautiful ride
What a beautiful ride
        
     
         It has been a very long time since I have written a personal post. So, if you would indulge me for a moment. This time of year, we tend to look back and see how many things have changed in the last twelve months. The good times that we never thought would come. The bad times thought would never end. The obstacles that came our way and conquered or let conquer us. It is a time that we can look at where we are now and say look how far I have come or we say..I have got to do better. One thing is for certain, life is going to keep changing. Nothing ever stays the same. People come and people go...There are no guarantees in life. I have learned that people both come and go from your life when it is time and you may not know the reason until later.We can plan our life out and in an instant things change. Our reactions to them determine if we fail or succeed. I have learned that I can have a certain idea in my head of how life is going to go or I get comfortable with the way my life is and life has a way of either quietly knocking on the door or slapping me upside the head and saying "Hello friend, you were getting complacent, it was time for me to make a change." I have learned that life very rarely goes as planned or expected but that it turns out the way it is supposed to.
           As many of you know, my brother has been in legal trouble. Things could have gone better, things definitely could have gone worse. I had no control over that situation but I did have control over how I let it effect me. I found out a few months ago that we were expecting our 5th child. SURPRISE to us. This, along with many other things have proven to me that although we think that we are in control of our lives, there are quite a few things that we cannot control. Oh, sure, we can control our diet, our exercise program and things like that but the BIG things...we usually have to sit in the passengers seat and ride out the storm. Does this mean that we shouldn't make an effort to better ourselves and progress forward? No. It simply means that we must prepare ourselves spiritually or mentally to face hard times. The death of a loved one, the loss of a job, the failure of a marriage. The hard times that always happen to other people will eventually befall us. Life is very rarely fair. If we are prepared or as prepared as we can be, then the punches that life throws at us won't knock us out, they may knock us down but we can always get back up. That my friend is the key to life,it is not many times you get knocked down but how many times you get back up. Remember, it is alright to get knocked down as long as you get back up. If you get  knocked down 7 times you had better get up 8. The more we learn to roll with the punches, the more often we will be able to pick ourselves back up, dust ourselves off and move on with our lives.
            Life is uncertain and there are many times in my life that I wonder what if I would have made this decision instead of THAT decision? I may be in a totally different place. But, regret is a wasted emotion. Had I changed one small thing, would I be as blessed as I am today? Of course there are a few things that I wish I could have changed..most of those being my reactions to things that happened. The way I treated others, the way I reacted to the way I felt I was being treated. The loss of valued friendships and loved ones. Life is always changing and evolving the way it is supposed to. You cannot hang on to the past, you must let it go and move forward. I look back now at the time I spent worrying, wondering, yearning to be a mother. I couldn't for the life of me figure out why for seven years my husband and I just couldn't conceive and there were women in the world that didn't want chidren or couldn't take care of them. It baffled me. The only "regret" if you can call it that, is that I wish I would have spent more time enjoying being a couple. The ironic thing is that I am still doing that today..with my children. Life goes way too fast and you can't stop the hands of time my friends.
             Why re-evaluate your life one day out of 365 and vow to make changes? New Years has always been sort of silly to me. I think life is better served, if you evaluate your life on a regular basis. Look at where you, decide where you want to be and begin moving forward. If I would have set my goals for the year on January 1st..they would have already been out the window. I didn't plan on being pregnant again or reconnecting with lost friends but I am truly blessed with both. I do have a few consistent goals however. To be a more patient, understanding and loving mother to my children. To be the mother that they deserve. To be a better wife to my husband. To be a better sister, friend, neighbor. to be of value to those around me. I need to teach my children this. If I don't then who will? Who will teach them that life isn't always fair, that sometimes you fall down, sometimes you don't get what you want..when you want it? Who is going to teach them that patience always pays off and life will go on and it will be beautiful but it isn't always easy but you can NEVER give up? As a parent that is my job and I hope I can succeed.
         The blessings in my life now are abundant.They have always been abundant and sometimes it has taken me awhile to recognize them. I feel so blessed to have the life that I have..and what I have is a perfectly, imperfect life and that is what makes this such a beautiful ride.
       
Monday, December 5, 2011

Meatballs and Mashed Potatoes

           Scanning through Tasty Kitchen, I was struck at how many good recipes I had to choose from this morning. I didn't want to give you guys another dessert, especially since last week was spent with cookies. This recipe really caught my eye. Simple, easy and it LOOKS delicious. The only thing I would have to change is..I have no idea about the brand of soup she is talking about. AND because I am less than healthy, I think I may add some grated cheese on top..maybe broil to melt. I will have to use the tomato soup I can find.  A warm and hearty dish, sure to warm you up heart and soul. The recipe and photo come from Tasty Kitchen by way of Sarah Smith. Thank you Sarah...MmMm!


Meatballs and Mashed Potatoes
FOR THE MEATBALLS:
1 whole Egg
1 teaspoon Worcestershire Sauce
¾ stalks Celery
1 pound Lean Ground Beef
1 cup Oats
2 containers Imagine Creamy Tomato Soup, 32 Ounce Containers, Divided
FOR THE MASHED POTATOES:
8 whole Red-skinned Potatoes, Medium Size
5 teaspoons Butter
1 cup Reduced-fat Milk, Slightly Warmed
2 pinches Salt To Taste
2 pinches Pepper To Taste
      Preheat oven to 350 degrees F. Whisk together one egg and a teaspoon of Worcestershire sauce. Set aside. Chop about 3/4 of a celery stalk into small pieces. Combine ground beef, celery, oats, and egg mixture by hand. Add about 1/4 cup of tomato soup until mixture is moist. Make 20 tablespoon sized meatballs and place on an aluminium foil lined cookie sheet. Brown for 15-20 minutes at 350 degrees F. Place the rest of the tomato soup in a large pot on the stove and bring to medium heat.Once browned, remove meatballs from oven and place directly into the warmed soup for 20 minutes. Meanwhile, quarter 8 red skinned potatoes and boil them in a pot of water until a fork easily passes through, about 15 minutes. Drain potatoes and place in a large mixing bowl. Add butter and a quarter of the warmed milk. Begin to mix with an electric mixer. Gradually add the remaining milk until potatoes are light and fluffy. Finish with salt and pepper to taste. To finish, place a large scoop of potatoes on a plate and make a well in the center. Place 2 to 3 meatballs in the well and fill with tomato soup. Garnish with salt and pepper.
Saturday, December 3, 2011

Melt in your Mouth Toffee Pecan Cookies

           The first week of December has arrived. Are you done shopping? I sure wish I was. I despise shopping. I don't even enjoy the thrill of hunting for a good deal. I have done the bulk of my shopping online..for a few reasons. My children, who can shop with children? I mean the baby is young enough that he is none the wiser but..ugh. Another reason, people are grumpy at this time of the year. I can shop online without being glared at, yelled at and best of all I don't have to search for a parking spot. I still have shopping to do but I am at least making some headway. I hope that you are enjoying the season.
           Finishing up the week for the cookie exchange, a simple yet addictive cookie. This recipe couldn't get much more simple. The recipe and photo came from just a pinch. What a great recipe to add to your recipe box.

Melt in your Mouth Toffee Pecan Cookies

Melt In Your Mouth Toffee Pecan Cookies
1/2 cup softened butter
1 box yellow cake mix
2 large eggs
1 Tbs. water
1 pkg. Heath Toffee Bits
1/2 cup pecans, chopped
        Preheat oven to 350. Mix together butter. cake mix. eggs and water together. Stir in toffee bits and pecans. Drop by Tbs. onto ungreased cookie sheet and bake for 9-10 minutes.
Thursday, December 1, 2011

Ginger Spice Cookies

            I have a confession. During the holidays....I could inhale these cookies. The whole batch. Better yet, put ice cream in the middle of two cookies, and you may not see me for a week. They are easy to make and you won't be sorry that you made them. Well unless your hubby doesn't prefer them, then you may be sorry because you will have to eat the whole batch, which may seem like a great idea at the time...but I digress. The photo comes from Our Best Bites and the recipe is from Paula Deen.


Ginger Spice Cookies
recipe from Paula Deen
Ingredients:
3/4 C Butter flavored Crisco
1 C sugar, plus more for rolling
1 large egg
1/4 C molasses
2 C flour
2 t baking soda
1 t ground cinnamon
1 t ground ginger
1/2 t ground cloves
1/2 t salt
Instructions:
Preheat oven to 350 degrees.
Line cookie sheets with parchment paper or a silpat. Or don’t line them at all :) With an electric mixer, combine shortening and sugar and cream until light and fluffy (about 2 minutes). Add the egg and the molasses and beat until completely incorporated. Sift or whisk together the flour, baking soda, cinnamon, ginger, cloves and salt and then add to the mixture. Stir until combined. Roll the dough into 1 inch balls and roll in sugar. Place on cookie sheets. Bake for 8-10 minutes or until just set around the edges and you start to see “crackling” on the top. Don’t overbake! You want to keep them nice and chewy-soft in the middle.
Wednesday, November 30, 2011

Giant Mallow Cups

           Oh confessions of a cookbook queen....really?! sigh. I know that technically this isn't a cookie for cookie exchange week but...if you brought these little beauties to my house I wouldn't turn you away. As a matter of fact I would let you move in. Picture and recipe are from Confession of a Cookbook Queen.. He site is hilarious give it a looksie.


Giant Mallow Cups
 16 oz chocolate almond bark
2 (7 oz) jars Marshmallow Creme
1 cup sweetened flaked coconut
Nonstick Mini Tart Pans
          Melt chocolate according to package directions. Spoon a large spoonful in the bottom of each tart pan and use a pastry brush to brush it up the sides of the pan. Once the sides and bottom are covered with a good layer, place pans in the freezer for about 5 minutes to firm up.

While chocolate is setting, spoon marshmallow creme into a bowl and fold in the coconut. Remove pans from freezer and spoon marshmallow filling over the set chocolate, spreading to the edges and leaving room for chocolate on top. Spoon chocolate over the top of the marshmallow and spread to edges. Place back in the freezer until set.

Remove from molds by turning upside down and gently tapping bottom of pan (you may need to wiggle sides a bit too like an ice tray). Mine popped right out.

Makes 10 -12 GIANT Mallo Cups.
Tuesday, November 29, 2011

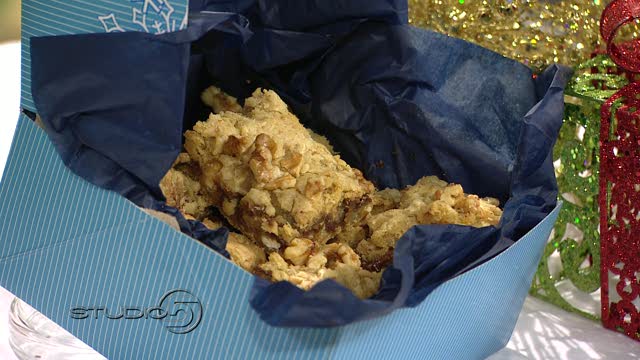
Bars Fantastic

         Continuing with the cookie exchange theme. On a local home show, one of the recipe contributors made these little bars. The ingredients are fairly simple and the taste?! Well, if you believe in heaven, these bars just may take you there. Thank you Studio 5 for contributing to my pregnancy weight gain : )


Bars Fantastic
1 c. butter (room temperature)
¾ c. brown sugar
¼ c. sugar
2 eggs
1 t. vanilla
3 c. all purpose flour
¼ t. baking powder
1 t. baking soda
½ t. salt
½ c. white chocolate chips
1 c. semi sweet or milk chocolate chips
14 caramels unwrapped and cut in 6 pieces each (or ¾ c. caramel bites)
1 c. Heath bar chips
½ c. chopped walnuts
Method:

In medium bowl measure flour, baking powder, baking soda and salt, stir to mix and set aside. In a large bowl cream the butter, brown sugar and sugar. Add the eggs and vanilla and mix until fluffy. Add dry ingredient mixture and mix until well incorporated.

Divide dough in half and spread one portion as evenly as possible in the bottom of a well greased 9x13 pan. On a work surface place a piece of plastic wrap the size of your pan. Put the 2nd portion of dough, flatten the dough slightly, cover with another piece of plastic wrap the same size as the first and flatten with your hands or use a rolling pin to make it to the size of the baking pan, set aside. Sprinkle the white chocolate chips, semi-sweet chocolate chips, caramel pieces and heath chips on top of dough in the pan. Remove the top piece of plastic wrap from the second piece of dough and place that side on top of the heath bar chips. Slightly press the dough down and remove the second piece of plastic. Sprinkle nuts on top of dough and bake at 350-degrees for 20-25 minutes or until light golden brown. Cool 15 minutes then cut in 20 pieces. Serves 20.
Monday, November 28, 2011

Norwegian Butter Cookies

            I am so over poultry at my house..how about you? I took a small break from posting over the holiday weekend. It was nice but it is good to be back. Can you believe we are already starting with the holidays? I am not a black Friday shopper, although I did some shopping online. Kicking of the festivities...a cookie recipe. Just in time for all of those cookie exchange parties coming up. I love butter cookies..the way they melt in your mouth. yum. The recipe and photo come from C&H Sugar company.


Norwegian Butter Cookies

3/4 pound (3 sticks) butter, softened to room temperature
1 1/2 cups C&H® Pure Cane Granulated Sugar
2 eggs, lightly beaten
3 cups all-purpose flour (measure after sifting)
1/3 teaspoon salt
1/2 teaspoon vanilla extract
1/4 cup C&H® Pure Cane Powdered Sugar, sifted
a cookie press or pastry bag with a large star tip

        Preheat oven to 375°F. In a large bowl, using an electric mixer, cream butter, then slowly beat in sugar. Add lightly beaten eggs. In a separate bowl, mix flour and salt; gradually add to sugar mixture. Blend well. Add vanilla. Fill cookie press or pastry bag with one quarter of dough at a time. Pipe cookies onto ungreased cookie sheet, spacing about 2 inches apart. Bake for 8-10 minutes. Remove from oven and allow cookies to cool 10 minutes while on cookie sheet. Transfer to rack to cool completely. Over waxed paper, lightly dust with powdered sugar. Store cookies in airtight container.

Makes 48 cookies.
Wednesday, November 23, 2011

Turkey Pot Pie~Perfect for leftovers

          This is one of my fave ways to us up leftover turkey. You could make your pie crust but the day after Thanksgiving for me, is a no fuss, no muss kind of day. I would use just a store bought crust but you can do as you choose. I watched the Chew yesterday and Carla used this recipe for her "leftover's" segment. I have been making something similar to this for a few years. You have to try this one...you will not regret it. Recipe and photo are from the Chew.


Turkey Pot Pie
3 tablespoons canola oil
1 onion (diced)
2 medium carrots (cut into 1/2" half moons)
2 celery ribs (halved lengthwise and cut on the bias into 1/2" thick pieces)
1 sprigs thyme
1 sprigs rosemary
1 leaf of sage
Salt & pepper (to taste)
4 oz butter
1/4 cup flour
1 quart turkey/chicken stock
1 bay leaves
1/4 cup heavy cream
1 1/2 cups cooked turkey meat (pulled in bite-size pieces)
1 cup frozen peas
       Place the first half or pie crust on a parchment covered sheet pan and bake for 15 – 18 minutes in a 375°F oven until golden brown. Allow to cool. Reserve the second half for the top crust of the pot pie. (You would of course use a pie pan instead if you a doing a traditional pot pie)       
             For the Turkey Filling: In a 8-quart pot, heat 3 tablespoons canola oil. Sauté the onions, carrots, and celery with the thyme, rosemary and sage for 15 minutes. Season with salt and pepper. Allow to cool on a sheet pan. Remove herb stems.       
      In the same pot, melt the butter and whisk in the flour.(Carla used leftover gravy and then thinned as necessary)  Gradually pour in chicken/turkey stock, and whisking to stay smooth. Add bay leaves and heavy cream. Bring the mixture to a boil and reduce to a simmer. Stir in vegetable mixture, turkey and peas. Adjust seasoning if necessary. Remove from heat and allow mixture to cool. This step may be done ahead. In a large casserole dish, place cooked crust on bottom. Pour turkey filling on top. Place raw crust on top and crimp edges around dish. Brush with eggwash and bake in 375°F oven until bubbling and golden brown.
    
Sunday, November 20, 2011

Old Fashioned Banana Cream Pie

            Back before instant pudding, there was a simple recipe to make cream pies. This recipe is for banana cream pie, BUT if you omit the bananas, you have vanilla cream pie, add 1 cup shredded coconut while cooking and you have coconut cream pie. This is really simple. I got the original recipe from Food Network quite awhile ago. I changed the amount of milk and flour a bit just to make sure it thickens nicely. Just in time for the holidays.

Old-fashioned Banana Cream Pie. Photo by Sharlene~W

Banana Cream Pie
1 9-inch pie shell, baked
2 3/4 cups whole milk (original was 3 cups)
3/4 cup white sugar 

1/2 cup all purpose flour (original was 1/3 cup)
1/4 teaspoon salt 
3 egg yolks, slightly beaten
2 tablespoons butter 
3 bananas
1 teaspoon vanilla  
     
Have baked 9-inch pie shell ready. In a large saucepan, scald the milk. In another saucepan, combine the sugar, flour and salt; gradually stir in the scalded milk. Over medium heat, stirring constantly, cook until thickened. Cover and, stirring occasionally, cook for two minutes longer. In a small bowl, have the 3 egg yolks, slightly beaten, ready; stir a small amount of the hot mixture into beaten yolks; when thoroughly combined, stir yolks into hot mixture. Cook for one minute longer, stirring constantly. Remove from heat and blend in the butter and vanilla. Let sit until lukewarm. When ready to pour, slice bananas and scatter in pie shell; pour warm mixture over bananas. Let chill for a few hours or overnight if possible. I would top with some fresh sweetened whipped cream.


Saturday, November 19, 2011

The Busy Week of Thanksgiving


          This is a busy week for most of us. A lot of prep work and house cleaning. For this week, because of the hectic nature, I will be re posting some of our family favorites as well as some favorites that have been submitted. They won't appear as new posts however. If you would like to see what I am sharing, head over to my Home Cooking for Six Facebook page. There you will find all of the posts as well as some blog posts from other blogs! I hope you have a great Thanksgiving (if you are from the U.S.). I look forward to resuming regular posting next week. As always, thank you for your support and for caring enough to stop in. You are welcome here anytime. Remember to submit some of your fave recipes. I would love to try them and post them. To submit simply email me at camiehowlett@gmail.com. Until next week. Keep your loved ones close, be humble and thankful for all that you have and most of all.... have a great Holiday!
Thursday, November 17, 2011

Cherry Chocolate Mousse

          Well we are coming down the home stretch to Thanksgiving. I am doing some of my shopping today, for the things that have a long shelf life. If you are looking for a rich decadent dessert, look no further. This wonderfully rich, and chocolaty dessert is simple to make. It only requires a few ingredients. If you are looking for a dessert to change up you Thanksgiving table...give this one a try. Recipe and photo are from ABC.com. The pictures shows the mousse in a pie crust but you can also serve in individual dishes if you prefer.


Cherry Chocolate Mousse
4 1/2 ounces bittersweet chocolate, finely chopped
2 tablespoons unsalted butter, diced (1 ounce)
2 tablespoons cherry puree
1 cup cold heavy cream
3 large eggs, separated
1 tablespoon sugar
(Optional) Raspberries and extra whipped cream
         Combine the chocolate, butter and cherry puree on the top of a double boiler over hot, but not simmering, water, stirring frequently until smooth. Remove from the heat and let cool until the chocolate is just slightly warmer than body temperature. To test, dab some chocolate on your bottom lip. It should feel warm. If it is too cool, the mixture will seize when the other ingredients are added.
Once the melted chocolate has cooled slightly, whip the egg whites in a medium bowl until they are foamy and beginning to hold a shape. Sprinkle in the sugar and beat until soft peaks form.When the chocolate has reached the proper temperature, stir in the yolks.Gently stir in about one-third of the whipped cream. Fold in half the whites just until incorporated, then fold in the remaining whites, and finally the remaining whipped cream. Spoon or pipe the mousse into a serving bowl or individual dishes. If you wish, layer in fresh raspberries and whipped cream. Refrigerate for at least 8 hours. (The mousse can be refrigerated for up to a day.)    
Wednesday, November 16, 2011

Lomo Saltado~ Peruvian Stir Fry

           My beautiful sister in law, traveled to Peru for work. She was there for about a week. While there, she raved about the Peruvian food. Full of flavor and delicious. She sent me this recipe and said it was a must post. One of the suggestions was to use some smoked paprika in place of the regular paprika. I am going to post as is. Lomo Saltado is a Peruvian stir fry dish served with rice and fried potatoes. It is one of Perus' most loved recipes. A simple but delicious meal idea. Thank you Eren.


Lomo Saltado

Marinade:
1 1/2 tablespoons crushed garlic
1/2 teaspoon salt
2 teaspoons cumin 
1 1/2 teaspoons ground black pepper 
2 tablespoons rice vinegar 
2 tablespoons soy sauce 
2 tablespoons canola oil
Stir Fry:
1 1/2 lbs beef tenderloin, cut into strips (or some other tender steak)
2 medium red onions, cut into strips
1 (15 ounce) can diced tomatoes, drained
salt and pepper, to taste
1 -2 jalapeno (optional)
Other Ingrdients:
Cooked white rice
French Fries (Frozen Steak Fries would work fabulously here)
paprika or smoked paprika
    
Make a paste by combining the garlic & salt. Whisk together the garlic paste, rice vinegar, soy sauce, canola oil, cumin, & ground black pepper. Place the steak in one bowl & the onions in another. Divide the marinade between the 2 bowls & let set in the refrigerator for at least an hour. Pour a small amount of oil in a wok & turn on medium heat. Once the oil is hot add the steak with marinade & cook until brown. Add the tomato & simmer for a few minutes. Add the jalapeño, cilantro, & onions with marinade to the wok, slowly stirring until well blended. Simmer for 5 more minutes. As the ingredients are cooking in the wok, sprinkle the potatoes with paprika & fry in a separate pan. Once done add to the other ingredients. Serve with a dish of white rice.


Tuesday, November 15, 2011

Old Fashioned Stuffing or Dressing~ Whatever floats your boat!

            The thing with stuffing..you are either a lover or a hater. There are no in between people..at least that I have met. I wanted to include at least one stuffing recipe this season for all of the lovers out there. My husband does not share in the love for stuffing therefore, we don't make it for Thanksgiving. There are many different recipes out there some with fancy add ins like cranberries and apples but I am just doing a basic recipe today. For every family out there, I am sure there are different recipes. Here is tasty stuffing recipe if you are looking for a simple recipe. Now, of course it takes more prep work than the store bought brand but homemade is much, much better. Now I cubed my bread instead of making it into crumbs. I prefer it that way. Before I let it dry I sliced it into about 1 inch cubes. You could use corn bread as well. MmmMmm! I got the recipe from Allrecipes but adapted it a little. I hope you enjoy.


Old Fashioned Stuffing
30 slices white bread, lightly toasted (You could half the bread here and for the remaining half use       seasoned bread from the store)
2 tablespoons butter
1 large onion, finely chopped
2 stalks celery, finely chopped (I included the leaves)
2 eggs, lightly beaten
3-4 cups chicken broth
1 tablespoon rubbed sage
1 teaspoon garlic powder
1/2 cup chopped fresh parsley
salt and pepper to taste
       Allow the toasted bread to sit approximately 24 hours, until dry. Preheat oven to 325 degrees F (165 degrees C). Lightly grease a 9x13 inch baking dish. Crush the bread into crumbs with a rolling pin. Place the crumbs in a large bowl. Melt the butter in a medium saucepan over medium heat. Stir in the onion and celery and slowly cook until soft. Remove from heat and drain. Mix the eggs and 2 cups chicken broth into the bread crumbs. The mixture should be moist, but not mushy. Use water, if necessary, to attain desired consistency. Mix in the onion, celery, rubbed sage, garlic powder, parsley, salt and pepper. Press the mixture into the baking dish. Bake 1 hour in the preheated oven, or until the top is brown and crisp. Basting with remaining broth. Of course you could cook inside your turkey as well.
Monday, November 14, 2011

Homemade Jellied Cranberry Sauce

            What would the holidays be without cranberries? At our house, we love cranberries. Now you can buy the cranberries in the can, (we like those as well) or you can make your own. The recipe is not difficult and only requires a few ingredients. By a few I mean 3. You can do it. Give it a try. There are some fancy recipes out there with zest and other things in them but this is just a basic recipe. The photo and recipe are from Ocean Spray!. They have some great recipes on there for the holidays. This is for a smoother type sauce which, I prefer, over the whole berries.


Homemade Jellied Cranberry Sauce
1 cup sugar
1 cup water
1 12-ounce package Ocean Spray® Fresh or Frozen Cranberries
          Combine sugar and water in a medium saucepan. Bring to a boil; add cranberries, return to a boil. Reduce heat and boil gently for 10 minutes, stirring occasionally. Place a wire mesh strainer over a medium mixing bowl. Pour contents of saucepan into strainer. Mash cranberries with the back of a spoon, frequently scraping the outside of the strainer, until no pulp is left.  Stir contents of bowl. Pour into serving container. Cover and cool completely at room temperature. Refrigerate until serving time. 
Makes 1 cup.
Saturday, November 12, 2011

Herb Roasted Turkey Breast

          I am re posting this recipe from a blog that I fell in love with over a year ago. I shared it on my FB page but for those that don't follow by way of FB, I wanted to share this wonderful recipe from Taste and Tell. This recipe is perfect if you are intimidated by cooking a full size turkey, if you have just a small family, OR if you are like my house and your family doesn't eat the dark meat off of the bird. Usually, we would find a new home for the dark meat. My brother loved it. Since that won't be happening for a few years, I needed to think of something different. I came to realize that if I were to cook a full sized bird, even if it were small,  it wasn't going to be cost effective. Partly because you pay by the pound and I would be paying for all of the bone and not to mention it would be a waste of the meat. I can't bear to do that. So, Turkey Breast it IS!
           This beautiful recipe is so simple. The herbs and the butter make for great tasting and super moist meat. The key is to let the meat rest before slicing. I have never used an apple when roasting turkey. I have used an orange or lemon before, which tastes amazing. What a tasty way to make turkey. She did a fantastic job with both the recipe and photo. I can't thank her enough for saving my Thanksgiving this year. You can find the turkey breasts in your grocers meat section. Give this one a try, if not for Thanksgiving, then for a great Sunday meal.


Herb Roasted Turkey Breast
1 bone-in turkey breast, 6-8 lbs.
4 tablespoons butter, softened
2 tablespoons fresh flat leaf parsley, chopped
1 tablespoon fresh rosemary, chopped
1 tablespoon fresh sage, chopped
1 tablespoon fresh thyme, chopped
1 apple, quartered
1 onion, quartered
1 tablespoon flour
½ cup chicken stock
       Preheat the oven to 350F. Rinse and dry the turkey breast. Gently pull the skin up from the breast, creating a pocket. In a small bowl, combine the butter and the herbs. Mix together completely. Using your hands, press the butter in between the skin and the breast meat. Place the apple and the onion in the small cavity under the bone. Place the tablespoon of flour in an oven-safe turkey bag. Shake to distribute. Place the turkey breast in the bag and set in a baking dish that is at least 2 inches deep. Make sure the onions and apple are on the bottom. Tuck the edges of the bag under the breast and cut a few slits in the top of the bag.  Bake in the preheated oven until a thermometer inserted in the breast reads 170F, about 1 ½ to 2 hours. Let sit for 10 minutes before slicing. 
     
Thursday, November 10, 2011

Rocky Road Cupcakes

            Today my baby girl is seven years old. My goodness how time flies. It seems like just yesterday, I brought her home from the hospital. She was a fussy, fussy baby. But, the older she got, the easier and the better she became. She is my big helper. I don't know what I would do without her. Her laugh makes me smile and her hugs make my day just a little brighter.She is happy all of the time. She is so respectful, sensitive and grateful for everything. I couldn't have asked for a better little girl. Whatever I did to deserve her I will never know. Happy Birthday Grace! Mama loves you more than you will ever know. For her birthday we are making chocolate cupcakes. I hope you enjoy these as well. The recipe and photo came from thecupcakerecipes.com. If you like cupcakes...their site is the bomb! Keep in mind this recipe only makes 12 cupcakes so if you need more you will have to double it.


Rocky Road Cupcakes
1 stick unsalted butter, at room temperature
1/2 cup granulated sugar
2 eggs
1 cup self-rising flour
3 tablespoons unsweetened cocoa powder
3 tablespoons milk
1 oz. white chocolate chips
1 cup mini-marshmallows
2 tablespoons slivered almonds or brazil nuts
        Preheat the oven to 350 F. Beat the butter and sugar together in a bowl until pale and fluffy, then beat in the eggs, one at a time. Sift the flour and cocoa powder into the mixture and fold in. Stir in the milk, followed by the chocolate chips, marshmallows, and nuts.
Spoon the mixture into the paper liners and bake in the preheated oven for about 18 minutes until risen and the tops spring back when lightly pressed. Transfer to a wire rack to cool.

To decorate
3 1/2 oz. bittersweet chocolate, finely chopped
1/2 cup heavy cream
3 tablespoons almonds or brazil nuts
1/4 cup white chocolate chips
mini-marshmallows (optional)
           To decorate, put the chocolate in a heatproof bowl. Heat the cream in a saucepan until almost boiling, then pour in the chocolate and let melt for about 5 minutes. Stir until smooth and creamy, then let cool for about 30 minutes until thick and glossy.
Spread the chocolate mixture over the cupcakes and sprinkle with the nuts, chocolate chips, and marshmallows, if using.
makes 12


Wednesday, November 9, 2011

Slow Cooker Classic Italian Marinara Meat Sauce

           You all know the love affair I have with my crock pot. Browsing through the recipes on the Crock Pot website, there are just too many things to choose from. Soups, Breads, Drinks..where to start? I opted on the sauce department. There are a lot beautiful things that can come from a basic sauce. This recipe has just basic ingredients in it. Probably stuff you have in your pantry. Once you make your own sauce, whether it is a marinara, pizza, or alfredo, you will never go back to store bought. The great thing about the crock pot is you fix it and forget it. Most of the time it is a short assembly time too. Just like this recipe. Aside from browning the meat in the skillet, everything else is dump and let cook.Keep in mind, if you like mushrooms you can add those as well.The recipe and photo came from Crock Pot.com


Slow Cooker Classic Italian Marinara Meat Sauce
1/4 pound sausage
1 pound ground beef
2 medium onions, chopped
1 green pepper, chopped
4 cloves garlic, minced
2 tablespoons sugar
1 tablespoon salt
2 teaspoons basil
1/8 teaspoon red pepper flakes
32 ounces Italian style tomatoes, canned
6 ounces tomato paste, canned
           Remove sausage from casings, brown in a skillet with the beef. Break up sausage and beef with a wooden spoon as they brown; drain well. Add to stoneware with remaining ingredients; stir well. Cook on Low for 8-10 hours or High for 4-6 hours.
Tuesday, November 8, 2011

Chex Pumpkin Pie Crunch

          Who doesn't love Chex Mix? This is a twist on a classic. The difference here is the brown sugar, pecans and pumpkin pie spice. Such a great idea for a party or just to have around as a snack. The photo and recipe are from Pillsbury.


Chex Pumpkin Pie Crunch
1/4 cup brown sugar
1 Tablespoon pumpkin pie spice
1/4 cup butter
2 teaspoons vanilla extract
2 cups Cinnamon Chex® cereal
2 cups Wheat Chex® cereal
2 cups Honey Nut Chex® cereal
8 ounces pecans

In small bowl, mix brown sugar and pumpkin pie spice; set aside. In small microwave-safe dish, microwave butter on High about 30 seconds or until melted. Stir in vanilla. In large microwavable bowl, mix all cereals and pecans. Pour butter mixture over cereal mixture, stirring until evenly distributed. Add sugar and spice mixture and stir until coated.

Microwave uncovered on High 5 minutes or until mixture begins to brown, stirring every minute. Spread on wax paper or a cookie sheet to cool. Store in airtight container.      
Monday, November 7, 2011

Baked Potato Casserole

          Looking for something different for Thanksgiving? This casserole would be something to wow peoples socks off. The photo and recipe came from Just A Pinch by way of Joelle Teague. Mmm! Thanks Joelle. I have a HUGE bag of Yukon Golds that are just itching to be devoured. This should help.


Baked Potato Casserole


Baked Potato Casserole
5 lbs potatoes (your choice, I prefer Yukon Golds)
2 stick butter
1/4 cup dried chives
4 cups shredded cheese
salt and pepper to taste
2 pkgs. REAL bacon bits (or if you are feeling energetic, cooked bacon that has been crumbled)
24 oz. sour cream (of course you can use fat free or low fat if you choose)
**Taste at the mixing step, you may want more sour cream**      
          Peel, wash, and dice potatoes. Put in large pan and cover with water. Add chives and one stick of the butter. Also add salt and pepper to your taste. Cook potatoes until fork tender and drain (usually about 45 minutes) Place in mixing bowl with remaining stick of butter and 1/2 the sour cream to start with. Add salt and pepper to taste. Mix potatoes on low speed to blend everything. Add remaining sour cream to get potatoes to your preferred consistency. After potatoes are mixed, take a 9X13 casserole dish and layer potatoes, cheese, and bacon bits. Repeat so that you have atleast 2 layers. Cook on 350 for approximately 35 minutes or until cheese is bubbly.
***CAN BE PREPARED AHEAD OF TIME AND/OR REFRIGERATED, YOU WILL JUST NEED TO INCREASE THE COOK TIME**
Saturday, November 5, 2011

Creamy Swiss Onion Soup

            The other day, I went to lunch with my sister in law to Cafe Zupas. They let me sample one of their most popular soups that is only back for a limited time. I was very skeptical. I am, by no means an "onion person". This soup was divine. Creamy, mild flavor. Mmm! Now I don't know their exact recipe but this one comes awfully close. This is a creamy delicious soup. Great to warm your bones on a cold day. The only chage I would make is..I would dice the onion. I just don't prefer the texture of long sliced onions. The photo and recipe are from Taste of Home.
Creamy Swiss Onion Soup Recipe

Creamy Swiss Onion Soup
7 tablespoons butter, divided
1-1/2 cups cubed day-old bread
3 large onions, quartered and thinly sliced
1-1/2 cups water
4-1/2 teaspoons chicken bouillon granules
1/4 cup all-purpose flour
1-3/4 cups milk, divided
1-1/2 cups (6 ounces) shredded Swiss cheese, divided
Pepper to taste
Fresh minced chives or parsley
     Melt 3 tablespoons of butter; toss with bread cubes. Place on a lightly greased baking sheet. Bake at 350° for 7 minutes; turn and bake 7 minutes longer or until toasted. Meanwhile, in a large saucepan, saute onions in remaining butter until lightly browned, about 12 minutes. Stir in water and bouillon; bring to a boil. Reduce heat; cover and simmer for 15 minutes. Combine flour and 1/2 cup milk until smooth; gradually stir into onion mixture. Stir in remaining milk. Bring to a boil; boil for 2 minutes, stirring until thickened. Reduce heat to low; stir in 3/4 cup Swiss cheese and pepper. Ladle into four ovenproof bowls; sprinkle with reserved croutons and remaining cheese. Broil 4 in. from the heat until cheese is melted and bubbly. Garnish with chives. Yield: 4 servings

Blog Archive

Followers