Search This Blog

Sunday, July 31, 2011

Slow Cooker Barbeque Beef Sandwiches

 
             So as  you all may know I am in love with my slow cooker.  In the summer months you can get the full flavor of a meal cooked in the oven but without heating up your kitchen. Nothing smells better than a meal that has been cooking all day in the slow cooker. A little prep in the morning and when you get home...you are greeted with the smells and tastes of a home cooked meal. The slow cooker in my opinion is the most under appreciated kitchen appliances. These sandwiches are so easy and so delicious. The picture and recipe are courtesy of Pillsbury.  
Slow Cooker Barbecue Beef Sandwiches
 
Slow Cooker Barbeque Beef Sandwiches
3 pounds beef boneless chuck roast
1 cup barbecue sauce
1/2 cup peach or apricot preserves
1/3 cup chopped green bell pepper
1 tablespoon Dijon mustard
2 teaspoons packed brown sugar
1 small onion, sliced
12 kaiser or hamburger buns, split
      Trim excess fat from beef. Cut beef into 4 pieces. Place beef in 4- to 5-quart slow cooker. Mix remaining ingredients except buns; pour over beef. Cover and cook on low heat setting 7 to 8 hours or until beef is tender. Remove beef to cutting board. Cut into thin slices; return to cooker. Cover and cook on low heat setting 20 to 30 minutes longer or until beef is hot. Fill buns with beef mixture.
For a delicious kick, spread buns with horseradish sauce.
Take a dip! Sandwiches can be served au jus. Serve the juices left in the cooker in small bowls to dip the sandwiches into while eating to make each bite extra delicious!
Friday, July 29, 2011

Perfect Diner Pancakes

           I am a sucker for malt powder. I have made cookies, cupcakes and of course shakes with it but it had never occured to me that pancakes would be a great place for my malt obsession to go. These look MARVELOUS and taste even BETTER! The recipe and photo comes from a spicy perspective. Yet, another beautiful site. I am a sucker for breakfast and when it comes to homemade pancakes or waffles, store bought mixes just don't compare.  Homemade is easy and delicious. A must try for breakfast.


Perfect Diner Pancakes
1 cup All-purpose Flour
⅓ cups Malted Milk Powder
¾ teaspoons Salt
1-½ teaspoon Baking Powder
¼ teaspoons Baking Soda
¾ cups Milk
1 whole Extra Large Egg
1 teaspoon Vanilla Bean Paste Or Extract
3 Tablespoons Melted Butter
           Heat the griddle (or non-stick skillet) to medium-high. In a bowl, add all the dry ingredients and whisk to blend. In a smaller bowl, whisk the milk, egg, and vanilla until frothy. Add the milk mixture to the dry mix and whisk until smooth. Finally, whisk in the melted butter. Allow the pancake batter to rest for 3-5 minutes to thicken. Start by making one pancake as a test-batch to ensure your heat in accurate. Use a 1/4 -1/3 cup scoop to ladle the batter onto the griddle. Cook for 1-3 minutes per side. Flip when small bubbles rise to the top of the batter.If your batter thickens too much, add 1-2 tablespoons of milk to thin it just enough to pour.
Makes 8-10 pancakes.
Wednesday, July 27, 2011

Orange Breakfast Shake

             So I used to just be famished in the mornings and HAD to eat first thing. I am not sure if it is because I am older or if it is because I have to feed the kids first now but by the time it is my turn to eat breakfast...I just really don't want it. I eat breakfast but I usually don't have time for much more than a few bites here and there. This lovely breakfast shake is easy and delicious. You could of course sub in some 1% milk and a little sugar if you aren't a soy fan. I put this in a blender with a few ice cubes to make it a little slushie. The photo and recipe came from just a pinch by way of Nikki Smith! Yum! Thanks Nikki you may have saved my breakfast.

Orange Breakfast Shake
Breakfast Shake
1 cup fresh orange juice
1/2 cup soy milk
1/4 tsp. vanilla
a few ice cubes
     Put in a blender and blend until smooth.                                
Tuesday, July 26, 2011

Peppermint Bark Popcorn

            Allow me to let you in on some FANTASTIC news! Christmas is only 152 day away! Yep...disheartening isn't it?! So I thought I would celebrate Christmas in July today! I know you may not h ave candy canes on hand..unless you are an elf but you could use the Brachs peppermint discs. Around the holidays I like to stock up on the bark when they sell it for cheap. In the  meantime, get your gift list ready and get ready to deck those halls. Afterall, all of the big chain stores have probably already started stocking up. Shouldn't you?!


Peppermint Bark Popcorn Recipe by Our Best Bites
16-20 C popped popcorn (fresh, or about 2 bags microwave popcorn)
1 lb Almond Bark
1 6oz box candy canes, crushed. (About 1-1 1/2 C total and Bob’s are the best!)
2 tea. peppermint extract, or a few drops of peppermint oil
3/4 C semi-sweet chocolate chips
*one bag microwave popcorn has about 10 cups in it, so if you’re air-popping, do about 20 cups.
         Place popcorn in a very large mixing bowl.Unwrapping the candy canes to crush them is the most labor intensive step of this easy treat, so you can do that ahead of time if you want too. I put my candy canes in a large zip-lock bag and have a whack with a heavy marble rolling pin. One they’re crushed, dump them into the bowl with the popcorn.To melt the almond bark, follow the instructions on the package. I just break it up and put it in a glass measuring cup and microwave on 1 min intervals until it’s nice and smooth.
           When your almond bark is melted, add the peppermint extract. It will seize a little bit (get kind of lumpy) but it’s totally fine. If you use a peppermint oil it shouldn’t seize at all, just make sure to only use a few drops as oil is stronger than extract. Pour over popcorn and candycanes.
Stir it up really well until the candy is evenly distributed. Pour the popcorn out onto a piece of waxed paper, parchment, or foil. Spread it out into an even layer and leave it alone!
While the popcorn is setting, place chocolate chips in a microwave-safe bowl and microwave in 30 second intervals until melted and smooth. I really like dark chocolate to counter-balance the sweetness of the almond bark, but I know there’s a lot of dark haters, so do what you want!
Drizzle the melted chocolate over the popcorn. You can use a fork, or put it in a zip-lock bag with the corner cut off.
             Leave it until the almond bark and the chocolate is hardened. If you need to hurry it up, do this whole process on lined cookie sheets you can pop in the fridge. When chocolate is hardened, use your hands to break up popcorn into chunks. Toss in a bowl, a jar, a cute package, or in your mouth :)
Monday, July 25, 2011

Peanut Butter Cookies

          I love a good peanut butter cookie. Give me a tall glass of milk and I am a happy girl. My daughter, Grace, is the only one of my children that is big on peanut butter. However, if it comes in cookie form the others make an exception. This recipe and photo comes from Real Country Living. When my husband used to car pool, his ride to work wouldn't take money and so I would make him a treat of some sort every week. Now, that Doug has retired I usually try and make just one treat per week. I LOVE to cook so that proves difficult for me sometimes.Who knows I may make some of these for our treat of the week, this week. Enjoy!
peanut butter cookies


Peanut Butter Cookies

Cream Together:

1 Cup Shortening (Crisco)
1 Cup White Sugar
1 Cup Brown Sugar
2 Eggs
1 teaspoon Vanilla
Sitr in 1 Cup of Chunky Peanut Butter (Whit uses Creamy though…whichever you prefer)

Sift together:

3 Cups Flour
2 teaspoons Baking Soda
1/2 teaspoon Salt
        Stir the sifted mixture into the creamed mixture. Roll into small balls. You can use a cookie scoop to measure each amount of dough, then rolls it into the ball to hold it together. Or measure by tablespoon. Place on a lightly greased cookie sheet (spray it with a bit of cooking spray) a couple of inches apart. Flatten each dough ball with a fork in a cross-wise pattern.Bake them at 350 degrees for about 10 minutes about 9 to make sure they stay soft... or until light brown. Let the cookies set up on the pan for about a minute and then removes them to cool on a paper towel. Enjoy!

Saturday, July 23, 2011

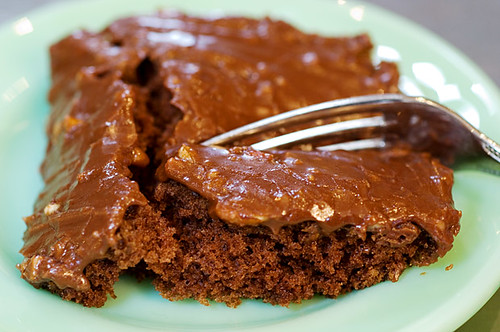
The Best Chocolate Sheet Cake Ever!

            This bad boy is for dessert tomorrow at my in laws. Once again this is from Pioneer Woman as is the photo. You can omit the nuts if you would like. Keep in mind this is a runny frosting. You could add a little cinnamon to the cake as well..if you are feeling a little adventurous. I would say about 1 tsp. or so. I love chocolate and cinnamon together.I must be on a Pioneer Woman kick lately. Oh Well... hats off to her!
 DSC_0202


FOR THE CAKE:
2 cups Flour
2 cups Sugar
1/4 teaspoon Salt
4 Tablespoons (heaping) Cocoa
2 sticks Butter
1 cup Boiling Water
1/2 cup Buttermilk
2 whole Beaten Eggs
1 teaspoon Baking Soda
1 teaspoon Vanilla
FOR FROSTING:
1/2 cup Finely Chopped Pecans
1-3/4 stick Butter
4 Tablespoons (heaping) Cocoa
6 Tablespoons Milk
1 teaspoon Vanilla
1 pound (minus 1/2 Cup) Powdered Sugar (Close to 2 cups)
          Note: I use an 18x13 sheet cake pan.
In a mixing bowl, combine flour, sugar, and salt. In a saucepan, melt butter. Add cocoa. Stir together.
Add boiling water, allow mixture to boil for 30 seconds, then turn off heat. Pour over flour mixture, and stir lightly to cool. In a measuring cup, pour the buttermilk and add beaten eggs, baking soda, and vanilla. Stir buttermilk mixture into butter/chocolate mixture. Pour into sheet cake pan and bake at 350-degrees for 20 minutes. While cake is baking, make the icing. Chop pecans finely. Melt butter in a saucepan. Add cocoa, stir to combine, then turn off heat. Add the milk, vanilla, and powdered sugar. Stir together. Add the pecans, stir together, and pour over warm cake. Cut into squares, eat, and totally wig out over the fact that you’ve just made the best chocolate sheet cake. Ever.
**If you don't have buttermilk on hand you can pour regular milk into a measuring cup (just under 1/2 cup)add enough vinegar to make 1/2 cup and VOILA! It turns into buttermilk right before your eyes!

Dilly Beans

           This recipe and photo came from simply canning. In Utah dilly beans are all the rage. Give them a try. If you like a little heat..add some of the cayenne.


dilly beans dill pickled green beans
Dilly Beans
Green Beans - enough to make 4 pints or about 2 pounds
4 sprigs of fresh dill weed or 4 heads of dill.
4 cloves of garlic
1/4 cup canning salt
2 1/2 cups vinegar
2 1/2 cups water
1 tsp cayenne pepper (optional)
          Wash beans - snap off ends and snap (break or cut) to jar length. Add sprig of dill weed or head of dill and 1 garlic clove to each jar. if you like spicy try adding 1/8 tsp cayenne to each jar. (I personally like mild) Pack each jar with beans length ways. Combine -vinegar, water, salt. Bring to a boil. Cover beans with pickling solution, leaving 1/4 inch head space. Remove air bubbles with a plastic knife or other small tool. I like to use an orange peeler.  Wipe rims clean and process according to water bath canning directions about 10 minutes. This makes 4 pints.
Friday, July 22, 2011

Watermelon Granita

            Here in Utah one of the best treats of summer comes from Green River. Their watermelons are to DIE for. My father in law is an expert at picking the BEST watermelons. He said to find the best you should be able to tap it and it sounds like you are tapping on the toe of your shoe. I have yet to be able to perfect the technique. Here is a nother GREAT recipe from Pioneer Woman. The photo is beautiful. The trick I have for making great granita if to scrape down the ice a few times also it is less labor intensive. Also, you will have a finer texture instead of larger ice cube type granita. So Good. MmMm! Did I mention my excitement for the Pioneer Womans' new show coming up in August on Food Network?!

TPW_7344
Watermelon Granita
1/2 whole Seedless Watermelon, Cut Into Chunks (rind Discarded) (about 8 Cups Of Chunks)
2 whole Limes, Juiced
1/3 cup Sugar
Place half the watermelon, half the lime juice, and half the sugar in a blender. Process until smooth, then pour into a separate bowl. Repeat with other half of ingredients. Pour into same bowl as other batch.Transfer mixture to a 9 x 13 baking dish. Freeze for two or three hours, then begin the process of lightly scraping the top, frozen layer. Return pan to freezer with the shaved ice on top; remove a couple of hours later and continue scraping. Repeat the occasional scraping process until the entire mixture is shaved. Store, covered in plastic wrap, until serving. Serve in pretty glasses with a twist of lime.
    *Note: if you use a regular watermelon with black seeds, lightly blend the watermelon first, then push through a strainer to get rid of the seeds/seed particles. Then continue the recipe above.
Thursday, July 21, 2011

Garlic Bread Seasoning

           Looking for a tasty way to season  your breadsticks and garlic bread. Look no further. With a few simple ingredients you can have some mighty tasty Garlic Bread Seasoning. Thanks to Our Best Bites for the photo and the tasty recipe!

Garlic Bread Seasoning
1/2 c. powdered Parmesan cheese
2 tsp. Kosher salt
2 Tbsp. garlic powder
2 tsp. oregano
2 tsp. basil
2 tsp. marjoram
2 tsp. parsley
            Combine ingredients in a jar (preferably one with a sprinkle top) and shake. Sprinkle on top of breadsticks or combine 1 1/2 Tbsp. seasoning with 1/2 c. of softened real butter and spread on a loaf of French bread (cut in 1/2 lengthwise). Wrap in foil and bake at 375 until butter’s melted. If you want, you could also pop it open-faced under the broiler for a few minutes so it gets brownish and crispy.
Wednesday, July 20, 2011

Mocha Brownies

            First of all let me say that I love the Pioneer Woman. I made these brownies today and they smell SO good. I would recommend just one change though. The recipe calls for an 8x8 pan. I poured the batter into that pan and they nearly overflowed before cooking. Against my better judgement I baked them. They filled the pan up to the tippy top. No room for frosting. I would recommend a 13x9 and you will still get the thick brownies you want without having to dislocate your jaw to eat them. The frosting recipe makes A TON. for a 13x9 pan you may be alright or you may be able to half it and if you have some left over store it in the fridge and keep some for later. Now if you are not a coffee drinker you can sub in milk, although they wouldn't be mocha brownies.Other than that....enjoy. Either way Thanks Ree!


Mocha Brownies
4 ounces unsweetened chocolate, melted
 1/2 pound (2 sticks) unsalted butter, room temp
 2 Cups sugar
 4 large eggs
 3 Teaspoons vanilla extract
 1 1/4 Cups all-purpose flour
Mocha Icing: 1/2 pound (2 sticks) unsalted butter, room temp
 5 cups powdered sugar
 1/4 Cups cocoa powder
 1/4 Teaspoon salt
 3 Teaspoons vanilla extract
 1/2 Cup brewed coffee, cooled to room temp

        For brownies:
Preheat the oven to 325º F. Spray an 8-inch square baking pan with nonstick baking spray. (Remember I recommend a bigger pan).To make the brownie batter, place the chocolate in a microwave-safe bowl. Melt the chocolate in the microwave in 30-second increments, being careful not to let it burn. Set it aside to cool slightly.
In a medium mixing bowl, cream the butter and sugar. Beat in the eggs. With the mixer on low speed, drizzle in the melted chocolate. Add the vanilla extract and mix. Add the flour to the bowl and mix just until combined; do not over mix. Pour the batter in the baking pan. Spread it to even out the surface. Bake for 40 to 45 minutes, (If using a larger pan I would check them at about the 35-35 minute mark) until the center is no longer soft. Set the brownies aside to cool completely before icing.
          For icing:In a large mixing bowl, combine the butter, powdered sugar, cocoa powder, salt and vanilla. Mix until slightly combined, then add 1/2 cup of the brewed coffee. Whip until the icing is the desired consistency. If the icing is overly thick, add 1/4 cup more coffee. It should be very light and fluffy.
Ice the cooled brownies, spreading the icing on thick. Refrigerate until the icing is firm, and then slice the brownies into squares
Tuesday, July 19, 2011

Farafalle with Zucchini

           Have an over abundance of zucchini? Are your neighbors leaving them on your doorstep at night? Has your unlocked car become a drop zone for unwanted zucchini?  I am always trying to find different recipes for zucchini. I mean I love zucchini bread and cake and kabobs... but after awhile you just have to branch out. This lovely dish is from Pioneer woman as is the picture. It LOOKS SO GOOD! Arrowroot is found in the spice section and is used primarily as a thickener. However the arrowroot is not necessary to thicken the pasta. Just simmer it for awhile and that should suffice. Now dare I say if you wanted you could leave out the pasta and eat just the veggies. Oh My! Thank you Ree Drummond!
DSC_0084_0179


Farafalle with Zucchini
4 whole (to 5) Regular-sized Zucchini
1 whole Medium Onion
Grape Or Cherry Tomatoes
3 cloves Garlic
Farfalle (bowtie) Pasta
2 Tablespoons Olive Oil
2/3 cups White Wine (or Chicken Broth)
1 Tablespoon Arrowroot
1/2 cup (to 3/4 Cup) Cream
Parmesan Cheese
Fresh Herbs (lemon Thyme, Fresh Basil, Chives, Etc.)
Salt And Pepper, to taste
        Bring a pot of water to boil. Dice 1 medium onion and the zucchini into small slices. Slice the tomatoes in half lengthwise. Next dice up the garlic. Once the water is boiling, go ahead and cook the pasta according to directions on the package, on the al dente side so it has a nice “bite” to it.
While the pasta is boiling, heat a couple tablespoons olive oil over medium high to high heat in a saucepan. When the oil is hot, throw in half the zucchini and let it brown. Once brown, toss it onto a plate and repeat with the 2nd half of zucchini and repeat the process. Once the zucchini is cooked, throw in the onions and garlic. Next throw in the halved grape tomatoes on top and toss around a bit, keeping the heat at medium low to medium.
        Pour in 1/3 cup white wine (or chicken broth) and with a whisk or spoon, scrape the bottom of the pan so all the flavorful bits will be released. Pour another 1/3 cup wine (or chicken broth) into a dish and sprinkle the Arrowroot in and stir. Pour this into the pan with the onions and tomatoes, and now add in ½ to ¾ cup cream. Next, turn the heat off and add in the zucchini and stir gently to combine. Grab a cup or two of the cooking liquid from the pasta and pour into the saucepan if the sauce needs to be thinned out a bit.Salt and pepper to taste.To serve, pour the drained pasta into a large serving bowl or platter. Add your choice of fresh herbs, and pour the contents of the pan over the top.
Add some Parmesan and a final sprinkling of fresh basil – voila!

Pina Colada Cupcakes

           These little beauties..I cannot gush enough about them. The BEAUTIFUL recipe came from confessions of a cookbook queen. Check out her beautiful site.  I believe I am addicted to it! These are a must try! Yumm!


Pina Colada Cupcakes
1 box white cake mix (I used Duncan Hines)
15.25 oz can crushed pineapple
1/4-1/2 cup pineapple juice
3 eggs
1 stick butter, melted
Frosting:
2 sticks butter, softened
1/2 cup Cream of Coconut
1 teaspoon vanilla
5 cups powdered sugar
4 TBS heavy cream
Coconut, for garnish (I used frozen, but you could use sweetened shredded)
         Preheat oven to 350. Line 24 muffin tins with cupcake liners. Strain canned pineapple over a large measuring glass, pressing gently to extract all the juice. Add enough extra pineapple juice to make 1 cup. In the bowl of a mixer, combine cake mix, eggs, butter, and pineapple juice. Beat on low for about a minute, then scrape the bowl and increase the speed to high. Beat for another minute. Gently fold in strained pineapple. Spoon into cupcake liners, filling about 2/3 full. Bake for 15-20 minutes or until tops spring back when lightly touched. Remove to a cooling rack and cool completely before frosting. In the bowl of a mixer, beat butter, cream of coconut and vanilla on medium-low speed until smooth. Add powdered sugar and beat on medium until combined. Add cream and beat on high for about a minute or until light and fluffy. Pipe or spread on cupcakes and top with coconut.
Monday, July 18, 2011

Hawaiian Punch

          Looking for a refreshing drink on a hot summer day? How about this hawaiian punch? What is grenadine you may ask? Grenadine is non alcoholic cherry juice and is used to color and sweeten drinks..... it USED TO be made from pomegranate, but is now made from cherries....you can use the juice from the marchino cherries, basically the same thing, only thinner....Hope you are having a fantastic summer!


Hawaiian Punch
4 Cups of Orange Juice
4 Cups of Guava Juice
4 Cups of Pineapple Juice
1/2 Cup Red Grenadine
4 1/2 Cups Ginger Ale

Directions (Too Easy):
      Use frozen juice concentrates and mix according to the directions given by the manufacturer.
 Make sure the juices are well chilled and have been in the fridge for at least one day. (That way you won't have to add too much ice to make it cold.)
    When it is time to serve the punch, pour the juices into a large bowl and add the grenadine and ginger ale. (Make sure they are cold, too!) You can add some additional ice cubes if you wish.
     This recipe is close to a traditional Hawaiian rum punch...without the rum. If you wish you can add the rum by using 3 1/2 cups less ginger ale and substituting 3 cups of light rum and 1/2 cup of dark rum. Don't stir in the rum, just add it.
Sunday, July 17, 2011

Gourmet Rice Krispie Treats

        While watching the afternoon news, I caught the tail end of this cooking segment.I did not get her name but all of these look and sound delicious. I was having an issue while getting these entered into my blog..so I apologize that they are spaced out so much. There are three recipes on this post! Yumm! No picture this time! Sorry!


Rocky Mountain Grizzly Bear Paw Rice Krispie Treats
Ingredients:
5 tbsp butter
5 1/2 cups Rice Krispie Cereal
1 10oz package marshmallows
·1/3 cup peanut butter ( White Chocolate Wonderful)
 1 4oz bar of chocolate, melted (Hershey)
·1 4oz bar white chocolate, melted ( Lindt )
· 3/4 cup coarsely chopped cashews
· 1/4 cup prepared, or homemade caramel
           Butter a small baking sheet, set aside. In a large saucepan, melt butter over low heat, add marshmallows and stir until smooth. Remove from heat, and stir in peanut butter. Fold in cereal.When evenly coated, pour into prepared pan. Press to flatten slightly.Sprinkle cereal mixture with half the nuts. Drizzle half of the chocolate, white chocolate and caramel over the nuts. Refrigerate for 5-7 minutes, or until chocolate is slightly set.From the small end of pan, lift cereal and roll, jelly roll style. Pressing lightly to compress. Smoothing edge to seal.With seam side down, drizzle remaining, chocolates, and caramel over the top of roll, finishing with remaining chopped nuts.Refrigerate until firm. Slice into rounds when ready to serve.  Makes 10 pieces
    Seaside Salt Water Taffy Rice Krispie Treats
    Ingredients:
    · 5 tbsp butter
    · 5 1/2 cups Rice Krispie Cereal
    · 1 10oz package marshmallows
    · 3 cups miniature marshmallows
    · 12-15 pieces of salt water taffy, suggested flavors, Cotton Candy, Vanilla, Strawberry, etc...
     Powdered sugar for dusting
    Method:
     Dust a small baking sheet with powdered sugar. Slightly warm taffy with hands. Roll into long strips and cut into about ten small pieces per taffy. Place cut taffy onto baking sheet, dusting with powdered sugar to lightly coat.  In a large saucepan, over low heat, melt butter, add marshmallows and stir until almost smooth.  Remove from heat and fold in cereal. When evenly coated, fold in miniature marshmallows. Add taffy pieces, and place mixture into buttered 7 inch springform pan. Pressing lightly to compress.  Cool to set. Cover until ready to serve. Slice into wedges. Makes 10 pieces
    Bear Lake Raspberry Lemon Layered Rice Krispie Treats
    Ingredients:
    · 5 tbsp butter
    · 5 1/2 Rice Krispie Cereal
    · 1 10oz package marshmallows
    · 1 tbsp fresh lemon juice
    · Zest from 1 lemon
     2 1/2 cups miniature marshmallows
    · 1/4 cup Raspberry freezer jam,
    · Raspberry frosting:
    Raspberry Frosting
    1/4 cup butter, softened
     2 cups confectioners' sugar
    · 1/4 raspberry freezer jam
     1-2 drops red food coloring if desired

           Butter a 9inch loaf pan. Set aside.In a large saucepan, melt butter over low heat.Add marshmallows, stir till almost smooth.Remove from heat and stir in lemon juice.
    Add zest. Fold in cereal.When evenly coated, add miniature marshmallows.Place half of the cereal mixture into prepared pan. Flatten slightly. Spread jam evenly over the top. Cover jam layer with remaining cereal, pressing lightly to compress. Cool to set. In a medium sized bowl, beat butter.Add powdered sugar and preserves. Beat until light and fluffy.Turn pan upside down to remove from pan. Spread the frosting over the top and let set.  Makes 10 pieces
    Saturday, July 16, 2011

    Don't You Know You're Beautiful?


      "Don't You Know You're Beautiful"
    Hey, little girl with your tangled hair
    Your tattered clothes.
    Your 15,
    And you're bound to bloom just like a rose.

    You're wishing that you had designer jeans.
    Like the ones you see in magazines.
    I know you'd give anything just to give in,
    But you aren't on a price tag, it comes from within.

    [Chorus:]
    Don't you know you're beautiful?
    Don't you know you're beautiful?
    Don't you know you're beautiful?
    Just the way you are

    Hey, there little home coming queen,
    In that back seat.
    I bet his brown eyes,
    are promising you everything.

    I know you want to be just like your friend,
    But he'll still love you if you don't give in
    If those girls are being honest that have been were you're at,
    I bet they'd tell you that they wish they had their innocence back.

    [Chorus:]
    Don't you know you're beautiful?
    Don't you know you're beautiful?
    Don't you know you're beautiful?
    Just the way you are.

    [Bridge:]
    Still he left you for a girl that could be your twin,
    If you were twenty-eight again.
    Let him go (Let him go)
    Let him fly (let him fly)
    Keep your head up get on with your life.

    [Chorus:]
    Don't you know you're beautiful?
    Don't you know you're beautiful?
    Don't you know you're beautiful?
    Just the way you are

    Don't you know you're beautiful?
    Don't you know you're beautiful?
    Don't you know you're beautiful?
    Just the way you are

    (Don't you know you're beautiful?
    Don't you know you're...)

    Just the way you are

    (Don't you know you're beautiful?
    Don't you know you're beautiful?
    Don't you know you're beautiful?)

                While having a little quiet time today. I realized something. Most of my problems that I have today stem from one thing. I have NEVER in my life felt worthy of anything. It all began I am sure when I was young. My biological father has never wanted anything to do with me and  I know that. It affected my life in so many different ways. For all of the things that I have never felt worthy of, friends, love, happiness, marriage, a husband that is good looking and treats me well, my kids, religion ...EVERYTHING! I have tried to over compensate with being funny, friendly, a push over and on top of that..I try and sabotage everything that is good in my life. Until I get to the point in my life that I can accept love,accept that I am in fact worthy I will never be happy.
                What about you my friends? Do you know how special you are? Do you know that in the history of the earth there has never been nor will there ever be another person like you? Do you know that you are worthy of love, happiness and all of the good things in life...even if you have made mistakes? Well, you are! Everyone that is alive, in my opinion, deserves to be loved, deserves to be happy and deserves to have second chances. So why is it so difficult for us, as human beings to give ourselves a break? Why must we feel like we are unworthy of love and happiness? I seem to be harder on myself than others but I suppose I would rather be that way than those who have low opinions of themselves, and in turn make others suffer. Here's my hope for you and I my friends, I hope that one day I will not feel guilty for feeling happy. I hope that one day I will feel worthy of love and all of the good things in my life. I hope that you will feel all of these things too because if we can't lift ourselves up...we can't lift anyone else either.
               Have you ever heard the story about the crab in the bucket? Well it goes something like this :      
            One time a man was walking along the beach and say another man fishing in the surf with a bait bucket beside him. As he drew closer, he saw that the bait bucket had no lid and had live crabs inside.
    "Why don't you cover your bait bucket so the crabs won't escape?", he said.
    "You don't understand.", the man replied, "If there is one crab in the bucket it would surely crawl out very quickly. However, when there are many crabs in the bucket, if one tries to crawl up the side, the others grab hold of it and pull it back down so that it will share the same fate as the rest of them."

    So it is with people. If one tries to do something different, get better grades, improve herself, escape her environment, or dream big dreams, other people will try to drag her back down to share their fate.

    Moral of the story: Ignore the crabs. Charge ahead and do what is right for you. It may not be easy and you may not succeed as much as you like, but you will NEVER share the same fate as those who never try.

    We have been enriched by the talents of people who have had less than "perfect" bodies, whether by birth, accident or disease - Helen Keller, F.D. Roosevelt, Stephen Hawking, George Bush, Stevie Wonder, Christopher Reeve, to name just a few. They chose to "climb the crab bucket" instead of listening to others.

              What if instead of others pulling you down, you were the one always holding yourself back?What if those who have succeeded and made it "out of the bucket" had just sat around and continued to feel worthless, unbeautiful and depressed? It is easy to sit around and feel hopeless but to be able to sit down, clear your mind and pull ourselves up from our bootstraps takes effort and courage and sometimes it may take medication but until you can stand on your own two feet and look at yourself in the mirror and say "I am beautiful, I am worthy and I can be happy" AND MEAN IT, it won't matter how many things go right in your life,. I challenge you to realize just how fantastic you are...flaws and all! Take the time to really think about that...YOU my friend are worth it!
                Remember ..."When you're comfortable in your own skin, you look beautiful, regardless of any flaws." - Emily Deschanel

    Friday, July 15, 2011

    Mikes Bean Dip


                While trying to decide on a recipe for the day my hubby piped up and suggested I post his bean dip. All I can say is, it is a good thing he works for the treatment plant. The guys he works with won't be able to smell a thing. : ) He has made this dip since he was a teenager.
                    Notice the simplicity.....
            He really likes it. A lot. As for me, the need for a gas mask after really puts me off. But...I digress. If you are heading out to a party or hosting the Superbowl, as long as you provide good ventilation you should be alright AND with multiple people eating it... there is no need to blame the dog! Or, here's an idea, if you want to remove the hideous 70's wallpaper that lines your bedroom walls. a few hits of this on a chip and VOILA!..just a suggestion, HA!
             In all seriousness..it is simple, it has few ingredients and anyone can make it. It can be eaten hot or cold. Just don't say I didn't warn you about the aftermath. I would dare say you could add a few diced up jalapenos. That way the offender can feel as much pain as the offendee. : ) Happy Eating!


    Mikes Bean Dip (AKA Death By Flatulence)
    1 can refried beans
    1/3 onion diced
    1 cup grated cheese
    1-2 TBS. Taco seasoning
    jalapenos (opt)
           Mix together and eat cold or warm it up in a 350 oven for 10-20 minutes or until heated through.

    Peach Preserves

               Peach preserves..not to be confused with peach jam. Preserves are supposed to be the consistency of honey. If you are looking for a thick jam, this recipe is not for you. However...this is so good and so easy. No peeling required and the fragrance that fills your home is just...divine. Now a little hint here..if you add your pectin too soon it will wind up runny. Make sure to follow the directions closely. Also, remember when making jam or preserves it is best to use firm and slightly under ripe fruit. I got the recipe from Allrecipes. Now for all of my bountiful basket friends that will be getting a case of donut peaches, you could use those beauties but I am betting that one try of your donut peaches and you will want to eat the sweet beauties all by themselves.


    Peach Preserves
    12 fresh peaches, pitted and chopped
    4 1/2 cups white sugar
    1 (2 ounce) package dry pectin
              Crush 1 cup chopped peaches in the bottom of a large saucepan. Add remaining peaches, and set pan over medium-low heat. Bring to a low boil, and cook for about 20 minutes or until peaches become liquid (my family likes a few bits of peach left) . Pour peaches into a bowl, and then measure 6 cups back into the pan. Add sugar, and bring to a boil over medium heat. Gradually stir in dry pectin, and boil for 1 minute. Remove from heat after 1 minute, and transfer to sterilized jars. Process in hot water bath canner for 10 minutes. Let cool, and place on shelf.
    Thursday, July 14, 2011

    Caramel Apple Salad

               This salad requires no cooking at all and is a crowd pleaser. I reccommend using a variety of apples if possible to add depth to the flavor. The recipe and picture came from Tasty Kitchens by way of Twinks. A BIG thank you to her!


    Caramel Apple Salad
    8 ounces, weight Regular Or Fat-Free Cool Whip
    1 package (3 Oz) Regular Or Sugar Free Butterscotch Pudding Mix
    1 can (16 Oz) Crushed Pineapple (do Not Drain)
    4 whole Apples
    2 cups Miniature Marshmallows
    ½ cups Walnuts Or Pecans or any other nut you prefer, Optional
              
           Stir the pudding mix and pineapple into the Cool Whip. Chop apples into bite-sized pieces; no need to peel them. Fold the apples and marshmallows into the pudding mixture. If desired, top with chopped nuts. Chill.
    Wednesday, July 13, 2011

    Giant Rainbow Cookies

                So, the God's are working against me. EVERY day I say to myself, "self," (and I know it's me because I am wearing the pajamas I wore to bed) "Self, today you will post something that is NOT a dessert." Then, I'll be danged if someone in the blogging world doesn't post something that is a "must try". Maybe it is beacause it is summer and so they aren't posting soups and stuff but I am just as guilty. So...my apologies to you my readers. More sugar today..again.Will you ever forgive me?
                 So the beautiful blogger that posted these beauties is from How Sweet Eats. She LOVED these cookies. I mean REALLY loved these cookie. Her post is hilarious. This beautiful photo is from her as well.http://www.howsweeteats.com/2011/07/giant-rainbow-cookies/  Enjoy! I promise I will try and be better.


    Giant Rainbow Cookies
    makes 18 large or 36 small cookies
    2 cups + 2 tablespoons all-purpose flour
    1/2 teaspoons baking soda
    1 1/2 sticks (12 tablespoons) of salted butter, melted and cooled
    1 cup brown sugar
    1/2 cup sugar
    1 egg + 1 egg yolk, at room temperature
    2 teaspoons vanilla extract
    1 cup mini m&m’s (or something else that you love)
    Preheat oven to 325 degrees F.
               Mix the flour and baking soda in a bowl and set aside. In another bowl, mix the butter and sugars until they are combined. Add the egg, egg yolk, and vanilla and stir until mixed. Gradually add flour and mix until a dough forms – it will look crumbly at first, but it will come together. I even used my hands to help at one point. Fold in the m&m’s.
               Divide the dough how you choose (1/4 cup portions for 18 large cookies or 2 tablespoon portions for 36 smaller cookies). Shape each portion into a ball with your hands then pull each ball into two equal pieces. Turn each half so that the rough side of the half (what used to be the inside of the ball) faces upwards and then squish both halves together. Place the dough rough-side up on a baking sheets. If you’re doing large cookies, I’d leave about 2 inches in between each.

    (The secret picture shhh! Really...this is how you make them)

    Bake for 12-15 minutes (large cookies) or 8-12 minutes (small cookies) or until the edges are slightly brown. The centers should be soft and puffy. Do not over bake. Let cool completely then dig in!
            Note: to melt the butter I simply microwaved it, and to let it cool I allowed it to sit for about 10 minutes.
    ETA: a few readers have told me that this is the same recipe as Cooks Illustrated chocolate chip cookie recipe!
    Tuesday, July 12, 2011

    PMS Cookies

               You read it right ladies. PMS cookies. Now you can fill in what you would like for what PMS stands for but these cookies have a little of everything. Chocolate, salty, sweet! Perfect to curb those cravings. And while we are at it let's be honest, you men have PMS as well. Well, come on, tell mama your troubles and have a few cookies while you're at it. I got the recipe and picture from Just a Pinch. The wonderful lady that submitted it, Kathleen Kulinksky, got rave reviews and won a Blue Ribbon for the recipe. Katheleen said that she has also omitted the marshmallow fluff before and substituted jam. So what you waiting for, times a wasting. Make these ahead and store them in the freezer for emergencies!
    PMS Cookies


    PMS Cookies
    1 box ritz crackers
    1 jar peanut butter
    1 (7 oz) jar of marshmallow fluff
    2.5 lbs dipping chocolate (Ghiardelli preferred)
            Spread peanut butter, then marshmallow cream onto Ritz crackers. Sandwich together. Melt chocolate bark (I like Ghirardelli the best) in microwave or double boiler. Dip sandwiched cookies into chocolate, covering both sides. Place cookies on waxed paper and allow to harden. (I find that if you put the paper or silpat on a cookie sheet and place it in the freezer for 5 minutes, the cookies harden up faster!). Store in airtight container - Enjoy!!
    Monday, July 11, 2011

    Chunky Guacamole

               My first experiences with guacamole....that yucky stuff in the dairy section. OH. MY. GOODNESS. I hated guacamole...or so I thought. My  husband and I got married and it was then that I realized that I LOVED guacamole..as long as it is the real stuff. I found this recipe on "Home Baked Memories" I used her beautiful picture as well. It is quite similar to mine (I use a little onion powder in mine). If you want it a little smoother I find that one of the drink mixers work fabulously!


    Chunky Guacamole
    4 ripe avocados
    3 limes or lemons, juiced
    1/2 red onion, chopped
    1 garlic clove, minced
    1 tsp cumin
    Salt and Pepper
            Halve and pit the avocados. Scoop out the flesh with a tablespoon into a mixing bowl. Mash the avocados with a fork, leaving them somewhat chunky. Add the remaining ingredients, and fold everything together to gently mix. Lay a piece of plastic wrap right on the surface of the guacamole so it doesn't brown and refrigerate 1 hour before serving.
    Sunday, July 10, 2011

    Bathing with tub toys and cleaning the toilet just ain't as fun as they used to be


               Not really sure where my post will take me today. Probably shouldn't be writing. Oh well. I just have to purge again I suppose. The summer seems to be dragging for my household. The kids can't seem to find anything to do besides fight. All I hear is, "She did this, he did that, stop bugging me, but why I DID go to the bathroom..when I got up this morning who cares if it is afternoon? I STILL DON'T HAVE TO GO!", and my all time fave, "we never get to do anything fun...EVER." I feel like saying, "Yeah join the club, I absolutely LOVE sitting here listening to complaints ALL DAY EVERY DAY."
               Why is it that before I had children that my bathroom was a place of relaxation and now...contention? It is always dirty even if I scrub it daily. The sink looks as if we wash pigs in it. Somehow toothpaste is always on the wall behind the door ( I have yet to figure that one out). The tub is just a crying shame. That is if you can find it amidst all of the tub toys that no one plays with, unless you count throwing them out of the tub, flooding the bathroom with and not wanting to clean them up. Every night after bath time, I tell them to clean it up. Then, comes time for my two minute scrub up and I can't get in the tub without tripping on them, so, who cleans them up? ME!! I tell them I am going to throw them away and I have but they just find new ones to bring in. The toilet...ahh the toilet. It isn't fit for a pigsty. And, apparently Maddox thinks that I just enjoy cleaning the toilet. Let me give you an example of a conversation that I overheard between Maddox and Grace.
               Maddox says to Grace, "Grace when I get older, I just can't clean my toilet."
    Grace: " Maddox, you have to or it will be really dirty...I guess when you get married you can make your wife do it"
               Maddox: "Well Grace, I just can't do it..it will make me fro up." After a bit of pondering he said "I know..I will just have mama do it..she likes to clean the toilet."
               Now I can't be positive but I feel safe in saying, I have NEVER told my children that I adore cleaning the commode. And while we are on the subject of the toilet..Is it REALLY that difficult to aim? I mean come on. I seem to manage, even with people pounding on the door and breaking everything in the house. Perhaps, if I had a toilet the size of a bathtub, it may be a little easier. Who am I kidding? They wouldn't be able to hit the broad side of a barn. I am thinking an out house may just be the answer!  Maybe I can rent one from somewhere! Ahh kids!
                              "In a house where there are small children the bathroom soon takes on the appearance of the Old Curiosity Shop."  ~Robert Benchley
                                                              
               One more month and then the girls will be all day school and Maddox will be three days a week. Kind of bittersweet. Grace is my little helper. I may never shower again, with her in school all day. How is it possible that theses little people can make me so mad and yet, I love them with every fiber of my being?
                I say to myself every night before I go to bed..tomorrow will be better. I will be more patient. I will do less yelling. I will be a better mom. And, the sun comes up, the bickering begins and tempers start to flare....pretty soon I am falling into the same pattern as I have every other day. I think sometimes I must be speaking a different language than the children because they just don't seem to understand the response I give them..that is unless I am screaming and then they have the nerve to look surprised.
               I am so paranoid that I will be the same mother as my mom. Don't get me wrong, as an adult I loved her but my childhood was not as it should have been all the time. She was a yeller. I hated that. I vowed I would be better at that when I became a mom. Now, I know that "real" life moms aren't like June Cleaver but I feel like I am failing miserably. Nothing like going out in public and someone pointing that out. I especially love it when I go to the store and the clerk says to me "My goodness you have your hands full." As if I don't already know that. "Thank you for acknowledging that, I will file that under the category, WELL DUH!" I am a stay at home mom that has about 50 jobs and I can't just stay home locked in the house until the kids behave. We do need to eat.In fact I am certain that at one point the lady behind the counter had her hands full once as well. One of my favorite quotes about being a mom, 
               "The world is full of women blindsided by the unceasing demands of motherhood, still flabbergasted by how a job can be terrific and torturous."~Anna Quindlen
                 This makes me feel a little better, it means I am not alone in my mommy madness. Thanks for listening to my rant. Now if you will excuse me..my two second bath with a toddler throwing tub toys at me, awaits!

    Saturday, July 9, 2011

    Lime Bars

               This wonderful recipe and picture came from Brandy's Baking. What a beautiful site she has. I love anything lime. These lime bars sound divine. In fact..they sound like dessert for tomorrow! A little sweet and little tart. Thanks Brandy!


    Lime BarsSource: very slightly adapted from Evil Shenanigans
    For the crust:
    1 1/4 sleeves of graham crackers
    6 tablespoons salted butter, melted
    1/4 cup sugar
    zest of one lime

    For the filling:
    2 large egg yolks
    1-14 oz. can sweetened condensed milk
    1/2 cup lime juice

    1. Heat the oven to 350F. Line an 8″ square pan with parchment paper that hangs over the edge of the pan by a few inches (so you can remove the bars from the pan more easily). Grease the parchment paper.
    2. Place the graham crackers, sugar, and lime zest in a food processor. Pulse until the graham crackers are reduced to fine crumbs and the mixture is well combined. Turn on the food processor and slowly stream in melted butter until all crumbs are coated. Press crumb mixture evenly into the prepared pan. Bake for 10 minutes. Allow to cool completely.
    3. Once the crust is cooled, combine the egg yolks and sweetened condensed milk until well mixed. Stir in the lime juice and combine. It will begin to thicken slightly. Pour the filling into the crust, making sure the filling reaches the edges. Bake for 15 minutes, or until just set.
    4. Cool to room temperature, then chill for several hours or overnight. Pull the bars out of the pan using the parchment paper and transfer to a cutting board. Cut into squares with a sharp knife, wiping the knife clean with a damp cloth between cuts. Store in the refrigerator. 
    Friday, July 8, 2011

    Cinnamon Bear Popcorn

               I can't help but wonder how some milk chocolate drizzled over the top of this would taste. I LOVE chocolate covered cinnamon bears. They are one of my faves. What a fantastic way to change up your popcorn! Not sure where I got the recipe but the picture came from grey luster girl! Enjoy!


    CINNAMON BEAR POPCORN
    2 cubes butter
    1 1/2 cups sugar
    1/2 cup karo syrup
    cook to a boil, then turn down and cook 5 minutes more
    Add:
    1 tsp. vanilla
    1 tsp. cinnamon flavoring
    few drops red food coloring
    4 cups mini marshmallows….stir till melted
            Just before pouring over popcorn add 1 pkg cinnamon bears cut up with kitchen scissors…pour quickly over popcorn. I used air popped popcorn and it almost filled a large Tupperware bowl.
    Thursday, July 7, 2011

    Bovine Bath

                While browsing the web for my shameful addiction (recipes)...my husband mocks me all of the time and says that I get a funny look on my face when I come across a great recipe. Hello world I am addicted to recipes...I am a food porn addict. Anyway....I came across a website called  www.patiodaddiobbq.com What a beautiful site. He has every kind of recipe that you can think of on there. PERFECT for summer or any weather really! Afterall, grilling is an easy clean up and who says it is only for summer?! Here is a wonderful recipe for marinating beef. Give it a try..you won't regret it. Now if you will excuse me, I have to go hide somewhere and continue browsing.

              According to John Dawson AKA PatioDaddio, Give your cow a bath in this and tell me what you think. This is killer for big 'ol steaks or tri-tip. The cola, soy and Worcestershire all act as a tenderizers, while the rest adds serious bold flavor. After marinating you can also use this as a finishing sauce (I'm all about multi-use). Bring a cup or so to a light boil in a sauce pan for five minutes, to kill any nasties and reduce it a little. Brush it on the cow during the last few minutes of cooking. Be careful, the sugar will burn easily. This sauce is also great for grilled portobello mushrooms. You've got a hot grill, so why not? Oh, I almost forgot. Beer makes a great substitute for the cola. It tames the sweetness and boldness down, and still provides the tenderizing.


    Bovine Bath (Beef Marinade)
    Ingredients
    1 can cola (leaded, no diet!)
    1/4 cup Soy sauce
    1/8 cup Worcestershire sauce
    2 tsp Black pepper, ground fresh
    1 tsp Granulated onion
    1/4 tsp Granulated garlic

    Process
    Dump the whole mess in a one gallon zip-top bag, seal and shake well.Add the cow and marinate approximately 1-2 hours per inch of thickness. Try it starting on the low end and add more time as you see fit.

    Grill.

    Eat.

    Optional: If you're like me and dig spicy food, try tossing in some Tabasco, or your favorite hot sauce. The amount is between you and your taste buds (or taste "bugs" as my six year-old daughter would say).

    Minty Watermelon Floats

               I know I said that I wasn't going to post anymore sugary recipes for awhile. But, this looks SO good and so easy. Watermelon is in an abundance right now. Why  not give it a try? It along with the picture came from HowSweetsEat. Enjoy!


    Minty Watermelon Floats
    2-½ cups Fresh Watermelon Chunks (large Seeds Removed, Small Are Fine)
    15 whole Fresh Mint Leaves, Plus More For Garnish
    12 ounces, fluid Club Soda Or Carbonated Water Of Your Choice
    1 quart Vanilla Ice Cream
               
          In a blender, combine the watermelon, mint and carbonated water. Blend and pulse quickly, just until watermelon has broken down. This should only take about 30-60 seconds or so. The blending will “de-carbonate” the water a bit, but it should still have some fizz. Pour mixture through a fine mesh strainer into a large bowl, glass or measuring cup in order to remove the seeds.
    Fill two glasses with vanilla ice cream and pour watermelon soda over the top. Garnish with additional fresh mint.
    Note: I haven’t tried it yet, but I think that this would also be great with some flavored carbonated waters, such as lime or coconut La Croix.
    Wednesday, July 6, 2011

    Triple Layer Chocolate Chip-Fudge Brownie-Peanut Butter Blondie Bars (otherwise known as a mouthful of goodness)

                I know I do a lot of sugary desserts on here. I think I may need an intervention. I will try and change I promise. But, these babies spoke to me! Also, I usually use the original recipes post because...well I SUCK at photography. So if you notice the lovely pictures...just  know that they do not belong to  me.
                So....yeah! I don't even know how to explain the goodness. It has a long title but I really don't know what to call them..you are free to name them what you choose. The recipe an photo came from How Sweet It Is. Her post began with.."Hello my lover"....I think that fits! I am truly speechless!


    Triple Layer Chocolate Chip-Fudge Brownie-Peanut Butter Blondie Bars

    The chocolate chip layer (taken from my deep dish whole wheat cookies)
    1/2 cup butter, softened
    3/4 cup brown sugar, loosely packed
    1 egg
    1 teaspoon vanilla extract
    1 1/3 cups all-purpose flour
    1 teaspoon baking soda
    1/4 teaspoon salt
    1/2 tablespoon dark cocoa powder (optional)
    3/4 cup chocolate chips
         Preheat oven to 350 degrees F. Sift flour, baking soda, cocoa and salt together and set aside in a bowl. Beat butter and sugar together in the bowl of an electric mixer until it’s light and fluffy. Add egg and vanilla and beat until combined. Add in dry ingredients and mix until just combined. Fold in chocolate chips. Spray a 9×13 dish with non-stick spray and begin pressing the dough into the bottom. I found that using the back of a spoon sprayed with non-stick spray helped. It will JUST cover the pan and may seem thin, but it is the right amount for the bars.

    The brownie layer (taken from my red velvet brownies)
    1/2 cup butter, at room temperature
    1 1/2 cups sugar
    2 eggs
    2 teaspoons vanilla extract
    1 1/4 cups all purpose flour
    1/4 teaspoon salt
    3 tablespoons cocoa powder
    2/3 cups chocolate chips (optional)
            In the bowl of an electric mixer, beat butter and sugar until fluffy. Add eggs one at a time, then add remaining teaspoon of vanilla. With the mixer on medium speed, add in cocoa, flour and salt, mixing until combined. Fold in chocolate chips. Using a spatula sprayed with non-stick spray, evenly spread brownies on top of chocolate chip mixture.

    The blondie layer (adapted from simply recipes)
    1/2 cup of butter, melted
    1/3 cup peanut butter, melted (I used crunchy, hence the nuts in the pictures)
    1 1/3 cups of brown sugar
    1 egg
    2 teaspoons of vanilla
    1/2 teaspoon baking powder
    1/4 teaspoon of baking soda
    2 cups of all-purpose flour
    1/2 cup peanut butter morsels
              In a large bowl, whisk together sugar, melted butter and peanut butter until smooth. Add in eggs and vanilla. Combine dry ingredients together, and whisk into the batter. Fold in morsels. Spread evenly on top of the brownie layer. Set the baking dish on top of a cookie sheet and place it in the oven. Bake for 35-40 minutes, or until the top is just set and the middle is slightly soft. I covered the dish with aluminum foil for the last 10 minutes of baking. Let cool completely, then cut and serve!
    Tuesday, July 5, 2011

    Grilled Sesame Flank Steak

               This recipe and picture comes from Just a Pinch. If you are looking for a tasty marinade...look no further. If you are using sooking wine..you will need to adjust the salt. In fact maybe omit it until after cooking. You could possibly use grape juice as a substitute but I haven't done that with this recipe.
              Chef Scotts'advice... Flank steak is a delicious cut of beef and is often stuffed or rolled, yet I’m here to tell you that it’s an often-misused piece of beef. Unless properly treated this delicious piece of beef can come out as tough as shoe leather or as crispy as overcooked bacon.The biggest tip is to marinate the flank steak overnight to tenderize it and bring out its flavor. It cooks up quick over high heat on the grill but is equally delicious smoked low and slow. This recipe can be used in either case but I’m going to showcase grilling to bring out the tenderness of this steak.I usually cook two pieces of flank, and save one for the next days sandwiches.

     Grilled Sesame Flank Steak
    Grilled Sesame Flank Steak
    1 c merlot or cabernet
    3/4 c red wine vinegar
    1/4 c sesame oil
    1/2 c olive oil, extra virgin
    4 Tbsp garlic, chopped
    3 Tbsp fresh ginger, coarsely chopped
    3 tsp thyme, leaves (substitue 1 tsp. dried)
    1 tsp cracked black pepper
    1/2 tsp coarse sea salt
    2 lb beef flank steaks
               Combine all marinade marinade ingredients in a bowl, whisking to emulsify. Place the marinade in either two separate gallon sized zip lock bags and add one flank steak to each bag. zip bags closed and shake to evenly coat the meat then place in a metal pan and into fridge. Marinate the steak overnight turning several times to evenly coat the meat. On a preheated grill over medium high heat (375F), first sear the flank steak on each side, approximately 1-2 minutes per side. Continue cooking 6 minutes per side, turning once. When the internal temperature reaches desired doneness, remove from grill and rest of at least 8-10 minutes under a piece of aluminum foil tented over the top. Resting allows the juices to pull back into the meat before carving
    Monday, July 4, 2011

    S'mores Dip

                Happy 4th of July everybody. I hope that you get to spend the day with those you love. Thank a service member or their family for the sacrifices they make for all of us. Remember we are the land of the free BECAUSE of the brave. A big shout out to my friends currently serving in the military, Michael Green and his family, Jake Withers and his family, and Brett Goddard and his beautiful family. A special thanks goes to Amanda Gurnsey for being a supportive wife of a deployed service member. I can never forget my friends that have served, Jason Payne for his service and Clayton Barnes who made the ultimate sacrifice. My grandfather proudly served his country during WWII. THANK YOU!
              This recipe came from Tasty Kitchens. What simple idea. Especially if you don't have the time or patience to make a whole batch of S'mores. Sure you won't have the crackling fire and all the gooey marshmallow oozing out of your sandwich but..this would come in a close second.The picture and recipe came from cake rocks. LOVE  IT!


    S'mores Dip
    11-½ ounces, weight Milk Chocolate Chips
    14 ounces, fluid Sweetened, Condensed Milk
    7 ounces, weight Marshmallow Creme
    32 whole Graham Cracker Sticks
          Combine chocolate chips and sweetened condensed milk in a heatproof bowl. Heat in the microwave for 30 seconds. Stir until melted and smooth. Microwave for 10 additional second increments at a time if needed. Then use a spoon to mix until the melted mixture is smooth. Then dot the surface of the melted mixture with spoonfuls of marshmallow creme. Stir it slightly until the dip has desired marbled effect (see photo). Serve with graham cracker sticks.
    Sunday, July 3, 2011

    Professional Cream Cheese Buttercream Frosting

                 Here is the second frosting recipe that I was gushing about. I have to admit I was skeptical. There is no milk or cream or any other liquid for that matter but it all came together beautifully. I halved the recipe and it made enough to frost a 13x9 in cake. This stuff is the bomb. If you have a stand mixer it is a breeze. You could add a little milk or water if you need to thin but I don't think that is necessary especially if you whip it long enough. This is a very stable frosting and can withstand room temp for a long time. This too is a must try recipe. The recipe and picture came from wicked creations. I must agree...this stuff is pretty wicked!


    Professional Cream Cheese Buttercream Frosting
    1 cup Salted Butter, Softened
    ½ cups Shortening
    16 ounces, weight Cream Cheese (softened, Cut-up)
    1-½ Tablespoon Clear Vanilla Extract
    4 pounds Confectioner's Sugar
    ½ teaspoons Salt* *see Note
              In a large bowl, using your Kitchen Aid mixer, cream together shortening and butter. Stop and scrape down sides, and keep mixing till creamy. Then add cut-up cream cheese and mix again (on high speed), scraping down sides till fluffy. Add vanilla extract and blend again. Then, a little at a time add confectioner’s sugar, starting on low speed as to not spray sugar all over. Make sure to scrape down sides of the bowl after each addition. Once it’s all incorporated and mostly blended, increase speed and continue blending. You may add salt if you need to (but only if you used unsalted butter).
    Turn on high speed for 15 minutes to make frosting blended, smooth and fluffy. If it’s not thick enough for frosting, you may have to chill frosting after completed.
    *If you don’t have salted butter and are using unsalted, you may add salt to recipe, otherwise if you add more salt, the recipe will taste salty.
    Saturday, July 2, 2011

    Sturdy Whipped Cream Frosting

                I made this frosting for my sons' birthday cupcakes and let me tell you..it was a hit. I added cocoa powder and it tasted like hot chocolate. I even considered adding some malted milk. The original recipe said that you could leave at room temp but given the heat of summer..mine started to melt. This recipe is so fantastic for a few reasons. Number one, it is a bit lighter than the standard butter cream icing. Number two, it so easily made. Three, you can make any flavor you want just by changing a few things. YOU HAVE TO TRY THIS ONE! I even had a little bit left over..so , I am dipping some strawberries in it. I am posting the recipe as it was written but I only put in 4 oz. cream cheese and the tang was just right. Now I have included a few variations...enough to get you started! This would be great on angel food cake or any cake for that matter!


    Sturdy Whipped Cream Frosting
    1 (8 ounce) package reduced-fat cream cheese, softened
    1/2 cup white sugar
    1 teaspoon vanilla extract
    1/2 teaspoon almond extract
    2 cups heavy cream or whipping cream
            Combine the cream cheese, sugar, vanilla extract and almond extract in a large mixing bowl or the bowl of a stand mixer. Fit the mixer with the whisk attachment and mix on medium speed until smooth. While the mixture is still whipping, slowly pour in the heavy cream. Stop and scrape the bottom of the bowl a couple of times while you continue whipping until the cream can hold a stiff peak. I whipped until I could stick a spoon in and it would stand up straight.
                   
    ***Some variations~
       Raspberry or Strawberry Whipped Cream: Instead of vanilla, add 2-1/4 cups raspberry or strawberry purée (purée the fruit in a blender and strain) to the cream when you add the sugar. Increase sugar to 7 Tbs. Before you begin whisking by hand, taste and adjust the flavoring. (Note: the purée increases the amount of whipped cream, so you may not need it all; save the extra for topping other desserts.)
    Lemon Whipped Cream: Instead of vanilla, add 1/4 cup plus 2 tablespoons freshly squeezed lemon juice and 1 Tbs. finely grated lemon zest to the cream when you add the sugar. Increase sugar to 8 Tbs. Before you begin whisking by hand, taste and adjust the flavoring.
    Orange Whipped Cream: Instead of vanilla, add 1/2 cup freshly squeezed orange juice and 1 tablespoon finely grated orange zest to the cream when you add the sugar. Before you begin whisking by hand, taste and adjust the flavoring.
    Chocolate Whipped Cream: Omit vanilla and increase sugar to 6 Tbs. After soft peaks form, turn off the mixer and add 1/4 cup sifted unsweetened cocoa powder, preferably Dutch-processed. Whisk until the cream is smooth, and stiff peaks form. Let the cream sit in the refrigerator for at least 1 hour to dissolve the cocoa. Whisk briefly before using.
    Mocha Whipped Cream: Omit vanilla and increase sugar to 6 Tbs. After soft peaks form, turn off the mixer and add 1/4 cup sifted unsweetened cocoa powder, preferably Dutch-processed, and 2 Tbs. instant espresso dissolved in 2 Tbs. boiling water. Whisk until the cream is smooth, and stiff peaks form. Let the cream sit in the refrigerator for at least 1 hour to dissolve the cocoa. Whisk briefly before using.
    Friday, July 1, 2011

    Cinnamon Caramel Popcorn with Pecans & White Chocolate

                   How does this recipe sound for a great snack? There are so many ways to dress up popcorn. Plain, buttered, candied it's all good! Thank you Our Best Bites!
    Cinnamon Caramel Corn with Pecans & White Chocolate
    Recipe by Our Best Bites

    12 C popped popcorn (about 1/2 C kernels)
    1 C pecan halves, roughly chopped
    1 C brown sugar
    3/4 t cinnamon
    1/4 C karo syrup (or honey makes a good substitution)
    1 stick real butter (1/2 C)
    1t vanilla
    1/2 t baking soda
    3 squares almond bark (about 4 oz)

    Preheat oven to 250 degrees, Place popcorn and chopped pecans in a large bowl and set aside. Combine brown sugar and cinnamon in a 2 liter capacity microwave safe bowl. Mix well. Chop butter into chunks and place on top of sugar mixture. Pour corn syrup over the top of everything. Microwave on high for 30 seconds and then stir to combine. Return to microwave and heat for 2 minutes. Remove and stir and then microwave for 2 minutes more. Remove from microwave and add in vanilla and baking soda. Stir to combine. Mixture will foam and rise. Pour caramel mixture over popcorn and pecans and stir very well so everything is well coated.  Spread popcorn mixture onto a foil-lined jelly roll pan. Place in oven and bake for 30 minutes, stirring every 10 minutes.Remove from oven and spread out on a large piece of parchment, waxed paper, or foil. Melt almond bark according to package instructions. Drizzle over popcorn mixture. When almond bark is hardened and popcorn is cool, break into chunks and enjoy!

    Blog Archive

    Followers