Search This Blog

Showing posts with label Dessert. Show all posts
Friday, February 7, 2014

Phenomenal Cheesecake

           For my birthday, this week, I decided that I wanted to make cheesecake.  It is my favorite dessert. I have tried cheesecake before with mixed results. The chocolate cheesecake that I made was sooo dark and rich that it was just too much. I made a pumpkin cheesecake was pretty much the same. I love a good cheesecake but the flavors have to balance and it has to have a smooth creamy texture. Not too much to ask right?
         Well, I found a few recipes and decided to attempt to pull it off this time. I decided to adapt a few different recipes and morph them into one. The result was PHENOMENAL! A thick New York Style cheesecake that was perfect.
         I learned a few things with my previous two attempts. All of the ingredients need to be at room temperature to ensure a smooth cheesecake. Cheesecake doesn't like to have a lot of air beat into it. I beat the cream cheese and sugar until it is smooth but when adding the other ingredients, only mix until blended. It likes to cook low and slow and I cooked this one in a water bath. I am not sure if it is the steamy oven or the even temperature that the water bath created but it worked great. There are other ways to bake without a water bath but honestly a water bath isn't difficult to do.
        It tasted really good the day of.. but the next day it was out of this world. I would recommend letting it age in your refrigerator before enjoying. So here is the recipe that I made. Purely decadent.


Phenomenal Cheesecake
      First, begin by preparing your springform pan. I used a 12 inch springform for this recipe. I wrapped the bottom of mine in two layers of heavy duty foil, halfway up the sides of the pan. This ensures that water from your water bath won't seep in and ruin your cheesecake.
Preheat your oven to 300 degrees Fahrenheit.


Crust:
2 pkgs. graham crackers (you could use Nilla wafers as well)
1/2 cup pecans
1/2 cup melted butter
1 tsp. Vanilla
     Pulse the crackers and pecans in a food processor until you have fine crumbs. Add in butter and vanilla. Using a cup, press into a greased springform pan. I forgot to grease my pan and it did not stick. But, you may want to, just to be safe.

Filling:
5 large eggs, room temperature

2 cups (one pint) sour cream, room temperature
4 8-ounce packages cream cheese, room temperature
8 tablespoons (one stick) unsalted butter, room temperature
1 1/2 cups sugar
2 tablespoons cornstarch
1 1/2 teaspoons almond extract (you could use vanilla)
1 teaspoon fresh lime juice (or lemon)
1 teaspoon grated lime zest (or lemon)
      In a stand mixer beat cream cheese, butter and sugar together until smooth and fluffy. Add in sour cream, cornstarch, almond extract, lime juice and lime zest. Mix well. Add in eggs one at a time only mixing until blended. Use a low speed for this process. Pour your filling into your crust. Place on a jelly roll pan and add hot water to the jelly roll pan (or other large pan You don't want the sides touching). Close the oven and NO PEEKING! Bake at 300 for 2 hours and 15 minutes. If you gently shake the cheesecake it will jiggle in the center. Turn off the oven. Open the oven door and let cool in the oven for about 30 minutes. Take out of oven. Remove foil and let cool to room temperature. At this point it will be difficult not to slice into this beautiful cake but put it in the refrigerator and chill at last 2 hours but preferably over night. I know. I'm sorry. You could eat plain or top with your favorite toppings. We enjoyed strawberries and chocolate sauce. Caramel was very good as well. Enjoy!
~Camie
Friday, April 19, 2013

Cutlers Chocolate Sugar Cookies

        Sorry I have been MIA the last few weeks. Between appointments, house remodel and kids. I have had no time to blog. I miss it! Hoping to get back into a groove soon!
        So I stumbled on this recipe. Having a chocoholic in this house, I couldn't pass it up. The recipe only made about 2 dozen. So it is just about right for one chocoholic or a family of moderate sweet eaters. :) I will post the recipe as I found it. I did use dark brown sugar however and in my opinion it could have used about 1/4 cup more flour. The dough was on the stickier side. I put the bowl in the refrigerator for a bit and although the dough had firmed up a bit but it was still a little messy to roll in the sugar. Maybe I didn't let the butter cool long enough?!
        The results.. a puffy, cookie that is a little crispy on the outside and chewy on the inside. Heaven. It is quite rich with chocolate. You could cut down on the cocoa powder if you like but honestly, they were good. Instead of vanilla, if you wanted to get adventurous, you could use a different extract, like orange or raspberry. If you love chocolate.. you gotta try these babies out. I got the recipe from cutlerscookies.blogspot.com


Cutler's Chocolate Sugar Cookies

1/3 cup granulated sugar
1 1/2 cups plus 2 tablespoons all purpose flour
3/4 cup unsweetened cocoa powder
1/2 teaspoon baking soda
1/4 teaspoon baking powder
14 tablespoons unsalted butter
1 3/4 cups packed brown sugar
(the original recipe calls for dark
brown sugar, but  Cutler's likes the flavor of
light brown sugar better)
1 tablespoon vanilla extract
1/2 teaspoon salt
1 large egg plus 1 large yolk

         Place the granulated sugar in a shallow bowl and set aside. Preheat your oven to 350 degrees and line 2 baking sheets with parchment paper. I used my silpat.
Mix flour, cocoa, baking soda and baking powder in a bowl. Microwave 10 tablespoons of butter in a measuring cup until melted, this will take about a minute. Stir remaining 4 tablespoons of butter into the melted butter, melting this also. Allow the butter to cool to between 90 and 95 degrees. This took around 10 minutes for my butter. Place the melted butter, brown sugar, vanilla and salt into the bowl of your stand mixer and mix with the paddle attachment until the mixture is smooth. Mix in the egg and egg yolk. Mix the flour mixture until just combined. 
     Using two tablespoons of dough at a time (I use my small ice cream scoop), roll the dough into balls and roll the balls into the reserved granulated sugar. Place on the prepared baking sheets. Using a glass, flatten the cookies until they are about 2 inches in diameter. Sprinkle each sheet of cookies with another 1 1/2 teaspoon of sugar, left over from when you rolled the cookies in it. 
      Bake the cookies 1 sheet at a time, until the cookies are slightly puffy and the edges have begun to set, this will take around 15 minutes. The cookies should look slightly underdone between the cracks. Allow to cool for 5 minutes on the baking sheet, then remove to wire racks to cool completely.

Tuesday, January 15, 2013

Cutler's Frosted Peanut Butter Cookies

           I am so sorry I have been MIA for so long. Between sick kids and a teething baby. I barely have time to shower. I came upon this recipe on one of my fave blogs, A Bountiful Kitchen. If you are peanut butter and chocolate lover..... this recipe is for you. My goodness the flavors are amazing. These are classified as a try ASAP! The recipe is from Curt Cutler of Cutlers Cookies here in northern Utah. The yummy photo is from Bountiful Kitchen. I had to share this recipe because I love you!  You're welcome! :) Have a great week and try to stay healthy!


Cutler's Frosted Peanut Butter Cookies
Curt Cutler
1 cup butter, room temperature
1 cup brown sugar
1 cup white sugar
1 teaspoon salt
1/2 teaspoon baking powder
1/2 teaspoon baking soda
1 teaspoon vanilla
2 eggs
3 1/4 cups cake flour ( he uses cake flour in all of Cutler's cookies)
1- 12 oz bag Reese's Peanut Butter chips (no substitutions)

Pre-heat oven to 350 degrees and place rack in center of oven.
Cream together butter, sugars, salt, baking soda and powder.  Add vanilla and eggs. Mix well.
Add flour and peanut butter chips. Mix just until flour and chips are blended together.
Using a cookie scoop or ice cream scoop, or just a large spoon, scoop into 2 inch balls and place on a parchment lined cookie sheet about 4 inches apart.  I bake about 8 cookies per sheet.
Bake for about 12 minutes, or until set.

Peanut Butter Frosting

1/2 cup butter, soft-room temperature
3 cups powdered sugar
1/2 cup peanut butter (not natural)
milk to thin to proper consistency (whole milk is best)

Cream together room-temperature butter and powdered sugar. Add peanut butter and beat until smooth. Add milk a tablespoon at time, just until frosting is smooth and creamy. Set aside.

Chocolate Frosting
1 cup butter or 1/2 and 1/2 blend butter/margarine
5-6 cups powdered sugar
1/4 cup unsweetened cocoa (or less if you like a lighter cocoa frosting)
1 tablespoon vanilla
1/4 to 1/3 cup milk

Cream butter and 5 cups powdered sugar. Add cocoa and vanilla. Add milk a tablespoon at a time until frosting is smooth. If needed, add more powdered sugar.

After cookies are cooled, frost with peanut butter frosting. Then frost on top of the peanut butter frosting with the chocolate frosting. When spreading the chocolate frosting on top of the peanut butter frosting, be very gentle and leave a small space between the edge of the peanut butter frosting and the chocolate frosting for a layered frosting look (see photo)
Tuesday, December 11, 2012

The best Spiced Ginger Molasses Cookies

       I love Molasses Cookies. I may be the only one in my house to feel this way but all the better reason to make them. This recipe is so good. I love spicy cookies and cakes. It has a hint of orange zest. You can taste the orange slightly but it just adds a depth to this cookie that can't be beat. My house smells just like Christmas. Did I mention that I am not a photographer?! Here's what I did...

Spiced Ginger Molasses Cookies
1 1/2 cups softened butter (3 sticks..don't judge)
2 cups brown sugar
2 eggs
1/2-1 tsp. grated orange zest. (add more if you want the flavor more pronounced)
1/2 cup molasses
1/2 tsp. salt
4 tsp. baking soda
1 Tbs. ginger
2  1/2 tsp. cinnamon
1/2 tsp. nutmeg
1 tsp. cloves (yum)
4 3/4 cup AP flour
1/2 cup sugar (to roll in)
     Preheat oven to 375 degrees. In a large bowl cream butter and brown sugar and orange zest. until light and fluffy.. about 3-5 minutes. Add eggs and molasses, mix thoroughly. Sift together the flour, baking soda, salt, cloves, cinnamon and ginger. Add the dry ingredients to the butter mixture. Use an ice cream scoop that holds 2 tablespoons of dough. Roll each ball into the sugar and place on a silpat lined cookie sheet or you can use parchment paper. Place in oven and bake for 10-12 minutes. Remove from oven and transfer to a cooling rack to cool. Makes about 3 dozen cookies.
Sunday, September 30, 2012

No Knead Sticky Buns

      It has been a long weekend for me. After giving birth to my son a few months back, I found a lump in my abdomen. I attributed it to my body trying to get back to normal but it has yet to go away. Needless to say, after a doctor visit and a CT scan, I discovered that I have a hernia as well as gallstones! YAY ME! Sigh! Not sure when I will find time to fit that in but..whatever. I have decided the children owe me big time when they are older :) At any rate..on to the food...   
      Because I have an obsession with searching for recipes....many many recipes, I have stumbled on many beautiful food blogs and websites. Last night was no exception. The photographs were amazing. The recipes sounded divine. The only problem I had was deciding which one to share. I decided on something sweet because those seem to be the most popular. Also, if I could have afforded to go to school to be a pastry chef, I think I would have. These wonderful photo and recipe comes from a beautiful website called merelymarie. It is a beautiful site and these look absolutely sinful. Yummy! Best part...no kneading. All of the gooeyness and a lot less work! It is a win win! Have a great week friends!


No Knead Sticky Buns
DOUGH
6 3/4 cups or 7 3/4 cups Unbleached All-Purpose Flour
1 tablespoon + 1/2 teaspoon salt
1 1/2 tablespoons instant yeast
1 3/4 cups lukewarm water
4 large eggs
1/2 cup honey
1/2 cup melted butter
FILLING
2/3 cup granulated sugar
1 tablespoon ground cinnamon
TOPPING
3 tablespoons butter, melted
2 tablespoons honey
1/3 cup + 3 tablespoons of brown sugar
2/3 cup pecan halves or coarsely chopped pecans
1) The flour/liquid ratio is important in this recipe. If you measure flour by sprinkling it into your measuring cup, then gently sweeping off the excess, use 7 3/4 cups. If you measure flour by dipping your cup into the canister, then sweeping off the excess, use 6 3/4 cups. Most accurate of all, and guaranteed to give you the best results, if you measure flour by weight, use 33 ounces.
2) To make the dough: Combine all of the dough ingredients, in the order written, in a very large bowl (at least 6 quarts). Stir to make a sticky dough. You can do this in a stand mixer and then transfer to a larger bowl; or simply use a big bowl and spoon (or dough whisk).
3) Cover the bowl, and let the dough rise for 2 hours at cool room temperature.
4) Refrigerate the dough for at least several hours, to chill it and make it easier to work with. It can be refrigerated for up to 3 days before using.
5) When you’re ready to make sticky buns, make the filling. Combine the sugar & cinnamon. Set aside.
6) To make the topping: Spread the melted butter and honey in a lightly greased 9″ round cake pan. Sprinkle the sugar atop the butter, then scatter the nuts atop the sugar. Set aside.
7) To make sticky buns: Spray your hand with non-stick vegetable oil spray, and dip it into the dough in the bucket. Pinch off/pull out 1/3 of the dough; this is about the size of a large softball or a large grapefruit, a scant 22 ounces. For best accuracy, weigh on a scale. Place the remaining dough back in the refrigerator, to use another time. Or wrap and store in the freezer. This dough recipe is enough to make three 8″ or 9″ round pans of sticky buns.
8) Transfer the dough to a floured work surface, and roll it into a rectangle approximately 15″ x 10″.
9) Spread the filling over the dough, leaving a narrow margin around the edges uncovered.
10) Starting with a long edge, gently roll the dough into a log. Don’t roll it too tightly; if you do, the centers of the buns will pop up as they bake.
11) Cut the log into 8 pieces. (I usually cut it into 12 pieces, to fit my 9 by 13 inch baking pan)
12) Space the buns in the pan. Lightly press each down till they’re touching one another.
13) Cover the pan, and allow the buns to rise till they’re quite puffy, about 1 hour. Towards the end of the rising time, preheat the oven to 350°F.
14) Uncover the pan, and bake the buns for 40 to 45 minutes, till they’re a deep golden brown.
15) Remove the pan from the oven, and turn it over onto a piece of parchment, or onto a cooling rack set over a piece of parchment or waxed paper (to catch any drips).
16) Lift off the pan, and scrape any nuts or sugar in the pan onto the buns. Then, allow to cool for a few minutes.
Devour! Immediately.
Tuesday, September 25, 2012

Salted Caramel Rice Krispie Treats

             I had time to write a quick personal post today but wanted to get at least one recipe up for the week. Rice Krispie Treats...What can I say about them? Besides that they are delicious. Salted Caramel...what can I say about salted caramel? LOVE IT! Combine the two and you have got one slice of heaven let me tell you! Pots and Pins had this beautiful picture and this divine recipe. I stumbled on her lovely website and was immediately smitten with this recipe. The key here is to cook the caramel until it gets to the right temperature or it will be runny...delicious but runny. Yeah you could use store bought sauce but why? Homemade caramel is a snap, if you follow the directions. Thank you for killing my post baby weight loss Pots and Pins :) Oh well...tomorrow is another day!  If you get a chance stop by and visit her website. Both the photo and recipe are from her site. www.potsandpins.com


DSCN3379

Salted Caramel Rice Krispie Treats
(You could also add chocolate or butterscotch chips to the Rice Krispies Treats, or sprinkle chocolate chips on top of the hot caramel before sprinkling with salt...fancy them up all you want, they are dang good...five dangs on the ol' meter!!)
Rice Krispies Treats:
3 tablespoons butter1 package (10 oz.) regular marshmallows or 4 cups of mini-marshmallows
*6 cups Rice Krispies
Caramel:
2 cups white sugar
1 1/2 cups corn syrup
2 cups heavy cream
1 cup butter
1 teaspoon vanilla extract
Coarse Sea Salt for sprinkling on top
              Butter a 9x13-inch baking dish. In a large pan, over medium-low heat, melt butter. Add marshmallows and stir until completely melted. Pour in Rice Krispies and stir until evenly coated. Scoop Rice Krispies mixture into prepared baking dish and using a lightly buttered spatula or buttered fingers, press Rice Krispies down firmly into baking dish.
             Make Caramel: In a large (mixture will bubble up so use a large pan!), heavy-bottomed pan, combine sugar, corn syrup, 1 cup of cream and butter. Stirring often, bring to a boil, over medium heat, then pour in remaining cup of cream. Heat, without stirring to 242 degrees (soft ball stage) or until a small abount of syrup dropped into cold water forms a firm but pliable ball when removed from water. (Using a candy thermometer is a really good idea, but if you don't have one, make sure to do the cold water test and the "ball" needs to hold it's shape but still be pliable for the caramel to set up right.) This will take about 20 minutes or so, watch so it doesn't boil over. Remove from heat, stir in vanilla. Immediately pour over Rice Krispies. Some of the Rice Krispies will float to the top and some bubbles will appear, just pop with a fork. Let caramel set for about 3 minutes then sprinkle with coarse sea salt. Allow caramel to cool completely, then cut into bars, squares or however big or small you want. I cut mine into 3-inch squares, wrapped them individually in waxed paper and tied them with a string, all in an attempt to make them harder for me to eat...didn't slow me down one bit!
*For your chocolate lovers out there, substitute Cocoa Krispies or make a batch that's half and half...dang good!
Thursday, September 6, 2012

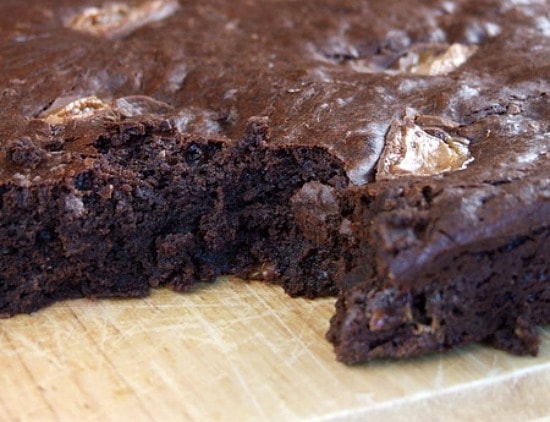
Milky Way Brownies

            So here's the thing...I could eat my weight in Milky Way candy bars...every day. I love the things. Especially when they are right out of the fridge or freezer. Yummm! I never crave any junk food while I am pregnant. Just ice. I had my baby just 3 months ago and just like the previous three postpartum times... I crave CHOCOLATE! Normally, I don't eat a lot of chocolate. For some reason, after a baby.... I CANNOT get enough of the stuff. While looking for new ways to feed my love/hate relationship with chocolate, I stumbled on these Milky Way Brownies by recipe girl. The photo and recipe are from her beautiful site. Can you imagine the possibilities? You could chop up any candy bar and create your own dessert. But, to be honest, she had me at Milky Way. MmmMMmmm! I wouldn't have the patience to put them in the fridge and wait. I would want them gooey with a scoop of ice cream.


Milky Way Brownies
1 pound (4 sticks) unsalted butter, cut into pieces
1 pound semi-sweet chocolate chips (or chopped chocolate)
6 ounces unsweetened chocolate, chopped
2 Tablespoons instant espresso powder
7 large eggs
2 Tablespoons vanilla extract
2 1/4 cups granulated white sugar
1 1/4 cups all-purpose flour
1 Tablespoon baking powder
1 teaspoon salt
12 ounces miniature Milky Way Bars, chopped
1 full-size Milky Way Bar, sliced thinly

Directions:

1. Preheat oven to 350°F. Butter and flour 12x18x1-inch pan. Line with foil or parchment that hangs over the sides for ease in getting them out (butter the foil/parchment).
2. In a heatproof, medium-bowl set over a saucepan of simmering water, heat butter, and chocolates until melted and smooth; cool slightly.
3. In a large bowl, whisk together the eggs, espresso powder, vanilla and sugar. Stir the egg mixture into the slightly cooled chocolate mixture. Cool to room temperature.
4. In a medium bowl, sift together flour, baking powder, and salt, then add to batter. Stir chopped mini Milky Way bars into chocolate mixture. Then pour into prepared baking pan and smooth top with a rubber spatula. Place slices of the full-size Milky Way Bar onto the top of the brownie batter.
5. Bake for 25 to 35 minutes, or until toothpick inserted in center comes out clean with a few crumbs attached; do not overbake! Let cool completely, then cover tightly and chill overnight. Chilled brownies are easier to cut.

Tips:

*These taste better the second day.
*If it's a warm day inside your house, you might consider chilling the Milky Way bars before you try to cut them.

Monday, August 20, 2012

Zucchini Oat Dark Chocolate Chip Cookies

           This has been one LONG hot summer. The weather has been unseasonably warm and we have had more than our shares of wildfires. It has been so dry. To top that off we have a new baby and my husband started a new job. He will normally work the day shift but has been on grave shift for almost two months. It has not been easy keeping 5 children quiet while my husband tries to sleep. It threw a wrench in the entire summer. I am so thankful for him and I am thankful for his job but oh how I loathe grave shift. The kids go back to school tomorrow and they are excited....not as excited as their mother but excited. Coincidentally, my husband is now off grave shift. Life will be getting back to  "normal"...I hope. I thought I would brave church yesterday with all 5 kids. I have never had so many people give me that "I feel for you" look. But, we made it....and that's all that counts. Small blessings!
           Are you being over run with zucchini? It is that time of year when people are scrambling trying to figure out what else they could possibly make with zucchini. I stumbled on this recipe at Tollhouse and was intrigued. I love squash of all kinds..my hubby, doesn't prefer squash. I try and sneak it in when at all possible. Loaded with fiber and vitamins it makes it well worth it. Now here's the thing If you are making theses you need to have it grated pretty fine or you need to peel it. My food processor gates pretty coarsely and I was pretty much flossing with the zucchini. This cookie incorporates oats which adds a great texture, along with some spices (I added nutmeg and cloves) and dark chocolate but you could use whatever chocolate you have on hand. Photo and recipe are from Tollhouse.
Zucchini-Oat Dark Chocolate Chip Cookies

Zucchini Oat Dark Chocolate Chip Cookies
1 1/2 cups all-purpose flour
1 teaspoon ground cinnamon
1/4 tsp. ground nutmeg
1/4 tsp. ground cloves
1/2 teaspoon baking soda
1/2 cup (1 stick) butter, softened
3/4 cup granulated sugar
1 large egg
3/4 teaspoon vanilla extract
1 1/2 cups shredded zucchini (1 medium)
1 cup quick oats
1 cup chopped nuts
1 2/3 cups (10-oz. pkg.) NESTLÉ® TOLL HOUSE® Dark Chocolate Morsels

PREHEAT oven to 350° F. Lightly grease baking sheets.
COMBINE flour, cinnamon, nutmeg, cloves and baking soda in small bowl. Beat butter, sugar in large mixer bowl until well combined. Add egg and vanilla extract, beat well. Add zucchini; gradually beat in flour mixture. Stir in oats, nuts and morsels. Drop by rounded teaspoon 2 inches apart onto prepared baking sheets.
BAKE for 9 to 11 minutes or until light golden brown around edges. Cool on baking sheets for 2 minutes; remove to wire rack to cool completely. Store in tightly covered container at room temperature.
Wednesday, July 11, 2012

Daphne Oz Blueberry Whoopie Pies

             This recipe caught my attention. It looked fairly simple and delicious and to be honest the recipe is basic enough that you could change it up a bit. Maybe with strawberries or rasperries or even cherries in place of the blueberries. You could make the whoopie pies vanilla instead of chocolate. If you can't find the mascarpone cheese..sub in cream cheese.The possiblities are limited only to your imagination. The recipe and photo are from "The Chew"


Daphne Oz Blueberry Whoopie Pies

For the Whoopie Cake:
1 cups Unbleached All-Purpose Flour
1/4 cup Unsweetened Cocoa
1/4 teaspoon Baking Soda
1/4 teaspoon Fine Salt
4 tablespoons Unsalted Butter (at room temperature)
1/2 cup Granulated Sugar
1 large Egg
1/2 cup Milk

For the Filling:
1 pint Mascarpone Cheese
1/2 cup Confectioners Sugar
1 teaspoon Vanilla
1/4 cup Blueberry Puree (strained)
pinch fine salt
For the Whoopie Cake:
      Arrange the oven racks in the upper and lower thirds of the oven and preheat the oven to 425°F. Line 2 large baking sheets with parchment paper.Whisk together the flours, cocoa, baking soda and salt in a medium bowl. Cream the butter and sugar in the bowl of an electric mixer at high speed until fluffy, about 4 minutes. Add the egg and milk and beat at medium speed until incorporated. At low speed, add the flour mixture in 2 batches, alternating with the milk, mixing until just blended. Using a half-tablespoon measure, drop 18 generous teaspoons of batter onto each sheet, leaving about 2 inches between cakes. Bake the 2 sheets at the same time, 5 to 7 minutes, until springy to touch. Let cool on the sheets for 5 minutes, and transfer to racks to cool completely.   
For the Filling:
      Beat together mascarpone, confectioners sugar, salt and vanilla in a bowl with electric mixer at medium speed until smooth, about 3 minutes. Fold in blueberry puree. Spread filling on half of the cakes. Sandwich them closed and serve.   
 For Blueberry Puree:
         Pulse a pint of blueberries in a blender or food processor until pureed. Strain mixture with strainer or cheese cloth.
Thursday, July 5, 2012

Lemon Ice Cream

          I love anything with lemon. A custard shop near my house, sells Lemon Chiffon custard on every other Friday. It is to die for. I have only tried to make ice cream once...a long time ago and it did not work out...at all. Of course I was in my teens and barely started to cook but it was enough to stop me I guess. This ice cream recipe came to my email from Just a Pinch via Pat Morris. It requires NO ice cream maker. The ingredients are basic too. This would be fantastic on any cobbler. It smooths out as it freezes. Can't get any easier than this. Light and refreshing. Delicious. This recipe makes one pint but can easily be doubled. Thanks Just a Pinch!


Lemon Ice Cream
3 Tbsp fresh lemon juice
1 c granulated sugar (you can use splenda)
1 pt half and half
2 tsp grated lemon rind
2 dash(es) (2 drops) yellow food coloring (optional)

      Blend well all of the above ingredients. Pour into a cake pan, glass loaf pan -or ice tray without the removable inserts. Freeze for 3 hours in freezer or freezing compartment of refrigerator. It is not necessary to stir, as it freezes smooth. No cooking -let the freezer do the work; no ice cream maker needed. Enjoy.
Delicious and refreshing on top of a warm slice of Blackberry (or Blueberry) Cobbler.
Monday, June 18, 2012

PW's Raspberry Cream Pie

         Well my little one is going on three weeks old. Time sure does fly. What a blessing he is. He has such a sweet spirit about him. He doesn't fuss too much..unless he is getting his diaper changed, being bathed OR his mama won't stop kissing his dimples. I thought that I would be a bit more overwhelmed but everything is going smoothly...so far. My husband started a new job last week and all seems to be going well. It is an adjustment though. He worked at the same place for 15 years and worked four 10 hour days. He works 5 days a week now. Between the new baby, school being out and my husband starting a new job there are moments when this mama wonders if she will make it. The good Lord must have taken mercy on me and given me this sweet soul for a reason.
          I thought that since he is such a good boy, I would try and get a post in here and there. You may or may not know that I love Pioneer Woman. This delicious pie, looks simple and you could sub in your favorite berry. How great would blueberries be with vanilla cookies in place of the Oreos?!  I hope you will try this one..it is definitely a keeper. The photo and recipe are from Pioneer Woman. Enjoy my friends.

TPW_8857

Raspberry Cream Pie
25 whole Oreo Chocolate Sandwich Cookies
4 Tablespoons Butter, Melted
1 cup (generous) Raspberries
3 Tablespoons Sugar
2 containers (6 Ounce Each) Raspberry Yogurt
1 package (3.4 Ounch) Instant Vanilla Pudding Mix
1 cup Heavy Whipping Cream
Extra Raspberries For Garnish
       To make the crust, preheat oven to 350 degrees. Crust cookies in a food processor (or smash in a Ziploc bag with a rolling pin). Stir in melted butter until all combined. Pour into a regular pie pan and press crumbs all over the pan and up the sides. Bake for 3 to 4 minutes---just long enough for it to set. Cool crust completely.
       Place raspberries on a plate or in an empty pan. Smash them with a fork, then sprinkle on 3 tablespoons of sugar. Stir together and allow to sit for 15 minutes.
In the bowl of an electric mixer, combine raspberry yogurt with the instant vanilla pudding mix (just the powder itself.) Beat on low until combined, about 1 minute. Pour in heavy cream and whip on low for 30 seconds. Stop the mixer and scrape down the bowl with a rubber spatula. Turn mixer on medium-high speed and beat for two minutes, or until mixture is thick.
         Turn off mixer, then fold in raspberries until just combined. Pour into cooled pie pan and spread evenly. Freeze for two hours, or until very firm. Cut into slices and top each slice with cookie crumbs, dollops of whipped cream, and extra raspberries. Keep in freezer, allowing time to thaw before serving.
Tuesday, May 29, 2012

Simple Strawberry Crumble


      This will be my last post for awhile. My baby is set to arrive sometime tomorrow. I am excited, nervous and ready. I just hope that the delivery goes well and baby Sawyer will arrive safely. As for recipes, I will try to resume as quickly as possible. Until then my friends, much love.
       This recipe and photo come from"Bake your Day". A simply beautiful website. What a great way to use up some of those sweet berries that are starting to come into season.


Simple Strawberry Crumble
1-½ cup Strawberries
½ Lemon, Juiced
3 Tablespoons Flour, Divided
1 cup Old Fashioned Oats
2 Tablespoons Brown Sugar
1 teaspoon Ground Cinnamon
⅛ teaspoons Salt
2 Tablespoons Grapeseed Or Canola Oil
2 Tablespoons Maple Syrup
2 teaspoons Vanilla Extract
Preheat oven to 350ºF. Spray 4 half-cup ramekins with nonstick cooking spray. In a small bowl, mix the strawberries, lemon juice and 1 tablespoon of flour until blended. Set aside.
In a medium bowl, mix oats, the remaining flour, brown sugar, cinnamon and salt together until mixed. In a separate bowl, whisk oil, maple syrup and vanilla. Stream into the oat mixture and stir with a fork until all the liquid is well-incorporated into the dry. Spoon 1/3 cup of the topping ingredients into the strawberry mixture and stir.
Divide the strawberry mixture evenly among the ramekins and divide the oat mixture evenly on top of the strawberries.
Bake in the preheated oven for 25-30 minutes until the strawberries are tender and the topping is golden brown and crisp.
Note: Swap out the strawberries for any fruit that you like. A mixture of various berries would be delicious!
Wednesday, May 23, 2012

Hot Mess Brownies

                 I have 7 days left in my pregnancy. It will be my last one and it is kind of bittersweet. I can't believe how fast it has gone. It is hard to believe that I will be holding this little one soon. It is also the time that my mind starts to race. I worry about the delivery. I hope the baby will be OK. That he is born healthy. I worry about, what if something were to happen to me, who would help take care of my other babies. All of these things race through my itty bitty brain. Typical I suppose. If I drop off of the radar for awhile, know that I am still here..just a little busy. I will return shortly.
                Another beautiful site I discovered today.....Bakeaholic Mama. I mean one look at this picture from her and who would disagree?! My hubby, as most of you know, is a chocoholic and he loves.. loves...loves s'mores. These brownies may send him over the moon. This one is a must make for summer. Thank you Bakeaholic mama. The recipe and photo are beautiful. Stop by and say hello...that way we can all gain weight together.


Hot Mess Brownies
1 cup of butter
3 oz semi sweet chocolate
1/2 cup unsweetened coco powder
1 1/4 cup of sugar
3 eggs
2 tbs vanilla extract
1/4 a cup of sour cream
1/2 cup all purpose flour
1 tsp salt
S'mores stuff:
8 honey graham crackers
2 Hershey milk chocolate bars
2 cups of mini marshmallows

Directions:
In a sauce pan on medium low heat melt butter and semi-sweet chocolate together. Set aside and cool slightly. In the bowl of your electric mixer mix sugar vanilla, and eggs together. Slowly pour in your melted chocolate/butter. Mix in flour , coco powder., salt and sour cream.
       In the bottom of a parchment paper lined 8x8 or 9x9 square pan place 4 graham crackers. Spread 1/2 your brownie batter over the cookies. Top with half of your marshmallows and one of your Hershey bars broken into pieces. Top with 4 more graham crackers. Spread remaining browning batter over the top. Sprinkle remaining mallows over the top with pieces of your 2nd Hershey bar. Bake at 350 for 30-40 minutes. Remove and let cool for about 20 minutes before slicing.
They will be messy, oooeey and gooey I promise!
And if you want to make them extra good...
        Take 1 cup of marshmallows with 1 tbs of butter and 2 tbs of milk. Melt on medium low heat. Drizzle over brownies before serving
Monday, May 21, 2012

Triple Berry Cobbler

           I am on a berry kick I suppose. Who doesn't like a cobbler? Especially with a big dollop..OK a big scoop of vanilla ice cream. Cobblers are easy to make a taste sinfully delicious. This recipe, along with the photo came from a new found blog..."Between your ears". My goodness..just a beautiful blog. If this photo doesn't make you drool....I am not sure what will! Now the original recipe was for a bluberry cobbler but she adjusted it to a triple berry. No matter how you make it....it will be fantastic!

Triple Berry Cobbler with strawberries, blueberries, and blackberries
Triple Berry Cobbler

1 1/4 cups sugar
1 cup flour
1/4 teaspoon salt
2 teaspoons baking powder
1 cup milk
2 cups fresh blueberries*
1 tablespoon butter
1/4 cup sugar (to coat berries)
             Sift flour, sugar, salt, and baking powder together. Add milk and beat well. Melt the butter in a deep baking dish. Pour in the batter, then add the berries. Bake in moderate oven until brown. The batter will rise to the top of the cobbler and make a light, rich brown curst. Bake at 350 degrees for about 45 minutes**. Serve with whipped cream, vanilla ice cream or with a custard. Any way you serve it, it is DE-licious. Blackberries and peaches maybe used in the also.
*I used chopped strawberries, blueberries, and blackberries.
**I had to bake this for about 55 minutes, instead of 45 minutes.
Saturday, May 19, 2012

Raspberry Swirl Sweet Rolls

          So, the inspiration in searching for this recipe search was believe it or not...a cartoon. My kids have all loved Max and Ruby. In fact, I used to sing "Maddox and Gracie" inserting my children's name in the opening of the show..I am a nerd I know. In the particular show here, Ruby was making Berry Bottom Buns...a quick search and these delicious little things popped up. I suppose there is one good thing that comes from watching cartoons. Now, the recipe calls for frozen berries but if you had fresh, I am certain it would taste heavenly. It even has a few variations on here that would be great..even maybe mixing a few berries together. There is also make ahead directions on the bottom. The recipe and photo come from Food & Wine. Mmmm!


Raspberry Swirl Sweet Rolls
Dough
1 cup milk
2/3 cup sugar
1 1/2 tablespoons active dry yeast
1 stick unsalted butter, softened
2 large eggs
1 teaspoon finely grated lemon zest
1/2 teaspoon fine sea salt
4 1/4 cups all-purpose flour, plus more for dusting

Filling
One 10-ounce package IQF (Individually Quick Frozen) raspberries, not thawed
1/4 cup plus 2 tablespoons sugar
1 teaspoon cornstarch

Glaze
3/4 cup confectioners' sugar
3 tablespoons unsalted butter, melted
1 1/2 tablespoons heavy cream
         In a small saucepan, warm the milk over moderately low heat until it's 95°. Pour the warm milk into the bowl of a standing electric mixer fitted with the dough hook and stir in the sugar and yeast. Let stand until the yeast is foamy, about 5 minutes. Add the softened butter, eggs, grated lemon zest and sea salt. Add the flour and beat at medium speed until a soft dough forms, about 3 minutes. Increase the speed to medium-high and beat until the dough is soft and supple, about 10 minutes longer. Scrape the dough out onto a lightly floured surface and knead it with your hands 2 or 3 times. Form the dough into a ball and transfer it to a lightly buttered bowl. Cover the dough with plastic wrap and let stand in a warm place until doubled in bulk, 1 to 2 hours.
            Line the bottom of a 9-by-13-inch baking pan with parchment paper, allowing the paper to extend up the short sides. Butter the paper and sides of the pan. Turn the dough out onto a lightly floured work surface and, using a rolling pin, roll it into a 10-by-24-inch rectangle. In a medium bowl, toss the frozen raspberries with the sugar and cornstarch. Spread the raspberry filling evenly over the dough. Tightly roll up the dough to form a 24-inch-long log. Working quickly, cut the log into quarters. Cut each quarter into 4 slices and arrange them in the baking pan, cut sides up. Scrape any berries and juice from the work surface into the baking pan between the rolls. Cover the rolls and let them rise in a warm place until they are puffy and have filled the baking pan, about 2 hours. Preheat the oven to 425°. Bake the rolls for about 25 minutes, until they are golden and the berries are bubbling. Transfer the pan to a rack to cool for 30 minutes.
        In a small bowl, whisk the confectioners' sugar with the butter and heavy cream until the glaze is thick and spreadable.

****Make AheadThe recipe can be prepared through Step 4. Cover the rolls, refrigerate overnight and then return to room temperature before baking.
****NotesVariation The sweet rolls can be filled with a variety of frozen fruit. Try blackberries, strawberries, blueberries or chopped sweet cherries.
Tuesday, May 15, 2012

Strawberry Cream Dessert

       I have two weeks left in this pregnancy. To be honest, this pregnancy has flown by. It is hard to believe I am at the home stretch. These are the longest weeks though. I am getting anxious to meet this little guy. My husband is starting a new job right about when I am due. It makes me nervous, just for insurance purposes but I am so happy that he will be able to have a fresh start somewhere. he has worked at the same place for 15 years. Although, the new job is in the same field. Sometimes a fresh start is just what we need.
        Can I just say..I love the Internet?! I can find any kind of recipe that I want in less than two seconds. There are so many fun websites and blogs to discover. I stumbled on "The Big Green Bowl" blog by happy accident. What a beautiful blog. What a beautiful recipe. This one has a little wait time but MmMm! The recipe and photo ore from her beautiful blog. Stop in and say hello.


Strawberry Cream Dessert
2-1/4 cups graham cracker crumbs (~36 squares)
6 TB sugar
10 TB butter, melted
1 pkg (8 oz) cream cheese, softened
1 cup powdered sugar
2 cartons (one 16 oz and one 8 oz) frozen whipped topping, thawed, divided
1 pkg (3 oz) strawberry gelatin
1/2 cup boiling water
1 cup (8 oz) strawberry yogurt

Topping:
2 TB graham cracker crumbs
1-1/2 tsp sugar
1-1/2 tsp butter, melted

Layer 1:
Combine cracker crumbs, sugar and melted butter. Press into an ungreased 13x9" pan. Refrigerate for 15 min.

Layer 2:
Beat cream cheese and powdered sugar until smooth. Whisk in 1 cup whipped topping. Spread over the prepared crust. Refrigerate for 15 min.

Layer 3:
In a large bowl, dissolve gelatin in boiling water. (Be sure it's all the way dissolved.) Whisk in yogurt, then 6 cups of whipped topping until blended. Spread over cream cheese layer. Refrigerate for 1 hour.

Layer 4:
Spread remaining whipped topping over strawberry layer. Cover and refrigerate overnight. Just before serving, combine topping ingredients; sprinkle over the top.
Thursday, May 10, 2012

Mom's Raised Doughnuts

           I am almost full term with my pregnancy..for a while postings may be sporadic at best. After awhile I may not post at all for awhile. Know that I am still here, just busy with my little one. These little beauties made it to my email the other day. I love homemade doughnuts and these are quite simple. I can't believe how much store bought doughnuts cost now. I am making them for my husbands birthday, which this year, falls on Mothers Day! Every now and then, we share a day. However, my hubby is a chocoholic..I will be making some chocolate glaze to go on a few. Maybe double the glaze if you like them oooey and gooey. The recipe and photo came from Just a pinch recipe club by Peggy Ann Tebben. She has a suggestion on how to cut them if you don't have a doughnut cutter. This makes about 2 dozen doughnuts...as well as the doughnut holes. I can't wait until Sunday!
 MOM'S RAISED DOUGHNUTS

Mom's Raised Doughnuts
1/2 c water, warm (not hot)
2 pkg active dry yeast
3/4 c milk, lukewarm
1/4 c sugar
1 tsp salt
4 c all-purpose flour, sifted
1/3 c shortening
2 eggs
GLAZE
1 Tbsp water, warm (may need more to thin, but thicker is better)
1/2 tsp vanilla
1 c confectioners' sugar, sifted


               SOAK yeast in 1/2 cup warm (not hot) water - 5 minutes. TIP: I throw about 1 tsp. sugar in with this to kick it in the butt to get it going. SCALD the milk and melt shortening. (I always remember Mom melting the Crisco in the warm milk first, so that's how I do it.) POUR milk over sugar and salt in a bowl. Stir until dissolved. Make sure this mixture is warm, not hot. ADD 1 cup of flour, eggs and yeast mixture. Beat until smooth. ADD remaining flour to make a soft dough. When dough leaves sides of bowl, turn out onto lightly floured board. (Recipe calls for 4-4 1/2 cups flour, but every time I make it, it only takes me 4 cups to achieve the right consistency.) KNEAD until dough becomes smooth and elastic. Place in lightly greased bowl. Grease top of dough and cover with waxed paper. Allow to rise in warm place (80-85°) until doubled (1-1/2 hours). ROLL OUT dough to 1/2 inch thickness and cut-with a #2 can that has been opened with a tadpole can opener to leave a sharp cutting edge. Use a pill bottle or the center of doughnut cutter to make the center hole. Remove centers. LET RISE on the board until very light (40-60 minutes). DROP into deep hot fat (325° - 350°) and turn when doughnuts are just barely brown. Turn once again when browned sufficiently. DRAIN on absorbent paper. While still warm, glaze with glaze (ingredients above) or dust each doughnut with granulated or confectioners' sugar.

NOTE: This recipe is not recommended for use with self-rising flour.
Monday, April 30, 2012

Colossal Brownie Ice Cream Sandwiches

           Happy Monday my friends. I hope your weekend went well. Ours had a few rough patches with our soon to be 5 year old but it smoothed out by the end of yesterday. Time to get up and moving. The kids have school and I need to get some much needed house cleaning done. This recipe would be fantastic for a birthday party or if you were feeding a few people. I was surprised to find this recipe on the Quaker Oats site. See? You can convince yourself that this is healthy and have a piece or two. I mean it does have oatmeal in it. Both the recipe and the photo are from Quaker. Have a great week friends!


Colossal Brownie Ice Cream Sandwich recipe

Topping
1/3 cup Quaker® Oats (quick or old fashioned, uncooked)
3 tablespoons all-purpose flour
2 tablespoons firmly packed brown sugar
1/3 cup peanut butter (not reduced fat)
1 tablespoon margarine or butter

Brownies
1 cup (6 ounces) semi-sweet chocolate chips
1/2 cup (1 stick) margarine or butter
3/4 cup granulated sugar
1 teaspoon vanilla
2 eggs
1 cup all-purpose flour
3/4 cup Quaker® Oats (quick or old fashioned, uncooked)
1/2 teaspoon baking powder
1/4 teaspoon salt (optional)

1 quart fat-free or low-fat vanilla ice cream or frozen yogurt, slightly softened

Heat oven to 350°F. Line two 8 or 9-inch round cake pans with aluminum foil, allowing foil to extend over sides of pans. Spray with cooking spray. For topping, combine oats, flour and brown sugar in large bowl. Cut in peanut butter and margarine with two knives until mixture is crumbly; set aside. For brownies, melt chocolate chips and margarine in medium saucepan over low heat, stirring frequently. Remove from heat; cool slightly. Stir in sugar and vanilla. Add eggs; mix well. Add combined flour, oats, baking powder and salt; mix well. Divide batter evenly between pans. Sprinkle with reserved topping, patting gently.

Bake 22 to 24 minutes for 8-inch pan (20 to 22 minutes for 9-inch pan) or just until center of brownie is set. (Do not overbake.) Cool completely in pans on wire rack.

To assemble, spread softened ice cream evenly over one brownie while still in pan. Lift second brownie out of pan; remove foil. With topping side up, place brownie on top of ice cream, pressing gently. Cover and freeze several hours or overnight. Remove from freezer 10 to 15 minutes before cutting. Lift from pan using foil edges. Remove foil; cut into wedges. Individually wrap wedges and store in freezer.

Yield 12
Thursday, April 26, 2012

Banana Pudding Milkshakes

            I had the best of intentions on posting early today. I woke up not feeling too well and was having some pretty strong contractions. Eventually, they subsided and I am feeling better. I decided I had better get moving. I stumbled on this recipe and thought "Why haven't I tried this?" It is sheer genius. I am a sucker for milkshakes as well as banana pudding. My nephew and niece would love these, simply because they love banana cream pie. The recipe and photo are from A Spicy Perspective. She is fantastic. I love to just browse her site. Stop by and say hello! Enjoy!
Banana Pudding Milkshake

Banana Pudding Milkshakes
1 box (3.4 Oz. Size) Instant Vanilla Pudding
3-½ cups Cold Milk
8 whole Scoops Vanilla Ice Cream
1 cup Crumbled Vanilla Wafer Cookies
2 whole Large Bananas, Peeled And Roughly Chopped
FOR THE GARNISH:
Whipped Cream
Vanilla Wafers
Sliced Bananas
       Mix the instant pudding and milk in the blender. Puree until smooth. Then add the ice cream, crumbled cookies and bananas to the blender. Pulse until well combined. (You may have to work in 2 batches depending on the size of your blender.) Garnish with fresh whipped cream, cookies and banana slices
Tuesday, April 24, 2012

Cherry Mallow Cake

            A busy morning here..that is why the recipe post is a tad late. I had dental appointment for two of my children early in the morning. Why I made them at 8:20 am I will never know but they are done now and for 6 more months, I won't have to worry about it. As long as they don't eat too much of this cake!
            Looking for an easy dessert that will have your guests asking for the recipe? This cake starts with a cake mix and has only two extra ingredients. The marshmallows melt and rise to the top, creating a topping for the cake. The photo and recipe are from the Cherry Marketing Institute.


Cherry Mallow Cake
4 cups miniature marshmallows
1 (18.25-ounce) package yellow cake mix
1 (21-ounce) can cherry pie filling

       Preheat oven to 350°F (175°C). Spray a 13 x 9 x 2-inch baking pan with vegetable cooking spray. Place marshmallows evenly in the bottom of the pan. Prepare cake mix according to package directions. Pour batter over marshmallows. Spoon cherry filling evenly over cake batter. Bake for oven 45 to 50 minutes. The top of the cake will be bubbly and the marshmallows will be sticky on top of the cake. Let cool in the pan, then cut into squares.

Followers