Search This Blog

Friday, March 30, 2012

Pepper Jelly Chicken

          Stumbled upon this recipe the other day. I have a few friends that LOVE pepper jelly, especially to dip hot poppers in. This recipe is quick, simple and delicious. Thanks to GTU for the recipe and photo. Sorry the photo isn't the greatest.


Pepper Jelly Chicken
Chicken breasts
Fresh cracked pepper
1 jar Green Pepper Jelly
1 pint sour cream

          Pound chicken breast to a thin breast. Spray medium high heat pan with pam. Crack pepper on top of chicken breast. Sear on both sides in pan and then reduce heat to medium low and cover with lid
Place jelly in sauce pan and heat it. when chicken is done, plate it and spoon jelly sauce on top and dollop with sour cream.
Thursday, March 29, 2012

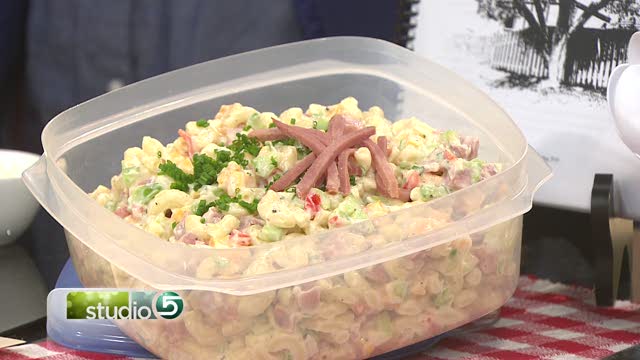
Ham and Cheese Macaroni Salad

           I love watching the local home improvement shows. They always have such fun recipes on there. This recipe was shared by Becky Low. My grandmother makes a macaroni salad..as does my sister in law. They use shrimp and I am not one for shrimp. This one sounds delish. Not to mention you could use your leftover Easter ham. I will say...usually I use Mayo and not Miracle whip...I suppose it is a preference thing. The great debate will continue. Thanks to Studio 5 for the recipe and photo.
 
Ham and Cheese Macaroni Salad
4 cups uncooked macaroni (about 1 pound)
1 pound ham, diced
1 pound cheese, diced
1 cucumber, seeded and diced
1/2 bell pepper, chopped (more or less to taste)
1 bunch sliced green onions or snipped fresh chives
1/2 cup fresh or frozen green peas
1 cup salad dressing (more or less to taste)
1-3 tablespoons milk
Salt and pepper to taste
Cook macaroni according to package directions. Drain, rinse in cold water and drain thoroughly. Combine macaroni with diced ham and cheese; peel and chop cucumber, chop or grate bell pepper, snipped chives. Thin Miracle Whip with a little milk, add enough dressing for desired consistency and moistness, salt and pepper to taste. Chill to blend flavors.

Notes from Becky:
For picnics and family gatherings Mom would make this favorite salad. She would adjust ingredients to what she had on hand and her taste preferences that day. She always had chives growing near the house and, much to my dismay, would add a big bunch of snipped chives to the mix - or grated onion in the winter. This recipe has always been a family favorite (for me, without the chives - although I do add chives for nostalgia or garnish). Even cousins say this is the salad they best remember my Mom for. Mom never had the recipe written down - she always added ingredients until it looked good, or tasted right. I standardized the recipe.
Wednesday, March 28, 2012

Salted Caramel Easter Popcorn

         While combing my fave blogs today for a fantastic recipe for you. I came upon "Two Peas and their Pod". Have you ever been to their blog? Go visit and you will see why it is one of my faves. hey are simply wonderful. She has some creative ideas for popcorn. This one is just in time for Easter. It has a great balance of sweet and salty. Simply delicious. Simply addicting. So here is your recipe for the day, Salted Caramel Easter Popcorn (or as I call it, crack corn..maybe that is where that song comes from..I have always wondered just what that song is about...eh hum..I seem to have gotten lost here). It doesn't have to be just for Easter. You could of course change it up a bit. Thanks to Two Peas and Their Pod for the wonderful recipe and photo.


Salted Caramel Easter Popcorn
6 cups plain popped popcorn
2 cups coarsely chopped salted pretzels
1 cup granulated sugar
1/2 teaspoon sea salt, plus more for sprinkling
1/4 cup water
1/3 cup heavy cream
1/2 teaspoon vanilla extract
1 cup miniature marshmallows
Drop of red food coloring-if you want to make the popcorn pink for Easter
1 1/2 cups Easter Pretzel M&M's
            In a large bowl, combine popcorn and pretzels. Set aside. In a medium saucepan, bring sugar, 1/2 teaspoon salt, and water to a boil over medium high heat. Boil, undisturbed, until mixture is amber in color, for about 8-12 minutes. Remove pan from heat and slowly pour in the heavy cream. Be careful because the mixture will bubble up. Stir until smooth and add vanilla extract, marshmallows, and drop of red food coloring-if using. Stir until marshmallows are melted and mixture is smooth.
          Pour caramel mixture over popcorn and pretzels and gently stir with a rubber spatula until popcorn is well coated. Stir in the pretzel M&M's. Transfer mixture to a large baking sheet and sprinkle with sea salt. Let cool completely.

***Note-I used air popped popcorn, but stove or microwave popcorn will work as well. I used red food coloring to make the popcorn pink for Easter. I also used Easter Pretzel M&M's. You can always change up the color or leave the popcorn plain. And feel free to stir in your favorite M&M's or other Easter candy. Robin Eggs or Mini Cadbury Eggs would be good too!
Tuesday, March 27, 2012

Pasta E Fagioli

             I know that is is Spring outside but yesterday was definitely soup weather here. I guess that is the thing about Spring..one day it is warm and the next, you need to bundle up! This warming soup is also a crock pot meal. Can't beat that. The recipe and photo are from The Country Cook. If you want you could add more broth to make it more..soupy but it is totally up to you. The pasta goes in uncooked. Easy, tasty and convenient! Thank you Brandie!


Pasta E Fagioli
1 pound ground beef
1 small onion, finely diced
2 carrots, finely diced
2 stalks celery, finely diced
1 can diced tomatoes, undrained
1 can dark red kidney beans, drained and rinsed
1 can cannellini beans (or white kidney beans), drained and rinsed
1 (26 oz.) container beef stock (or 3 cups)
1 jar (25 oz.) spaghetti sauce
2 tsp. dried oregano
2 teaspoons dried parsley
1 teaspoon ground black pepper
3/4 cup uncooked ditalini pasta (or your favorite pasta shape)
Salt, to taste (about ½ tbsp. kosher salt)
        
              Brown and crumble ground beef. Drain excess grease. Don't forget to drain and rinse your beans. Add all the ingredients to the slow cooker (except for pasta) and stir. Set slow cooker on low for 6-8 hours or on high for 4-5 hours. During the last 30 minutes or so of cooking, add in the pasta and stir.
   Cook’s Notes: Pasta likes to absorb a lot of the liquid so if you like your soup a bit more soupy, be prepared to have an extra can of beef broth handy. You can add it in towards the end.
            Also, you can do this without a slow cooker. Follow the instructions above, but instead of adding to a slow cooker, just put all ingredients in a large pot (except for the pasta). Cook over low heat for about an hour. During the last 15-20 minutes, add in the pasta.
Monday, March 26, 2012

To Die For Banana Cake with Vanilla Bean Frosting

          The weather here today is perfect for baking. I have a few over ripe bananas and baked some banana bread....I should have waited. This recipe and photo from ButterYum could have changed my mind in an instant. What do you do with your over ripe bananas? Usually I make bread, sometimes banana chocolate chip cookies, or slice them,dip them in chocolate and freeze them for a great summertime treat...or I freeze them for smoothies. Banana cake is a great idea. I may go get a bunch of bananas and let them get a little over ripe..just to try it. Beautiful site over there at ButterYum! Go say hello sometime.


To Die For Banana Cake with Vanilla Bean Frosting

makes one 8x8-inch pan (double recipe for a 9x13 pan)
Cake:
2/3 cup sugar
1/2 cup sour cream
1 egg
2 tablespoons butter, softened
2 mashed super ripe bananas (about 3/4 cup)
1 teaspoon pure vanilla extract
1 cup flour
1/4 teaspoon salt
1/2 teaspoon baking soda
Frosting:
2 tablespoons butter, softened
1/4 cup heavy cream
1/2 teaspoon vanilla bean paste (or equal amount of pure vanilla extract)
1 1/4 cups confectioner's sugar

To make cake (easily mixed by hand):
            Preheat the oven to 375F (see note below). Cream together sugar, sour cream, egg, and 2 tablespoons softened butter. Add mashed bananas and 1 teaspoon vanilla extract. Add flour, salt, and baking soda; mix well. Pour into greased 8x8 pan. Bake at 375F for 20-25 minutes until a toothpick inserted in the center comes out clean. Cool completely before frosting.

To make frosting:
          Cream butter and confectioner's sugar together until smooth. Slowly add the heavy cream; stir until smooth. Stir in the vanilla bean paste until fully incorporated. Spread on cooled cake.

Note - Bake at 350F if using a glass pan.
Recipe doubles well to fit in a 9x13 pan
Friday, March 23, 2012

Homemade Pop-Tarts

          I have seen a bunch of home made pop tart recipes floating around. This one is from the Brown-Eyed Baker's website. The crust looks so flaky. An easy recipe that even the kids will like. One advantage is these aren't pre-packaged and loaded with preservatives. You can customize the flavor to your liking. You could make a glaze if you want but it is not necessary. My kids love pop tarts, probably because they don't get them very often. These are a little time consuming but worth it. Thanks to Brown Eyed Baker for the recipe and the photo.She has one of my most fave blogs to look at! Enjoy!

Homemade Pop-Tarts


Homemade Pop-Tarts
Yield: 9 pop-tarts
Prep Time: 1 hour | Bake Time: 25 minutes

For the pastry crust:2 cups all-purpose flour
1 tablespoon granulated sugar
1 teaspoon salt
1 cup (2 sticks, or 8 ounces) unsalted butter, cold and cubed
1 egg
2 tablespoons milk

For the cinnamon sugar filling:½ cup light brown sugar
1½ teaspoon ground cinnamon
4 teaspoons all-purpose flour

For the strawberry filling:¾ cup strawberry jam (or whatever flavor you’d like)
1 tablespoon cornstarch
1 tablespoon water
1 egg, lightly beaten (to brush on pastry)
       Prepare the cinnamon sugar filling by whisking the ingredients together. If using the strawberry filling, prepare by whisking together the cornstarch and water, and then combine with the jam in a small saucepan. Bring to a boil and simmer for 2 minutes, stirring frequently. Remove from the heat and let cool. To make the crust, whisk together the flour, sugar, and salt. Using your fingers or a pastry blender, work in the butter until it is the size of peas and the mixture holds together when you squeeze it. Whisk together the egg and milk and add to the dough. Mix together with a fork until everything is evenly moistened. Knead briefly on a floured surface, if necessary, until the dough comes together.
            Divide the dough in half. (At this point you can wrap each in plastic wrap and refrigerate for up to 2 days.) If you refrigerate the dough, let it come to room temperature for about 15 minutes before rolling out. Roll out one piece of dough to about 1/8-inch thick, in a 9½ by 12½ rectangle. Using a sharp knife, pastry wheel or bench scraper, trim the rectangle to 9×12 inches. Cut the sheet of dough into nine 3×4 rectangles. Using a spatula, transfer the rectangles to a baking sheet that has been lined with parchment paper or a silicone baking mat. Brush the lightly beaten egg on each of the rectangles. Spoon a tablespoon of filling into the center of each rectangle, leaving a ½-inch of space around the edges.
            Roll out and cut the second piece of dough in the exact same manner as you did the first. One at a time, place a second rectangle of dough on top of the nine assembled ones. Using your fingers, press around the seams of the dough to make sure they are sealed. Press the tines of a fork around the edges of the rectangles. Prick the tops of the rectangles in multiple spots to allow steam to escape.
            Refrigerate the pan with the pastries (you don’t need to cover them) for about 30 minutes. In the meantime, preheat the oven to 350 degrees F. Bake for 25 to 30 minutes, or until lightly browned. Cool slightly before serving. Store pastries in an airtight container at room temperature for up to one week.
* Note 1: Each filling recipes makes enough for a whole recipe (9 pop-tarts). If you make to make a few different filling, just scale back the amounts for the fillings.
* Note 2: Some additional filling ideas: Chocolate chips, Nutella, different jam flavors, dulce de leche, etc. The possibilities are endless!
* Note 3: If your kitchen runs on the warm side, you will need to refrigerate the dough for at least 30 minutes before rolling it out so that the butter doesn’t start to melt.
Thursday, March 22, 2012

The Best Steak Fajitas

          I am not much of a meat eater as you may know..but I have a carnivore or two in my house. It makes for a challenging dinnertime most of the time. My husband LOVES Mexican food and he loves fajitas. You combine that with steak and he may just die and go to heaven. This lovely recipe and beautiful photo came from a new found favorite site... Laura's Kitchen..Culinary Cravings. I love looking for new food sites and recipes. Head over there and tell her hello. In the meantime, enjoy this recipe and get your meat marinating. BTW, my local meat department has this cut of meat already sliced, check and see if your local market does as well.


The Best Steak Fajitas
Marinade:
1 orange, juiced
2 limes, juiced
4 tablespoons olive oil
2 garlic cloves, roughly chopped
1-3 chipolte chiles, in adobo sauce, depending on level of spice desired. I would start with 1 the first time you make this and then adjust from there.
3 tablespoon roughly chopped fresh cilantro leaves
1 teaspoon ground cumin
1 teaspoon salt

2 1/4 pounds skirt or flank steak, trimmed of fat cut into thirds or 8-inch pieces
Salt and pepper
4 assorted color bell peppers (green, red, yellow, orange), thinly sliced
1 large white or red onion, thinly sliced
Lime juice, olive oil, optional
12 flour tortillas, warm
Guacamole
Pico de gallo or your favorite salsa
Sour Cream
Shredded Cheddar or Monterey Jack Cheese
        In a small 2 cup measuring cup, or something similar size and shape, combine all the marinade ingredients. Using an immersion blender, puree the marinade until smooth. Alternatively, you may combine all ingredients in a food processor or standard blender and process until smooth. Transfer to a re-sealable plastic bag and add the steak, seal and shake to coat. Refrigerate the beef for 2 to 4 hours to tenderize and flavor the beef.
Preheat a ridged grill pan on high heat.
            Drain the marinade from the beef. Lightly oil the grill or grill pan. Season liberally with salt and freshly ground black pepper. Grill the steak over medium-high heat and cook for 4 minutes on each side and then transfer to a cutting board and let rest. Depending on the size of your grill pan you may need to cook in batches.
            Once the beef is off the grill pan and resting, add the bell peppers and onions tossed with lime juice and olive oil, if using. Grill the mixture for 5 to 7 minutes until the vegetables are just barely limp.
         While the peppers and onions are cooking, heat up the tortillas. Turn any free burners on a medium low flame. Place a tortilla on each flame and let it char about 30 seconds to 1 minute, flip the tortilla and repeat on the second side. Once heated and charred remove the tortilla to a clean tea towel and wrap to keep warm. Repeat until you have warmed all of your tortillas.
You can also heat your tortillas in a microwave, lightly dampen a tea towel with some water, wrap the tortillas in the damp towel and heat in the microwave for about 1 minute. Check to see if they are warm, if not repeat the heating at 1 minute intervals until they are warm and pliable.
Thinly slice the steak against the grain on a diagonal.
To serve:
      Spread some guacamole on a tortilla, top with a few slices of steak, peppers and onions, pico de gallo, sour cream and cheese. Roll up the tortilla to enclose the filling.
Tuesday, March 20, 2012

Daphne Oz's Sweet Dreams Smoothie

          I love this recipe for a few reasons. Anything that will help me sleep is OK in my book. AND it has a banana in it. Now I will tell you why that matters to me. At this point in pregnancy, if I move my leg just right or wrong I get a MASSIVE charlie horse. This time around if I move my foot, the muscle in the arch of my foot even knots up. From the info I have read a banana or drinking milk helps alleviate that problem.I am willing to try it. There is not much worse than waking at night and moving the wrong way..and feeling that muscle knot up. The recipe and photo are from "The Chew". Thank you Daphne. My muscles thank you too.


Daphne Oz's Sweet Dreams Smoothie
1/2 cup warm milk
1/2 banana (room temperature)
1/4 teaspoon (dash) cinnamon
1/2 teaspoon vanilla extract
1 teaspoon maple syrup or honey (optional)
    Combine milk, banana, cinnamon, vanilla extract, and maple syrup or honey in a blender and whirl until frothy and smooth. Drink before going to bed.    

Peachy Graham Smoothie

             I have about 10 weeks left of gestating this little boy. My husband and I cannot seem to come to an agreement on a name. It would help if he would be serious. He throws out Greek God names and names that I wouldn't name a pet. SO, unless he has some helpful insight, I will name this child. : )
I REALLY like the name Sawyer. Coming up with a middle name that goes with that...is more difficult than it should be. I know that Sawyer would be a better middle name but I like it. My husband is leaning towards Luke. I like that as well but I keep coming back to Sawyer. I know I could combine the two and have Sawyer as the middle name but...I guess we will see. Ten weeks should give us enough time to come to some sort of agreement. As long as it is not Zeus or Calligula. Yes...that is how helpful he is.
           Today's recipe comes from Kraft, as does the photo. I love smoothie recipes. They taste great on a hot , muggy day. My kids love them too. The recipe calls for canned peaches, which, to be honest, I am not a fan of. I prefer fresh. I am certain you could sub in fresh when they are in season. Maybe add a banana. How delicious does this sound?! Mmm! Maybe when the weather warms up again..I will plug in my blender and let her rip. I hope you all are having a marvelous week.
Peachy-Graham Smoothie recipe
Peachy Graham Smoothie
1/2 cup vanilla low-fat yogurt
1 can (4 oz.) diced peaches in juice, undrained
2 HONEY MAID Low Fat Cinnamon Grahams, coarsely broken
1/3 cup ice cubes
      PLACE all ingredients except ice cubes in blender; cover. Blend on medium speed 30 sec. or until smooth. ADD ice; cover. Blend on high speed until thickened. SERVE immediately.    

Kraft Kitchens Tips

To Double
Prepare as directed, using 1 container (6 oz.) yogurt, 1 can (8-1/2 oz.) diced peaches in juice, 4 grahams and 1/2 cup ice cubes. Makes 2 servings.
Monday, March 19, 2012

Double Chocolate Marshmallow Crispy Bars

           I had something else planned for today but when I saw this picture...I just couldn't pass it up. I mean take a look at these and tell me that you aren't drooling. I stumbled on A farm girl dabbles site by way of Tasty Kitchens. It may just be my new obsession. A cute blog full of great recipes and fun things. Check it out. The photo and recipe are from her wonderful site. In the meantime, make these and pair it with a cold glass of milk. Happy Monday!


Double Chocolate Marshmallow Crispy Bars
1/2 c. unsalted butter, at room temperature
3/4 c. sugar
2 large eggs
1 tsp. pure vanilla extract
3/4 c. all-purpose flour
2 T. cocoa
1/4 tsp. baking powder
1/4 tsp. kosher salt
2 c. mini marshmallows
1 c. semi-sweet chocolate chips
1 c. creamy peanut butter
1-1/2 c. Rice Krispies cereal

       Preheat oven to 350°. Spray a 9'' x 13'' pan with cooking spray and set aside. In a medium bowl, cream the butter and sugar. Beat in eggs, one at a time. Add vanilla and stir to combine. Add flour, cocoa, baking powder, and salt. Spread batter into prepared pan and bake for 15 minutes. Do not over bake. Sprinkle marshmallows evenly over the top and bake 3 minutes longer. Cool completely on a rack.
       Once pan is cool, melt the chocolate chips and peanut butter over low heat, stirring to combine. Pour in the Rice Krispies cereal and spread mixture evenly over the marshmallow layer.
Once set, cut into bars. They will cut easier if the top layer is allowed time to set up, especially if they are chilled in the refrigerator a bit.
Friday, March 16, 2012

Pistachio Nut Cake

           I love Just a Pinch recipe club. They always have the best recipes on there. If you are looking for a St. Patty's Day dessert that isn't minty..this one may be for you. It arrived in my inbox today via "Just a pinch". So easy. I mean it starts with a cake mix...it doesn't get much easier..unless you buy it of course. The photo and recipe are from Just a Pinch and the original contributor is Laura Davis. I think this may be the dessert that I make tomorrow. Now I may sub in Cool Whip instead of dream whip. We will see. I may adjust it to cupcake form but I am excited. Have a great weekend.


Pistachio Nut Cake

Pistachio Nut Cake
1 yellow cake mix
2 (3.4) oz pistachio pudding
1 cup vegetable oil
3 eggs
1 cup carbonated water
1/2 cup chopped pistachio nuts
1 package instant dessert topping (dream whip)
1 1/2 cup milk
             Preheat oven to 350 degrees F Grease and flour a 10 inch Bundt pan. In a medium bowl, stir together the cake mix and 1 package of instant pudding. Add the oil, eggs and club soda, mix well. Fold in the chopped nuts, reserving some for garnish if desired. Pour into the prepared pan. Bake for 50 to 60 minutes in the preheated oven, until cake springs back when lightly touched. Cool for 10 minutes in the pan before inverting onto a wire rack to cool completely. In a medium bowl, stir together the instant whipped topping and instant pudding. Add the milk and mix until light and fluffy. Slice cooled cake into layers, fill and frost including the hole in the middle. Garnish with nuts if desired. Keep chilled until serving.           
Thursday, March 15, 2012

Christy Jordans' Ham Salad

          Anyone else out there ever get in a rut for lunch? I feel as if I have the same thing over and over again. This would be a great break from the norm. As many of you know I am not much of a meat eater. Ham is one thing I can tolerate..most of the time. I am not much of a chicken salad fan..grapes and chicken together.. just seem bizarre to me.With Easter coming up, I thought this would be a great recipe to share.If you have leftover ham....what a great idea. Christy Jordan (AKA Southern Plate) shared this recipe today and I thought it looked delicious. The recipe and photo come from Southern Plate. A great blog to check out. She is such a doll.

Christy Jordans' Ham Salad
2 cups chopped smoked or baked ham- diced as finely as you like
1/2 cup mayonnaise
1/4 cup sweet pickle relish
2 boiled eggs, peeled and chopped
1 teaspoon spicy brown mustard
pepper to taste (I usually don't add salt because the ham is salty, but add it if you like!)
        Chop up ham with a knife or food processor (however fine you want it to be). Place ham, mayonnaise, relish, mustard, and pepper in a bowl. Stir with spoon until well blended. Gently stir in chopped eggs. Serve on sandwiches, rolls, or crackers. Makes about three cups ham salad.
Wednesday, March 14, 2012

Blueberry Cream Cheese Pie

              Sorry my posts are coming late...this pregnancy thing is throwing everything off. Hope your day was great. In case you missed it..it was Pi day. Did you celebrate by making a pie? One of my friends asked for her friends to post their favorite pie recipe. I chose strawberry but..I came across this one. Now this uses the prepared pie filling but it is easy and a quick bake recipe. I found the recipe and photo on Tasty Kitchen. It was submitted by Nuttnhoney. Beautiful picture by her as well.


Blueberry Cream Cheese Pie
2 whole Pie Crusts, Unbaked
1 cup Ground Pecans
8 ounces, weight Cream Cheese, softened
2 cups Powdered Sugar, Sifted
1 pint Heavy Cream
1 teaspoon Vanilla
1 can Blueberry Pie Filling, 21 Ounce Can
     Preheat oven to 400 degrees F. Sprinkle ground pecans evenly into both pie crusts and bake for 8 minutes. Remove and cool completely before filling. You’re done with the oven. Soften cream cheese and add powdered sugar. Add heavy cream and beat briskly until soft peaks form. Add vanilla. Divide cream mixture evenly into pie crusts. Refrigerate for several hours.When you are ready to serve, spoon blueberry filling over tops of pies. Freezes well for several months.
Tuesday, March 13, 2012

P.W.'s Chopped Salad

          The weather is starting to warm up and salad and grilling season is around the corner. While thumbing through my fave blogs, I came across P.W.'s chopped salad. I truly love salad of any kind. This salad looks heavenly to me. Imagine the fresh flavors of summertime. Oh. My. Goodness. I could eat pounds of this..of course I would pay for it later but I digress. Who needs a salad bar?!?  The lovely photo and recipe are from Ree. Once again, I beg her to adopt me.
REE_3399

P.W.'s Chopped Salad
Greens
3 cups Mixed Salad Greens
3 cups Bibb Lettuce
8 whole Romaine Leaves
FIXINS
Grape Tomatoes, Halved
Kidney Beans, Drained And Rinsed
Garbanzo Beans, Drained And Rinsed
Pitted Mixed Olives
Sliced Or Diced Bell Pepper
Hard Boiled Eggs, Peeled And Sliced
Avocado, Sliced
Mushrooms, Sliced
Cheese, Grated
Fresh Mozzarella, Cubed
Cucumbers, Halved Then Sliced
Asparagus, Blanched And Sliced Into Pieces
Sunflower Seeds
Sliced Almonds
FOR THE DRESSING:
Dressings Of Your Choice
       Lay out different greens and all the fixins in small dishes. Have a big stainless bowl with tongs. Have everyone build their own salad by throwing what they want into the bowl. Toss with dressing, then pour tossed salad onto a cutting board. With two knives, quickly chop the salad so that it's chopped into smaller pieces. Transfer to a plate and sprinkle with a little salt and pepper.
Monday, March 12, 2012

Carla Hall's Slow Cooker Mac and Cheese

           I love watching "The Chew". Lately, they have been showcasing slow cooker recipes on their show. This one really caught my eye. For a few reasons. Slow Cooker recipe....Mac and Cheese and the actual prep on the show was HILARIOUS. If there is anything to take home from that it was to make sure ht noodles are COVERED COMPLETELY in liquid. Also, do not over cook the pasta ahead of time. It will be...not so good. A great slow cooker recipe. The recipe and photo are from "The Chew".


Carla Hall's Slow Cooker Mac and Cheese
1/2 lb Macaroni noodles (cooked to al dente)
2 cups Cheddar Cheese (grated)
2 cups Pepperjack Cheese (grated)
1 1/2 cups Half and Half
4 oz Cream cheese (half a stick) cut into small pieces
1 teaspoon Paprika
1 tablespoon Dijon
1 teaspoon Cayenne Pepper
1 teaspoon Salt
1/2 teaspoon Black pepper
1 egg
       In a mixing bowl combine cream cheese, egg, Dijon, paprika, cayenne, salt, pepper and milk. Whisk to combine. Put cooked pasta into the slow cooker. Add both cheeses and mix together. Pour egg and cream mixture over the pasta (milk should cover most of the pasta). Cook on low for 4-6 hours.    
Sunday, March 11, 2012

Tropical Granola

             A new week has begun. I can't believe how fast time goes. It seems like when I was a child, days would just drag. Summer days would last forever as would the cold winter nights. Now..I blink and my kids are no longer babies. They are turning into older children. The years pass by so quickly. All of the seasons go by quickly. I am almost 28 weeks in this pregnancy and I will be honest...it has flown by. I know that the last few weeks start to slow down but aside from sickness in the beginning, I have been blessed with a relatively normal pregnancy. I pray that it continues. I pray that my baby is born healthy and strong. So far, I have been blessed with healthy children. I know others that have not been as fortunate and for them my heart bleeds. I guess what I am trying to get at...cherish every moment. The hands of time do not slow down for anyone.
            Today's recipe comes from Quaker. I love oatmeal. I know I have told you that before. Apparently, I think it bears repeating. It is so versatile. From breakfast to snacks to dinner. Breads, muffins..desserts. There really is so much that you can do with oatmeal. Today we are going for the snack section. Tropical granola. Top your favorite yogurt and you have a snack that will sustain you until your next meal. Use it in ice cream or serve with milk for breakfast. Prep work is minimal. Give it a try.


Tropical Granola
3-1/2 cups Quaker® Oats (quick or old fashioned, uncooked)
1/3 cup coarsely chopped slivered almonds
2 tablespoons finely chopped crystallized ginger (optional)
1/2 cup honey
4 tablespoons (1/2 stick) butter or margarine, melted
1-1/2 to 2 teaspoons ground ginger
1/4 teaspoon salt
3/4 cup chopped dried tropical fruit mix
                Heat oven to 350°F. In large bowl, combine oats, almonds and, if desired, crystallized ginger; mix well. In small bowl, combine honey, butter, ground ginger and salt; blend well. Drizzle over oat mixture; mix well. Spread evenly in 15 x 10-inch jelly roll pan. Bake 18 to 20 minutes, stirring every 5 minutes. Remove from oven; immediately stir in dried fruit. Cool completely in pan on wire rack. Store in tightly covered container.
~~Serve with milk as a breakfast cereal, stir into low-fat yogurt, or sprinkle over fresh fruit, ice cream or frozen yogurt.
Friday, March 9, 2012

Mayan Chocolate Truffles

            Sorry my post is really, really late today. It was a beautiful day out and the boys were enjoying the sun and running around. I had my two week grocery shopping to do and I watched my sweet little niece. This is my 600th post. WOW! Who would have thought that I had that much to say and that many recipes that I wanted to try. I hope you have enjoyed my ranting and recipe sharing. I love to search the web and find new recipes to try and enjoy sharing them with you. Here's to 600 more!
            Todays recipe and photo come from Simply Scratch (one of my fave blogs). Mayan chocolate truffles. Chocolate with a kick! Have you ever had Mayan Hot Chocolate. It is SO good. A little bit of spice..a little bit of heat and a whole bunch of goodness. These truffles are dark, decadent and delicious. A must try for any chocoholic!
Tasty Kitchen Blog Mayan Chocolate Truffles

Mayan Chocolate Truffles
8 ounces, weight Dark Chocolate
½ cups Heavy Cream
¼ teaspoons Vanilla Extract
¼ teaspoons Cinnamon
⅛ teaspoons Cayenne Pepper
1 Tablespoon Coffee Or Coffee Flavored Liqueur
Optional Coatings: Powdered Sugar, Cocoa Powder, Toasted Coconut, Etc
         
             Cut up your chocolate as finely as you can (try to get uniform pieces so they will all melt the same, or you will be left with little chunks in the truffles). Place the chocolate into a heat safe bowl (I use a glass mixing bowl).
In a small saucepan, heat your cream just until it comes to a boil (bubbles will begin forming around the edges). Add the heated cream to the chocolate and allow to sit a few minutes.
Add in your vanilla, cinnamon, cayenne and coffee flavored liqueur (you could also use just a Tablespoon of regular fresh brewed coffee).
 * You do not have to add the cinnamon and cayenne, but I find it adds a nice flavor to the truffles.
               Whisk everything together until it is smooth. If you happen to have a few larger chunks, do not fear, you can place the bowl into the microwave for 10 seconds, then remove and stir again. Do this until your mixture is smooth, then allow the bowl to sit at room temperature for 1 hour (and good luck not “tasting” it every time you walk past for that hour).
             With a small spoon or cookie scoop, scoop out small balls of the truffle mixture and place on a cookie sheet (to avoid a huge mess I generally line my sheet with parchment or wax paper) and place these into the fridge for 30 minutes to set.
Thursday, March 8, 2012

Hunt's Arroz con Pollo y Frijoles Negro

             Huh?! Say what? What recipe are we doing today? Rice and chicken with black beans. Black beans are one of my faves. This recipe comes together in a snap, It takes about 20 minutes of prep and about the same time in cooking. I would change the chicken to breasts because I am not a drumstick fan but other than that this recipe is just about perfect. Of course you would need to adjust the cooking time a bit. If you wanted to add a little more spice you could sub in a can of Mexican Style tomatoes. The recipe and photo come from Hunt's Kitchen. Enjoy friends.


Hunt's Arroz con Pollo y Frijoles Negro
PAM® Original No-Stick Cooking Spray
6 bone-in skin-on chicken thighs or drumsticks (6 = 2-1/4 lbs)
1/2 teaspoon adobo seasoning blend
1 cup long-grain white rice, uncooked
1/4 cup sliced green onions, divided
1 can (8 oz each) Hunt's® Tomato Sauce
1 can (15 oz each) Rosarita® Premium Whole Black Beans, drained, rinsed
1-1/2 cups water
1 tablespoon caldo con sabor de pollo (chicken bouillon)
           Spray large skillet with cooking spray; heat over medium-high heat. Sprinkle chicken with adobo seasoning. Cook chicken 5 minutes per side or until lightly browned. Remove from skillet.
Add rice and half of onions to skillet. Brown in pan drippings over medium heat about 8 minutes, stirring constantly. Add tomato sauce, beans, water and bouillon. Stir until well blended. Place chicken on top of rice. Cover and simmer 20 minutes or until liquid is absorbed and rice is tender. Sprinkle with remaining onions.
Wednesday, March 7, 2012

Slow Cooker Taco Shredded Beef

           Busy day today but I didn't want to leave the blog unattended. There are days that I swear I run at the speed of light and barely get things accomplished. This recipe comes from Campbell's Kitchen. I got the photo from there as well. I love putting onion soup mix in with my beef while it is cooking in the slow cooker. I put it in my beef stew and my roasts. The flavor is amazing and it is so easy to do. Usually I make shredded beef tacos from my leftover roast beef. This recipe is simple. Instead of the mix, you just buy the can of soup. If you get it into the crock  pot in the morning, the beef will melt in your mouth and dinner will be a cinch. If you haven't used your crock pot in awhile, it is time to break it out. Now...I changed the recipe a bit. I added some chopped garlic, or you could add a little garlic powder. I added a can of diced tomatoes (Mexican Style) when I added the cilantro. You could add a can of diced green chili's as well. I would add the chili's while the beef cooks however. Use your imagination to make it your own. Have a great day! Happy cooking!

 
Slow Cooker Taco Shredded Beef
1 can (10 1/2 ounces) Campbell's® Condensed French Onion Soup
1 tablespoon chili powder
1/2 teaspoon ground cumin (I increased to 1 tsp.)
1 boneless beef chuck roast (about 2 pounds)
2 tablespoons finely chopped fresh cilantro leaves
16 taco shells
1 cup shredded Cheddar cheese (about 4 ounces)
Shredded lettuce
Sour cream
       Stir the soup, chili powder and cumin in a 4-quart slow cooker. Add the beef and turn to coat.
Cover and cook on LOW for 6 to 7 hours or until the beef is fork-tender. Remove the beef from the cooker to a cutting board and let stand for 10 minutes. Using 2 forks, shred the beef. Return the beef to the cooker. Stir the cilantro in the cooker. Spoon about 1/4 cup beef mixture into each taco shell. Top each with about 1 tablespoon cheese. Top with the lettuce and the sour cream, if desired.
Tuesday, March 6, 2012

Lucky You Mint Pie

           Yesterday, I had a severe case of Spring Fever. The weather here was just gorgeous. It was 60 degrees and the sun was out. I washed my car because I couldn't see out of the windows. The salt had made a beautiful deposit all over the windows. Everyone else in town had the same idea. There was quite a line. A fight even broke out between two well to do drivers that figured it was their turn next. They were grown men mind you. After the drama I came home and my two year old kissed my car when he got out. It must have been REALLY dirty before. Then I got a wild hair and I washed off my front porch. It had a few months of grime build up on it. While I was at it, I washed the windows and the shutters on the house. All of this knowing, that today, the weather was going to change. It sure felt nice to be outside and even if they only stay clean for a day or so...it was worth it.
           With the day of "green" approaching. I thought it would be fun to have of course a few holiday treats and foods in my arsenal. This one is for those of you that love the combination of mint and chocolate. This smooth and creamy pie is simple to make and will have your guests begging for the recipe. You can share your recipe if you wish, or just keep it to yourself. The recipe and photo are from Nestle. Enjoy my friends. I hope you have a wonderful day, no matter what the weather is.


Lucky You Mint Pie
1 cup (6 oz.) NESTLÉ® TOLL HOUSE® Semi-Sweet Chocolate Mini Morsels
1 can (12 fl. oz.) NESTLÉ® CARNATION® Evaporated Milk
1 tablespoon butter
1 prepared 9-inch (6 oz.) chocolate crumb crust
1 package (3.4 oz.) vanilla instant pudding and pie filling mix
1/3 cup water
1 teaspoon peppermint extract
3 to 4 drops green food coloring (optional)
1 container (8 oz.) frozen whipped topping, thawed, divided
Additional NESTLÉ® TOLL HOUSE® Semi-Sweet Chocolate Mini Morsels, fresh mint sprigs (optional)
           
        MICROWAVE 1 cup morsels and 1/3 cup evaporated milk in medium, uncovered, microwave-safe bowl on HIGH (100%) power for 45 seconds; stir until smooth. Stir in butter; pour into crust. Refrigerate for 20 minutes or until cool to the touch. MEANWHILE, BEAT remaining evaporated milk, pudding mix, water, peppermint extract and 3 drops food coloring in medium bowl until combined. Gently stir in 2 cups whipped topping and additional drop of food coloring, if desired. Spoon over chocolate layer. REFRIGERATE for 2 hours or until set. Sprinkle with additional morsels. Spoon remaining whipped topping in center of pie. Garnish with fresh mint.
Monday, March 5, 2012

Cream Cheese Pound Cake

            Did you know that yesterday was National Pound Cake day? Yeah me either. Sometimes I think they just make up days...But, I could use whatever excuse there is to eat a good cake. This recipe for an outrageously simple pound cake comes from Just a Pinch, as does the photo. Great with a steaming cup of hot coffee, a tall glass of milk or whatever else you may like. Serve with some fresh berries maybe some whipping cream. A great dessert that is simple and oh so delicious. Seven ingredients is all that it will take to make this great cake. Enjoy!
View Slideshow

Cream Cheese Pound Cake
6 eggs
2 stk butter, room temperature
2 c flour
2 c sugar
1 tsp baking powder
1/2 tsp vanilla extract
8 oz cream cheese
           Prepare A bundt pan by spraying with cooking spray. Making sure to get all of the edges. Preheat oven to 350. Mix sugar and butter very well. Add cream cheese and then add eggs one at the time, and mix it again. Add flour, baking powder, vanilla and mix well and ready to ready to bake. Preheat 350 F for abt 50 minutes or until golden brown.
 
 
Friday, March 2, 2012

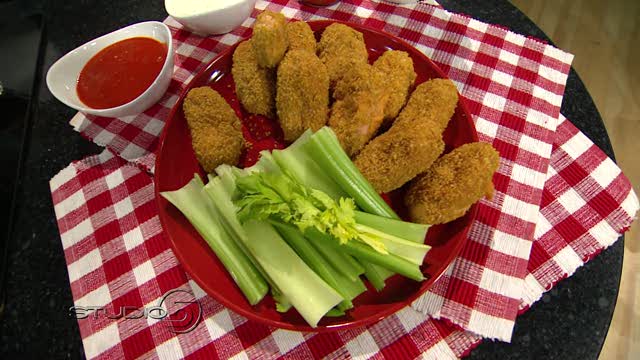
Buffalo Wing Chicken Poppers

              Today has been a crazy day. I am barely getting a recipe posted. Wheeww! This recipe comes from a local home show. If you love the flavor of buffalo wings but don't like to eat chicken from the bone..(guilty)..this one is a must try.


Buffalo Wing Chicken Poppers
1/2 cup flour
2 eggs, beaten
1 3/4 cups corn flake crumbs
3 cups shredded cooked chicken
1/3 cup Buffalo Wing hot sauce (more or less to taste)*
4 ounces cream cheese, softened
1 1/2 cups shredded sharp cheddar cheese
Celery sticks
Blue cheese or Ranch dressing
Additional Buffalo Wing sauce, optional dipping
Method:

Preheat oven to 350 degrees. Line baking sheet with parchment paper or spray with non-stick spray.

Place flour, beaten eggs and corn flake crumbs in three separate bowls. Set aside. Mix together well the shredded chicken, hot sauce, softened cream cheese and cheddar cheese. Shape into 24 chicken wing shaped bit-size logs (or 1 1/2 -inch balls). Roll poppers in flour, dip in egg then roll in corn flake crumbs (to reduce dipping mess - first roll all poppers in flour, then begin to dip in egg and roll in crumbs). Place poppers on prepared baking sheet. Bake 20-25 minutes or until lightly browned and crisp on the outside. Serve warm, dipped in additional wing sauce, blue cheese dressing or ranch dressing and enjoy with cool celery sticks.
Thursday, March 1, 2012

Streusel-Topped Blueberry Muffins

           My kids love muffins for breakfast. Usually it is a weekend thing around here. Because let's be honest..just getting them to school some days is an enormous task, let alone making muffins. The best place I have found to by these super berries is usually Costco. The girls at Our Best Bites have this recipe on their site. I do not believe it is in their cookbook however. I have their lovely book and use it all of the time. I love them. Their recipes make me happy. Take one look at these babies and tell me that it doesn't make you want a muffin. I sure do. Maybe this weekend. Your family will thank you. Your neighborhood will thank you. Trust me. The heavenly smell wafting through your house will travel outside and tickle their noses. And who does like a muffin?! Enjoy my friends.
              One thing...if you have a dark or non stick pan you may have to decrease your temperature. I have a few muffin pans and when I use the dark pan I have to cook my muffins at about 365 for the same amount of time. Every oven is different. I would hate for you to go through all of this work and have burned muffins on the bottom. It ruined many a good muffin in my house before I figured this out. Keep that in mind.


Streusel-Topped Blueberry Muffins
Recipe and photo from Our Best Bites

1 3/4 c. all-purpose flour
2 3/4 tsp. baking powder
3/4 tsp. table salt
1/2 c. sugar
2 tsp. grated orange or lemon peel
1 large egg
3/4 c. buttermilk
1/3 c. canola oil
1 c. fresh or frozen blueberries
1 Tbsp. flour
1 Tbsp. sugar
Streusel Topping1/4 c. sugar
2 1/2 Tbsp. flour
1/2 tsp. cinnamon
1 1/2 Tbsp. butter
          Preheat oven to 400 degrees. Lightly spoon the flour into measuring cups and level with with a knife and combine it in a large bowl with the baking powder, salt, sugar, and citrus peel. Make a well in the center of the mixture. In a smaller bowl, whisk together the egg, buttermilk, and oil. Add to the dry ingredients, stirring just until moistened.
         In a small bowl, combine the remaining flour and sugar and then toss the blueberries in this mixture until they are well-coated (this will help prevent them from sinking to  the bottom, keep them seperated). Gently fold the blueberry mixture into the batter. Spoon the batter into lined muffin tins, filling 2/3 full.
          To make the streusel topping, combine the 1/4 c. sugar, 2 1/2 Tbsp. flour, and cinnamon. Cut in the butter with a pastry cutter or two butter knives until the mixture is crumbly. Sprinkle over the batter and bake for 18 minutes or until the tops are golden and a toothpick inserted into the center of one of the muffins comes out clean. Remove from oven and allow to cool in the pan for 5 minutes and then transfer to a cooling rack. Makes 12 muffins

Followers