Search This Blog

Monday, August 27, 2012

Frozen Strawberry Lemonade

          I wish I would have taken a picture of my frozen concoction yesterday but they were devoured before I could get the camera out. I will make them again soon and take some pictures...until then you all will have to use your imaginations on what it looks like. It was a simple frozen lemonade recipe from my grandmother that I tweaked just a little. I used some fresh strawberries that I had frozen awhile back. You could use raspberries, blueberries or whatever else you could think of. You have to try this. The strawberries added an added sweetness that can't be beat. I got my lemons from Costco, so they were large lemons. Here's a picture.....as you can tell...I am not a photographer. :)


Frozen Strawberry Lemonade
Juice of 4 lemons (mine were fairly large lemons)
1 1/2 c to 2 cups sugar (start with less and adjust if necessary)
ice
water
frozen strawberries (I used about 5 berries)
      Juice the lemons and add to blender. Add in your sugar. Fill lender with ice then add enough water to fill blender. Blend until ice is slushy. Add in your berries and pulse until blended. This made four 12 oz glasses. This drink is great with out the berries as well. So refreshing on a hot summer day.
Friday, August 24, 2012

No Roll Mexican Rice Enchiladas

            We love Mexican style food at our house. Any new recipe is a welcome addition to my recipe box. This recipe from Betty Crocker is so versatile that you could add chicken, turkey or beef (although I would prefer the meatless version). You could customize the rice to whatever you had on hand. I used regular rice and added a can of Mexican style tomatoes to cook the rice in. I also prefer black beans. If you love Mexican food, give these a try. The photo and recipe are from Betty Crocker.
No-Roll Mexican Rice Enchiladas

No-Roll Mexican Rice Enchiladas
1 box (6.4 oz) rice and vermicelli mix with Spanish seasonings
2 tablespoons butter or margarine
2 1/4 cups water  
1 can (19 oz) Old El Paso® mild enchilada sauce
1 can (16 oz) pinto beans, drained, rinsed
1  can (11 oz) Green Giant® SteamCrisp® Southwestern style corn, drained
1 package (8.2 oz) flour tortillas for soft tacos & fajitas (ten 6-inch tortillas)
2 cups finely shredded Mexican cheese blend (8 oz)
      Spray 13x9-inch (3-quart) glass baking dish with cooking spray. In 12-inch nonstick skillet, cook rice and vermicelli with butter over medium heat until rice mixture is golden brown, stirring frequently. Stir in water and seasoning mix from rice box. Heat to boiling. Cover; reduce heat to low. Cook 15 to 20 minutes or until rice mixture is tender. Stir in 1/2 cup of the enchilada sauce, the pinto beans and corn. Heat oven to 350°F. Place about 1/2 cup rice mixture on center of each tortilla; top rice mixture in each tortilla with about 1 tablespoon of the cheese. Fold each in half. Arrange tortillas in 2 rows of 5 in baking dish, placing tortillas open end up, slanting and overlapping. Pour remaining enchilada sauce evenly over enchiladas. Cover tightly with foil.
             Bake 30 to 35 minutes or until hot and sauce begins to bubble. Uncover; sprinkle with remaining cheese. Bake uncovered about 5 minutes longer or until cheese is melted.
 

Tips****

*Enchiladas can be assembled earlier in the day. Pour the enchilada sauce over the enchiladas just before baking. Refrigerate enchiladas and sauce until just before baking. Enchiladas may need to bake 5 to 10 minutes longer.
*One can (15.25 oz) Green Giant® whole kernel sweet corn, drained, can be used instead of the Southwestern style corn. One can (15 oz) black beans, drained and rinsed, can be used in place of the pinto beans.
*One and a half cups finely chopped cooked chicken can be used in place of the beans.
Monday, August 20, 2012

Zucchini Oat Dark Chocolate Chip Cookies

           This has been one LONG hot summer. The weather has been unseasonably warm and we have had more than our shares of wildfires. It has been so dry. To top that off we have a new baby and my husband started a new job. He will normally work the day shift but has been on grave shift for almost two months. It has not been easy keeping 5 children quiet while my husband tries to sleep. It threw a wrench in the entire summer. I am so thankful for him and I am thankful for his job but oh how I loathe grave shift. The kids go back to school tomorrow and they are excited....not as excited as their mother but excited. Coincidentally, my husband is now off grave shift. Life will be getting back to  "normal"...I hope. I thought I would brave church yesterday with all 5 kids. I have never had so many people give me that "I feel for you" look. But, we made it....and that's all that counts. Small blessings!
           Are you being over run with zucchini? It is that time of year when people are scrambling trying to figure out what else they could possibly make with zucchini. I stumbled on this recipe at Tollhouse and was intrigued. I love squash of all kinds..my hubby, doesn't prefer squash. I try and sneak it in when at all possible. Loaded with fiber and vitamins it makes it well worth it. Now here's the thing If you are making theses you need to have it grated pretty fine or you need to peel it. My food processor gates pretty coarsely and I was pretty much flossing with the zucchini. This cookie incorporates oats which adds a great texture, along with some spices (I added nutmeg and cloves) and dark chocolate but you could use whatever chocolate you have on hand. Photo and recipe are from Tollhouse.
Zucchini-Oat Dark Chocolate Chip Cookies

Zucchini Oat Dark Chocolate Chip Cookies
1 1/2 cups all-purpose flour
1 teaspoon ground cinnamon
1/4 tsp. ground nutmeg
1/4 tsp. ground cloves
1/2 teaspoon baking soda
1/2 cup (1 stick) butter, softened
3/4 cup granulated sugar
1 large egg
3/4 teaspoon vanilla extract
1 1/2 cups shredded zucchini (1 medium)
1 cup quick oats
1 cup chopped nuts
1 2/3 cups (10-oz. pkg.) NESTLÉ® TOLL HOUSE® Dark Chocolate Morsels

PREHEAT oven to 350° F. Lightly grease baking sheets.
COMBINE flour, cinnamon, nutmeg, cloves and baking soda in small bowl. Beat butter, sugar in large mixer bowl until well combined. Add egg and vanilla extract, beat well. Add zucchini; gradually beat in flour mixture. Stir in oats, nuts and morsels. Drop by rounded teaspoon 2 inches apart onto prepared baking sheets.
BAKE for 9 to 11 minutes or until light golden brown around edges. Cool on baking sheets for 2 minutes; remove to wire rack to cool completely. Store in tightly covered container at room temperature.
Monday, August 13, 2012

Fresh Apricot Syrup

            Back when I was young and carefree....a LONG time ago, my grandparents had an apricot tree. That tree produced HUGE apricots. My grandmother would make homemade apricot jam. I loved to help her. I was about 3 years old and I had her recipe memorized. I can remember sitting on the counter at their little farmhouse helping her. I suppose my love for cooking started way back then. The best thing about homemade jams and syrups is that you can control the sugar. I love a little bit of tang to my apricot jam. Another memory of my grandmother and apricots...many years later when I was in high school, she would make french toast for me....everyday.Topped with apricot syrup. I appreciated her making me breakfast but at about the halfway point in the school year, I had to tell her that I just couldn't handle french toast one more day. The tree has been cut down for a long time but the memories that came from the fruit that it produced are priceless. Interestingly enough...french toast remains my favorite breakfast and apricot jam and syrup is still my fave as well. Just not everyday.
             This recipe and photo come from Grandmas Kitchen not my grandmas but someones grandma. After all, don't grandmas know best?!
Grandma made this syrup every year when her friends from the Northwest shipped her fresh apricots.
Fresh Apricot Syrup
5 1/2 pounds apricots
1 cup water
3 tablespoons fresh lemon juice
4 cups granulated sugar
Peel the apricots. Cut in half and remove the pits. Process apricots in a blender until pureed.Combine apricot puree, water and lemon juice in a large saucepan. Bring to a boil over medium-high heat, stirring frequently. Add granulated sugar to apricot mixture and stir until sugar is dissolved. Bring to a boil. Boil for 10 minutes; remove from heat. Skim foam from surface and discard. Spoon syrup into 4 hot sterilized 1-pint jars, leaving 1/2-inch headspace. Seal with 2-piece lids. Process in hot water bath for 5 minutes.  Makes 4 (1-pint) jars. Serve over waffles, pancakes, pound cake or ice cream.


Friday, August 10, 2012

PW's Good Morning Muffins

         School is starting soon. Am I the only mama doing the happy dance? The kids are bored and are ready to go back and I am ready to get my life back on a schedule and have a few hours of breathing room. Maddox starts Kindergarten this year which is always bittersweet. I try and hold back tears until after they have gone into their class. That way I am the only one that is traumatized by the fact that my baby is growing up too fast. That being said, WAHOOO! I love them but I love them even more when I get a break from them. Not to mention the grocery shopping will be a little..OK a lot easier. It has been a crazy summer, new baby, hubby has a new job and has been working shift work (hopefully that will stop and he will get a set schedule..graves are NOT fun for anyone). I hope your summer has been going well and that you are enjoying these last few weeks.
         My kids all LOVE muffins for breakfast. Blueberry, Cinnamon, Chocolate Chip...it doesn't matter to them. Not the healthiest breakfast around I know but once a week I let them splurge. When I don't feel like making muffins or I don't have the time I usually pull some gigantic muffins out of the freezer that we bought at Costco. I can split those babies in half easily. As you all know I have a mild obsession with Ree Drummond. I love her. My fave Saturday morning pastime is watching her cooking show. Although, I have helpers usually..thank goodness for DVR is all I have to say. She inspires me to cook, to be more self sufficient, be a better mother and enjoy life.  If I am in need of a good recipe, I go to her cookbooks or her website. These muffins look beautiful and taste delicious. A big thank you to PW for the great recipes. The photo is from Ree as well.
REE_3503
Good Morning Muffins
Muffin Batter:
4 cups Flour
1/2 cup Sugar
2 Tablespoons Baking Powder
1/2 cup Shortening (can Use 1/4 Cup Shortening With 1/4 Cup Butter)
2 cups Orange Marmalade
1 cup Orange Juice
1 teaspoon Vanilla
2 whole Eggs Beaten

Topping Ingredients:
3/4 cups Sugar
1 teaspoon Cinnamon
1 teaspoon Nutmeg
1 Tablespoon (plus 1 Teaspoon) Melted Butter
1/4 teaspoon Salt
Wheat Germ (optional)

Preparation Instructions

Preheat oven to 375 degrees. Sift together flour, sugar, and baking powder. Place in a mixing bowl. Use a pastry cutter to mix in shortening (or butter/shortening if desired). Mix marmalade, orange juice, and vanilla in a small bowl. Pour into dry ingredients. Beat eggs and pour into the bowl. Mix all ingredients together gently, using fewer than 10 large strokes. In a small bowl, mix topping ingredients. Fill muffin pans with batter. Sprinkle 1 heaping teaspoon of topping ingredients over each muffin. Sprinkle wheat germ over the top for extra crunch.
Bake for 20 to 22 minutes until done. Remove from pan and cool on wire rack. Eat warm or at room temperature.
Monday, August 6, 2012

Slow Cooker Rotisserie Chicken

           This recipe has been floating around Pinterest the last couple of days and when I stumbled on it I was both intrigued and skeptical. No chicken I have ever cooked in the crock pot has looked like this...EVER! I thought I would give it a try BUT I had to modify it. I did not have the whole chicken required because I don't eat chicken off of the bone..I know I am strange,,,, so..I did chicken breasts. I made the paste, rubbed it on and tossed it in the crock pot. Now the recipe doesn't call for any water or liquid at the bottom but since I was doing breast only I threw in a little bit of water (I would say about an inch or so in the the bottom of the crockpot) but you could use a little broth if you have it.. After a few hours, I peeked through the lid, because we all know the cardinal rule of slow cooking...."Don't open the lid!". It was not looking promising. BUT...after a few more hours, the aroma began permeating the house and it started to smell good. At the end of cooking time almost all of the liquid had evaporated. Now the breasts looked a little dry. I put a pat of butter on each because...you can't go wrong with butter.
                The true test was coming up...the family. My kids devoured it and my husband said that he couldn't believe how much it smelled like and tasted like turkey. I don't get that part BUT he loves turkey so I will take that as a compliment. The leftovers we shredded into a green salad the next day but you could make this into a variety of yummy things. The recipe and photo are from Busy-mommy.com. I HIGHLY recommend this one, it is tasty. You probably already have all of the ingredients in your pantry and freezer.
img_6379sigl
Slow Cooker Rotisserie Chicken
1 broiler/fryer chicken (3.5-4 lbs)
2 Tbsp Paprika (I used smoked)
1/2 tsp. cayenne pepper (optional!)
1 1/2 tsp onion powder
2 Tbsp garlic powder or 3 cloves garlic
1 tsp salt
1/2 tsp black pepper
(I added about 1 teaspoon of Season salt)
I also sliced up an onion for the bottom of the crockpot
   Start by removing the giblets and neck if you have a full chicken. No one wants those on their plate. Place all of your ingredients in a small bowl and stir in water by the teaspoon until a paste forms. Spray your slow cooker with cooking spray and place the chicken in, breast side up. I hate the look and feel of raw chicken, but trust me- it will be good when it’s done. Coat the chicken inside and out with the paste. Cover and cook on low 6-7 hours or on high 3.5-4.5 hours ( I added a little water to the bottom of the crock pot). Make sure the thickest part of the thigh registers at 180 degrees. Wow, how simple is that?
Monday, July 30, 2012

Baked Chicken Fries

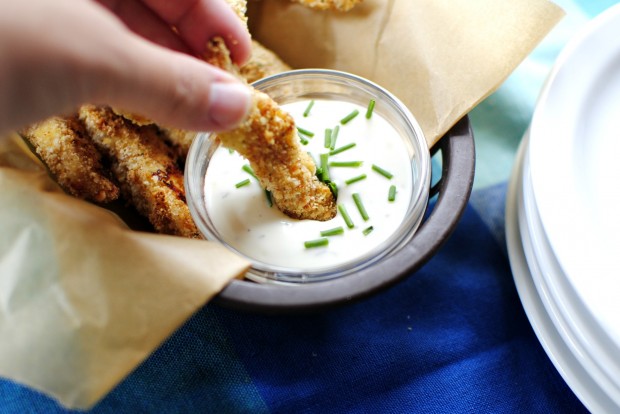
           Getting my footing under me with 5 kids home is proving more difficult than I originally thought. I apologize that my postings are so sporadic. Maybe when school is in (3 weeks and YES I am counting) things will calm down. Simply Scratch posted this recipe and I adore it. I am always looking for chicken recipes and more importantly...ones my kids will eat. I cheated and bought my chicken already cut from the butcher because I HATE handling raw chicken. Easy recipe with very minimal ingredients. Simple and delicious. AND They are baked! You can find the Panko bread crumbs either in your ethnic foods section or by the other bread crumbs at your local grocer. Happy Monday friends...Enjoy. A big thank you to Simply Scratch...she always seems to have the best recipes and the most beautiful photos. The photo I used is from her as well. I include a link to her Homemade Ranch Dressing at the bottom.


Baked Chicken Fries
6 Chicken Breast Halves, cut into 1/2 inch strips
1 cup Panko Japanese Breadcrumbs
1 cup Italian Breadcrumbs
1 cup Freshly Grated Parmesan Cheese
2 whole Eggs
1/2 cup Buttermilk
1/2 teaspoon Fresh Cracked Black Pepper
A couple pinches of Kosher Salt, for sprinkling
   
Preheat your oven to 400 degrees and line a rimmed baking sheet. In a food processor {I love my mini one!}; combine the Panko breadcrumbs with the freshly grated Parmesan cheese. Pulse until the cheese and Panko are combined. In a medium dish whisk together the egg, black pepper and buttermilk. Working in batches, dunk the strips of chicken into the egg mixture and let any excess drip off.  Place the coated chicken into the breadcrumbs and coat generously, pressing the crumbs into the chicken. Arrange on the prepared baking pan and slide them into the preheated oven for 15-20 minutes. They should come out golden and crispy.
Serve with homemade ranch or blue cheese dressing. Enjoy!
 Here's the link~http://www.simplyscratch.com/2011/05/buttermilk-ranch-dressing.html

Followers