Search This Blog

Friday, March 9, 2012

Mayan Chocolate Truffles

            Sorry my post is really, really late today. It was a beautiful day out and the boys were enjoying the sun and running around. I had my two week grocery shopping to do and I watched my sweet little niece. This is my 600th post. WOW! Who would have thought that I had that much to say and that many recipes that I wanted to try. I hope you have enjoyed my ranting and recipe sharing. I love to search the web and find new recipes to try and enjoy sharing them with you. Here's to 600 more!
            Todays recipe and photo come from Simply Scratch (one of my fave blogs). Mayan chocolate truffles. Chocolate with a kick! Have you ever had Mayan Hot Chocolate. It is SO good. A little bit of spice..a little bit of heat and a whole bunch of goodness. These truffles are dark, decadent and delicious. A must try for any chocoholic!
Tasty Kitchen Blog Mayan Chocolate Truffles

Mayan Chocolate Truffles
8 ounces, weight Dark Chocolate
½ cups Heavy Cream
¼ teaspoons Vanilla Extract
¼ teaspoons Cinnamon
⅛ teaspoons Cayenne Pepper
1 Tablespoon Coffee Or Coffee Flavored Liqueur
Optional Coatings: Powdered Sugar, Cocoa Powder, Toasted Coconut, Etc
         
             Cut up your chocolate as finely as you can (try to get uniform pieces so they will all melt the same, or you will be left with little chunks in the truffles). Place the chocolate into a heat safe bowl (I use a glass mixing bowl).
In a small saucepan, heat your cream just until it comes to a boil (bubbles will begin forming around the edges). Add the heated cream to the chocolate and allow to sit a few minutes.
Add in your vanilla, cinnamon, cayenne and coffee flavored liqueur (you could also use just a Tablespoon of regular fresh brewed coffee).
 * You do not have to add the cinnamon and cayenne, but I find it adds a nice flavor to the truffles.
               Whisk everything together until it is smooth. If you happen to have a few larger chunks, do not fear, you can place the bowl into the microwave for 10 seconds, then remove and stir again. Do this until your mixture is smooth, then allow the bowl to sit at room temperature for 1 hour (and good luck not “tasting” it every time you walk past for that hour).
             With a small spoon or cookie scoop, scoop out small balls of the truffle mixture and place on a cookie sheet (to avoid a huge mess I generally line my sheet with parchment or wax paper) and place these into the fridge for 30 minutes to set.
Thursday, March 8, 2012

Hunt's Arroz con Pollo y Frijoles Negro

             Huh?! Say what? What recipe are we doing today? Rice and chicken with black beans. Black beans are one of my faves. This recipe comes together in a snap, It takes about 20 minutes of prep and about the same time in cooking. I would change the chicken to breasts because I am not a drumstick fan but other than that this recipe is just about perfect. Of course you would need to adjust the cooking time a bit. If you wanted to add a little more spice you could sub in a can of Mexican Style tomatoes. The recipe and photo come from Hunt's Kitchen. Enjoy friends.


Hunt's Arroz con Pollo y Frijoles Negro
PAM® Original No-Stick Cooking Spray
6 bone-in skin-on chicken thighs or drumsticks (6 = 2-1/4 lbs)
1/2 teaspoon adobo seasoning blend
1 cup long-grain white rice, uncooked
1/4 cup sliced green onions, divided
1 can (8 oz each) Hunt's® Tomato Sauce
1 can (15 oz each) Rosarita® Premium Whole Black Beans, drained, rinsed
1-1/2 cups water
1 tablespoon caldo con sabor de pollo (chicken bouillon)
           Spray large skillet with cooking spray; heat over medium-high heat. Sprinkle chicken with adobo seasoning. Cook chicken 5 minutes per side or until lightly browned. Remove from skillet.
Add rice and half of onions to skillet. Brown in pan drippings over medium heat about 8 minutes, stirring constantly. Add tomato sauce, beans, water and bouillon. Stir until well blended. Place chicken on top of rice. Cover and simmer 20 minutes or until liquid is absorbed and rice is tender. Sprinkle with remaining onions.
Wednesday, March 7, 2012

Slow Cooker Taco Shredded Beef

           Busy day today but I didn't want to leave the blog unattended. There are days that I swear I run at the speed of light and barely get things accomplished. This recipe comes from Campbell's Kitchen. I got the photo from there as well. I love putting onion soup mix in with my beef while it is cooking in the slow cooker. I put it in my beef stew and my roasts. The flavor is amazing and it is so easy to do. Usually I make shredded beef tacos from my leftover roast beef. This recipe is simple. Instead of the mix, you just buy the can of soup. If you get it into the crock  pot in the morning, the beef will melt in your mouth and dinner will be a cinch. If you haven't used your crock pot in awhile, it is time to break it out. Now...I changed the recipe a bit. I added some chopped garlic, or you could add a little garlic powder. I added a can of diced tomatoes (Mexican Style) when I added the cilantro. You could add a can of diced green chili's as well. I would add the chili's while the beef cooks however. Use your imagination to make it your own. Have a great day! Happy cooking!

 
Slow Cooker Taco Shredded Beef
1 can (10 1/2 ounces) Campbell's® Condensed French Onion Soup
1 tablespoon chili powder
1/2 teaspoon ground cumin (I increased to 1 tsp.)
1 boneless beef chuck roast (about 2 pounds)
2 tablespoons finely chopped fresh cilantro leaves
16 taco shells
1 cup shredded Cheddar cheese (about 4 ounces)
Shredded lettuce
Sour cream
       Stir the soup, chili powder and cumin in a 4-quart slow cooker. Add the beef and turn to coat.
Cover and cook on LOW for 6 to 7 hours or until the beef is fork-tender. Remove the beef from the cooker to a cutting board and let stand for 10 minutes. Using 2 forks, shred the beef. Return the beef to the cooker. Stir the cilantro in the cooker. Spoon about 1/4 cup beef mixture into each taco shell. Top each with about 1 tablespoon cheese. Top with the lettuce and the sour cream, if desired.
Tuesday, March 6, 2012

Lucky You Mint Pie

           Yesterday, I had a severe case of Spring Fever. The weather here was just gorgeous. It was 60 degrees and the sun was out. I washed my car because I couldn't see out of the windows. The salt had made a beautiful deposit all over the windows. Everyone else in town had the same idea. There was quite a line. A fight even broke out between two well to do drivers that figured it was their turn next. They were grown men mind you. After the drama I came home and my two year old kissed my car when he got out. It must have been REALLY dirty before. Then I got a wild hair and I washed off my front porch. It had a few months of grime build up on it. While I was at it, I washed the windows and the shutters on the house. All of this knowing, that today, the weather was going to change. It sure felt nice to be outside and even if they only stay clean for a day or so...it was worth it.
           With the day of "green" approaching. I thought it would be fun to have of course a few holiday treats and foods in my arsenal. This one is for those of you that love the combination of mint and chocolate. This smooth and creamy pie is simple to make and will have your guests begging for the recipe. You can share your recipe if you wish, or just keep it to yourself. The recipe and photo are from Nestle. Enjoy my friends. I hope you have a wonderful day, no matter what the weather is.


Lucky You Mint Pie
1 cup (6 oz.) NESTLÉ® TOLL HOUSE® Semi-Sweet Chocolate Mini Morsels
1 can (12 fl. oz.) NESTLÉ® CARNATION® Evaporated Milk
1 tablespoon butter
1 prepared 9-inch (6 oz.) chocolate crumb crust
1 package (3.4 oz.) vanilla instant pudding and pie filling mix
1/3 cup water
1 teaspoon peppermint extract
3 to 4 drops green food coloring (optional)
1 container (8 oz.) frozen whipped topping, thawed, divided
Additional NESTLÉ® TOLL HOUSE® Semi-Sweet Chocolate Mini Morsels, fresh mint sprigs (optional)
           
        MICROWAVE 1 cup morsels and 1/3 cup evaporated milk in medium, uncovered, microwave-safe bowl on HIGH (100%) power for 45 seconds; stir until smooth. Stir in butter; pour into crust. Refrigerate for 20 minutes or until cool to the touch. MEANWHILE, BEAT remaining evaporated milk, pudding mix, water, peppermint extract and 3 drops food coloring in medium bowl until combined. Gently stir in 2 cups whipped topping and additional drop of food coloring, if desired. Spoon over chocolate layer. REFRIGERATE for 2 hours or until set. Sprinkle with additional morsels. Spoon remaining whipped topping in center of pie. Garnish with fresh mint.
Monday, March 5, 2012

Cream Cheese Pound Cake

            Did you know that yesterday was National Pound Cake day? Yeah me either. Sometimes I think they just make up days...But, I could use whatever excuse there is to eat a good cake. This recipe for an outrageously simple pound cake comes from Just a Pinch, as does the photo. Great with a steaming cup of hot coffee, a tall glass of milk or whatever else you may like. Serve with some fresh berries maybe some whipping cream. A great dessert that is simple and oh so delicious. Seven ingredients is all that it will take to make this great cake. Enjoy!
View Slideshow

Cream Cheese Pound Cake
6 eggs
2 stk butter, room temperature
2 c flour
2 c sugar
1 tsp baking powder
1/2 tsp vanilla extract
8 oz cream cheese
           Prepare A bundt pan by spraying with cooking spray. Making sure to get all of the edges. Preheat oven to 350. Mix sugar and butter very well. Add cream cheese and then add eggs one at the time, and mix it again. Add flour, baking powder, vanilla and mix well and ready to ready to bake. Preheat 350 F for abt 50 minutes or until golden brown.
 
 
Friday, March 2, 2012

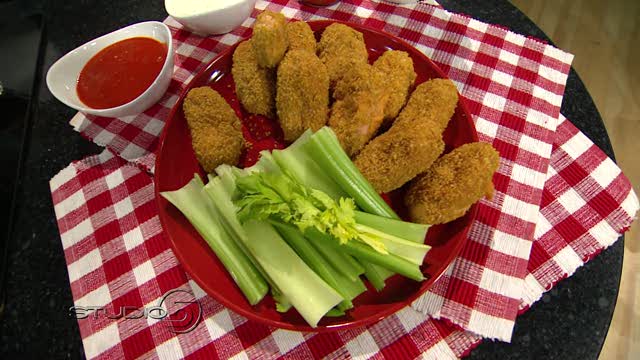
Buffalo Wing Chicken Poppers

              Today has been a crazy day. I am barely getting a recipe posted. Wheeww! This recipe comes from a local home show. If you love the flavor of buffalo wings but don't like to eat chicken from the bone..(guilty)..this one is a must try.


Buffalo Wing Chicken Poppers
1/2 cup flour
2 eggs, beaten
1 3/4 cups corn flake crumbs
3 cups shredded cooked chicken
1/3 cup Buffalo Wing hot sauce (more or less to taste)*
4 ounces cream cheese, softened
1 1/2 cups shredded sharp cheddar cheese
Celery sticks
Blue cheese or Ranch dressing
Additional Buffalo Wing sauce, optional dipping
Method:

Preheat oven to 350 degrees. Line baking sheet with parchment paper or spray with non-stick spray.

Place flour, beaten eggs and corn flake crumbs in three separate bowls. Set aside. Mix together well the shredded chicken, hot sauce, softened cream cheese and cheddar cheese. Shape into 24 chicken wing shaped bit-size logs (or 1 1/2 -inch balls). Roll poppers in flour, dip in egg then roll in corn flake crumbs (to reduce dipping mess - first roll all poppers in flour, then begin to dip in egg and roll in crumbs). Place poppers on prepared baking sheet. Bake 20-25 minutes or until lightly browned and crisp on the outside. Serve warm, dipped in additional wing sauce, blue cheese dressing or ranch dressing and enjoy with cool celery sticks.
Thursday, March 1, 2012

Streusel-Topped Blueberry Muffins

           My kids love muffins for breakfast. Usually it is a weekend thing around here. Because let's be honest..just getting them to school some days is an enormous task, let alone making muffins. The best place I have found to by these super berries is usually Costco. The girls at Our Best Bites have this recipe on their site. I do not believe it is in their cookbook however. I have their lovely book and use it all of the time. I love them. Their recipes make me happy. Take one look at these babies and tell me that it doesn't make you want a muffin. I sure do. Maybe this weekend. Your family will thank you. Your neighborhood will thank you. Trust me. The heavenly smell wafting through your house will travel outside and tickle their noses. And who does like a muffin?! Enjoy my friends.
              One thing...if you have a dark or non stick pan you may have to decrease your temperature. I have a few muffin pans and when I use the dark pan I have to cook my muffins at about 365 for the same amount of time. Every oven is different. I would hate for you to go through all of this work and have burned muffins on the bottom. It ruined many a good muffin in my house before I figured this out. Keep that in mind.


Streusel-Topped Blueberry Muffins
Recipe and photo from Our Best Bites

1 3/4 c. all-purpose flour
2 3/4 tsp. baking powder
3/4 tsp. table salt
1/2 c. sugar
2 tsp. grated orange or lemon peel
1 large egg
3/4 c. buttermilk
1/3 c. canola oil
1 c. fresh or frozen blueberries
1 Tbsp. flour
1 Tbsp. sugar
Streusel Topping1/4 c. sugar
2 1/2 Tbsp. flour
1/2 tsp. cinnamon
1 1/2 Tbsp. butter
          Preheat oven to 400 degrees. Lightly spoon the flour into measuring cups and level with with a knife and combine it in a large bowl with the baking powder, salt, sugar, and citrus peel. Make a well in the center of the mixture. In a smaller bowl, whisk together the egg, buttermilk, and oil. Add to the dry ingredients, stirring just until moistened.
         In a small bowl, combine the remaining flour and sugar and then toss the blueberries in this mixture until they are well-coated (this will help prevent them from sinking to  the bottom, keep them seperated). Gently fold the blueberry mixture into the batter. Spoon the batter into lined muffin tins, filling 2/3 full.
          To make the streusel topping, combine the 1/4 c. sugar, 2 1/2 Tbsp. flour, and cinnamon. Cut in the butter with a pastry cutter or two butter knives until the mixture is crumbly. Sprinkle over the batter and bake for 18 minutes or until the tops are golden and a toothpick inserted into the center of one of the muffins comes out clean. Remove from oven and allow to cool in the pan for 5 minutes and then transfer to a cooling rack. Makes 12 muffins

Followers