Search This Blog

Tuesday, December 27, 2011

Firecracker Wings

            It is hard to believe that the New Year is upon us. Do you plan on staying home or going out and painting the town? Are you  having a party or just an intimate gathering? My hubby and I usually never make it to midnight. Kids do that to you....especially small ones. I guess we could just celebrate midnight on the east coast.. That is 10 pm here. We may make it until then.
           If you are having a party these little wings would be a great appetizer or as an entree. One advantage that they have over regular buffalo wings is that they are dry, so no messy sauce. Of course you could serve with your favorite dipping sauces if desired. The heat comes from the pepper blend spice that you season the wings with. If you can't find the spice or don't have it on hand. There is a substitution at the bottom. Picture and recipe are from McCormick.


Firecracker Wings
Makes 6 (3-wing) servings.
Prep Time: 10 minutes
Cook Time: 30 minutes

1/2 cup plain bread crumbs
1 to 2 teaspoons McCormick® Hot Shot!® Black & Red Pepper Blend
1 teaspoon McCormick® Garlic Salt
2 pounds chicken wing pieces

      Preheat oven to 425 degrees F. Mix first 3 ingredients in large resealable plastic bag. Add chicken wings in batches; shake to coat well. Arrange chicken wings in single layer on large foil-lined shallow baking pan. Bake 30 minutes or until chicken is cooked through.

Substitution Tip: Prepare as directed, using 1 tablespoon McCormick® Chili Powder and 1/4 teaspoon each McCormick® Ground Black Pepper and Ground Red Pepper in place of the Pepper Blend.
Monday, December 19, 2011

Cheesy Bacon Potatoes

            Another side today. Cheesy Bacon Potatoes. Now, you can't tell me that just saying that recipe name  doesn't make your mouth water. I mean how could you go wrong. Creamy potatoes, gooey cheese and bacon. Doesn't bacon make EVERYTHING better? SO much better than the dried potatoes and powdered mix that comes in a box...and it is not very complicated. You deserve this.The recipe and photo came from just a pinch.

 Cheesy Bacon Potatoes

Cheesy Bacon Potatoes
6 potatoes, peeled and sliced
1/2 cup onion, diced
2 cups cheddar cheese, shredded
1 cup bacon, cooked and crumbled
2 cups milk
1/2 cup half and half
4 Tbs. butter
4 Tbs flour
salt and pepper
         Use a large pot. Saute chopped onions in butter till soft but not browned. In a small bowl, combine flour, salt and pepper. Stir flour mixture into onion mixture, add milk and half and half. Stir and cook over medium heat till mixture begins to thicken (about 3 minutes). Turn off heat.
Add 1 1/2 cups cheese to the sauce and stir till melted and smooth. Add sliced potatoes, bacon and stir well to combine. Pour mixture into a casserole dish sprayed with no stick spray. Cover with foil and bake at 350 for 35 minutes. Remove foil, sprinkle reserved cheese over top and return to oven to bake another 30 minutes or until potatoes are soft, cheese is melted and edges begin to brown. Let stand a few minutes before serving to allow sauce to thicken

Saturday, December 17, 2011

Sinas Hot Cocoa Mix

          What could be better on a cold winter day than a cup of Hot Cocoa? I have mentioned my sweet friend Sina before. This is one of her recipes. I thought that since I had posted Hot Chocolate Stirring Sticks yesterday, I would add a cocoa mix today. This would be great for a gift or for you just to have on hand. Sina said that if you store it in an airtight container, it would last six months. Keep in mind that this makes a lot but once you make homemade cocoa...the store bought stuff just won't do. You could vary the flavor a little by changing up the flavor of your non dairy creamer...cinnamon is the bomb. Thank you Sina!


Sinas Hot Cocoa Mix
10 2/3 cups instant nonfat dry milk
6 ounce jar powdered non dairy creamer
2 cups powdered sugar
16 ounce can instant chocolate drink mix

Combine all ingredients and mix well. Put in airtight container. Store in cool dry place for up to 6 months. 
        Now Sina didn't have prep instructions on her recipe. I added about 1/3 cup mix to a cup of boiling water. Make sure you give the dry mix a stir before scooping out your 1/3 cup. Of course you can add more or less depending on your taste.
Friday, December 16, 2011

Hot Chocolate Stirring Sticks

            Not really a recipe today but a very, very cute suggestion. Great for kids and a kid at heart. I love putting candy canes in my hot chocolate and this ide is super cute. The photos and recipe are from confessions of a cookbook queen. BTW her blog is hilarious! So, what are you waiting for?Get to it. You could make a ton of these in a short amount of time and be the rockstar of the neighborhood...well maybe not but you would be pretty cool.


Hot Chocolate Stirring Sticks
  1. Peppermint Candy Canes
  2. Marshmallows
  3. Chocolate Candy Coating
  4. Red and White Candy Coating
  5. Christmas Sprinkles
Gather up the goods. Unwrap the candy sticks and skewer two or three marshmallows on each. To make things easier, you can stick a knife through the marshmallows first, then push the candy through. Melt your chocolate according to package directions. (I like to put the chocolate in a mug or other small but deep container because it's easier for dipping.) Dip the marshmallow sticks in, and place on a wax paper lined baking sheet to set.Before the chocolate is set, melt the white and red candy and drizzle back and forth over the chocolate. Sprinkle immediately with Christmas sprinkles. To speed up the setting, you can place the Hot Chocolate Stir Sticks in the refrigerator.
Triple Decker Stir Sticks
Thursday, December 15, 2011

Pear Crunch Pie

            Pears are one of my most favorite fruits. Watching "The Chew" today, Clinton shared his grandmothers Pear Crunch Pie. HEAVEN! I may just have to bump the Dutch Apple Pie for Christmas and have this instead. sigh. I HAD to share it on here. Now, make sure if using canned pears that you use the best quality pears and preferably canned in pear juice not heavy syrup. Be prepared to oooh and ahhh your guests. Thank you to Clinton and his grandma! Mmmm!


Pear Crunch Pie
FOR THE CRUST:
1 stick of butter
¼ cup light brown sugar
1 cup flour
½ cup sweetened coconut
.FOR THE FILLING:
½ cup light brown sugar
1/3 cup flour
Hearty pinch of salt
¾ cup cup of pear juice (not pear nectar)
¾ cup whole milk
2 egg
½ teaspoon vanilla extract
2 tablespoon butter
.FOR THE WHIPPED CREAM:
8 ounce heavy cream
1 teaspoon confectioners sugar
dash of vanilla extract
.FOR THE GARNISH:
6 pear halves
cinnamon for dusting
           FOR THE CRUST: Combine all ingredients and bake at 350 degrees F on cookie sheet until golden brown (about 40-45 minutes). Check frequently to prevent edges from burning. When cool press into a pie plate. Crust should be crumbly when complete.     
            FOR THE FILLING: Combine all ingredients in (except eggs) a saucepan over medium heat and bring to a boil. In large bowl, beat 2 eggs. Add heated mixture to eggs, little by little to temper the eggs. Once eggs are tempered, transfer mixture back to saucepan. Add 2 tablespoons of butter and ½ teaspoon of vanilla extract and return to a boil (approximately 1 minute). Pour warm mixture into prepared pie shell and chill in the refrigerator.
           FOR THE WHIPPED CREAM: Whip the heavy cream with the confectioners sugar and vanilla until it stiffens to whipped cream. Before serving, top with the whipped cream.
           TO GARNISH: Top with 6 pear halves and dust with cinnamon. NOTE: If pears aren’t ripe enough, use canned pears or poach pears in a simple syrup of equal sugar and water.

Wednesday, December 14, 2011

Holiday Tree Brownies

            I am making these cute and easy Christmas Trees for Maddoxs' Preschool class. One pan will make enough for his entire class and they are SO cute. The recipe and photo are from Betty Crocker. Give these a try...If you didn't want to use a box you could of course use your own recipe from scratch. Just make sure they are a nice dense brownie to hold their shape. One reader suggested putting them in the freezer for an hour before cutting. Also the candy cane inserts easier if you use the side that wasn't against the pan while baking. Enjoy!
Holiday Tree Brownies

Holiday Tree Brownies
1  box (1 lb 2.4 oz) Betty Crocker® Original Supreme Premium brownie mix                 
Water, vegetable oil and egg called for on brownie mix box
2 or 3 drops green food color
2/3  cup Betty Crocker® Rich & Creamy vanilla frosting (16 oz. container)                                      
Betty Crocker® Decorating Decors red and green candy sprinkles or miniature candy-coated chocolate baking bits
Miniature candy canes (2 inch), unwrapped
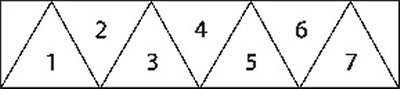
                Heat oven to 350°F (325°F for dark or nonstick pan). Line 9-inch square pan with foil so foil extends about 2 inches over sides of pan. Grease bottom only of foil with cooking spray or shortening. Make and bake brownie mix as directed on box. Cool completely, about 1 1/2 hours. Remove brownie from pan by lifting foil; peel foil away. To cut brownie into triangles, cut into 3 rows. Cut each row into 5 triangles, see diagram. Save smaller pieces for snacking. Stir food color into frosting. Spoon frosting into small resealable food-storage plastic bag; partially seal bag. Cut off tiny bottom corner of bag. Squeeze bag to pipe frosting over brownies. Sprinkle with decors. Break off curved end of candy cane; insert straight piece into bottoms of triangles to make tree trunks.


Tuesday, December 13, 2011

Chocolate Chip Muffins

          My kids love chocolate chip muffins. Box mixes can get pricey unless you stock up while they are on sale. This recipe is about as quick as the box and tastes better. You could omit the nuts if you prefer. My kids just like plain old chocolate chip muffins. I have two muffin pans, the reason I tell you this is not for bragging rights..is there such a thing? Anyway, one is light colored and one is really dark non stick. On the box recipes it says to bake at 425. My dark pan burns the muffins in minutes. I have to decrease the temp. to 360 to get them to come out decent. The point I was making...is, if you have a dark pan you may need to decrease either the temp or the time to avoid burning your muffins and who wants burned muffins? Watch them closely. The recipe and photo came from Food.com
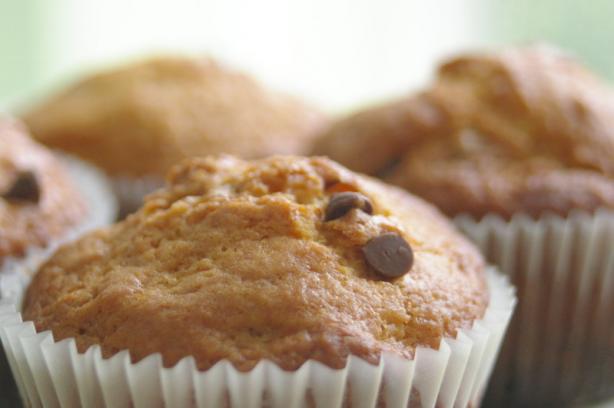
Chocolate Chip Muffins. Photo by Redsie

Chocolate Chip Muffins
2 cups all purpose flour
1/3 cup light brown sugar, packed
1/3 cup sugar 
2 teaspoons baking powder 
1/2 teaspoon salt
2/3 cup milk
1/2 cup butter, melted and cooled
2 eggs, lightly beaten
1 teaspoon vanilla 
1 (11 1/2 ounce) package milk chocolate chips
1/2 cup walnuts or 1/2 cup pecans, chopped
         Preheat oven to 400°F. (I decreased my temp to 360) remember that it all depends on your pan.  Grease twelve muffin cups or line with papers. In a large bowl, stir together flour, sugars, baking powder, and salt. In another bowl, stir together milk, eggs, butter, and vanilla until blended. Make a well in center of dry ingredients. Add milk mixture and stir just to combine.Stir in chocolate chips and nuts. Spoon batter into prepared muffin cups. Now bake for 15-20 minutes (mine was about 20 minutes) or until a cake tester inserted in center of one muffin comes out clean. Remove muffin tin to wire rack. Cool for 5 minutes. Remove from to tins to continue cooling. Serve warm or cold. These muffins freeze well.

Followers