Search This Blog

Monday, November 14, 2011

Homemade Jellied Cranberry Sauce

            What would the holidays be without cranberries? At our house, we love cranberries. Now you can buy the cranberries in the can, (we like those as well) or you can make your own. The recipe is not difficult and only requires a few ingredients. By a few I mean 3. You can do it. Give it a try. There are some fancy recipes out there with zest and other things in them but this is just a basic recipe. The photo and recipe are from Ocean Spray!. They have some great recipes on there for the holidays. This is for a smoother type sauce which, I prefer, over the whole berries.


Homemade Jellied Cranberry Sauce
1 cup sugar
1 cup water
1 12-ounce package Ocean Spray® Fresh or Frozen Cranberries
          Combine sugar and water in a medium saucepan. Bring to a boil; add cranberries, return to a boil. Reduce heat and boil gently for 10 minutes, stirring occasionally. Place a wire mesh strainer over a medium mixing bowl. Pour contents of saucepan into strainer. Mash cranberries with the back of a spoon, frequently scraping the outside of the strainer, until no pulp is left.  Stir contents of bowl. Pour into serving container. Cover and cool completely at room temperature. Refrigerate until serving time. 
Makes 1 cup.
Saturday, November 12, 2011

Herb Roasted Turkey Breast

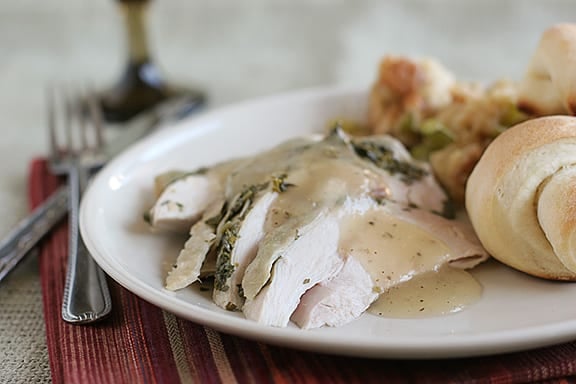
          I am re posting this recipe from a blog that I fell in love with over a year ago. I shared it on my FB page but for those that don't follow by way of FB, I wanted to share this wonderful recipe from Taste and Tell. This recipe is perfect if you are intimidated by cooking a full size turkey, if you have just a small family, OR if you are like my house and your family doesn't eat the dark meat off of the bird. Usually, we would find a new home for the dark meat. My brother loved it. Since that won't be happening for a few years, I needed to think of something different. I came to realize that if I were to cook a full sized bird, even if it were small,  it wasn't going to be cost effective. Partly because you pay by the pound and I would be paying for all of the bone and not to mention it would be a waste of the meat. I can't bear to do that. So, Turkey Breast it IS!
           This beautiful recipe is so simple. The herbs and the butter make for great tasting and super moist meat. The key is to let the meat rest before slicing. I have never used an apple when roasting turkey. I have used an orange or lemon before, which tastes amazing. What a tasty way to make turkey. She did a fantastic job with both the recipe and photo. I can't thank her enough for saving my Thanksgiving this year. You can find the turkey breasts in your grocers meat section. Give this one a try, if not for Thanksgiving, then for a great Sunday meal.


Herb Roasted Turkey Breast
1 bone-in turkey breast, 6-8 lbs.
4 tablespoons butter, softened
2 tablespoons fresh flat leaf parsley, chopped
1 tablespoon fresh rosemary, chopped
1 tablespoon fresh sage, chopped
1 tablespoon fresh thyme, chopped
1 apple, quartered
1 onion, quartered
1 tablespoon flour
½ cup chicken stock
       Preheat the oven to 350F. Rinse and dry the turkey breast. Gently pull the skin up from the breast, creating a pocket. In a small bowl, combine the butter and the herbs. Mix together completely. Using your hands, press the butter in between the skin and the breast meat. Place the apple and the onion in the small cavity under the bone. Place the tablespoon of flour in an oven-safe turkey bag. Shake to distribute. Place the turkey breast in the bag and set in a baking dish that is at least 2 inches deep. Make sure the onions and apple are on the bottom. Tuck the edges of the bag under the breast and cut a few slits in the top of the bag.  Bake in the preheated oven until a thermometer inserted in the breast reads 170F, about 1 ½ to 2 hours. Let sit for 10 minutes before slicing. 
     
Thursday, November 10, 2011

Rocky Road Cupcakes

            Today my baby girl is seven years old. My goodness how time flies. It seems like just yesterday, I brought her home from the hospital. She was a fussy, fussy baby. But, the older she got, the easier and the better she became. She is my big helper. I don't know what I would do without her. Her laugh makes me smile and her hugs make my day just a little brighter.She is happy all of the time. She is so respectful, sensitive and grateful for everything. I couldn't have asked for a better little girl. Whatever I did to deserve her I will never know. Happy Birthday Grace! Mama loves you more than you will ever know. For her birthday we are making chocolate cupcakes. I hope you enjoy these as well. The recipe and photo came from thecupcakerecipes.com. If you like cupcakes...their site is the bomb! Keep in mind this recipe only makes 12 cupcakes so if you need more you will have to double it.


Rocky Road Cupcakes
1 stick unsalted butter, at room temperature
1/2 cup granulated sugar
2 eggs
1 cup self-rising flour
3 tablespoons unsweetened cocoa powder
3 tablespoons milk
1 oz. white chocolate chips
1 cup mini-marshmallows
2 tablespoons slivered almonds or brazil nuts
        Preheat the oven to 350 F. Beat the butter and sugar together in a bowl until pale and fluffy, then beat in the eggs, one at a time. Sift the flour and cocoa powder into the mixture and fold in. Stir in the milk, followed by the chocolate chips, marshmallows, and nuts.
Spoon the mixture into the paper liners and bake in the preheated oven for about 18 minutes until risen and the tops spring back when lightly pressed. Transfer to a wire rack to cool.

To decorate
3 1/2 oz. bittersweet chocolate, finely chopped
1/2 cup heavy cream
3 tablespoons almonds or brazil nuts
1/4 cup white chocolate chips
mini-marshmallows (optional)
           To decorate, put the chocolate in a heatproof bowl. Heat the cream in a saucepan until almost boiling, then pour in the chocolate and let melt for about 5 minutes. Stir until smooth and creamy, then let cool for about 30 minutes until thick and glossy.
Spread the chocolate mixture over the cupcakes and sprinkle with the nuts, chocolate chips, and marshmallows, if using.
makes 12


Wednesday, November 9, 2011

Slow Cooker Classic Italian Marinara Meat Sauce

           You all know the love affair I have with my crock pot. Browsing through the recipes on the Crock Pot website, there are just too many things to choose from. Soups, Breads, Drinks..where to start? I opted on the sauce department. There are a lot beautiful things that can come from a basic sauce. This recipe has just basic ingredients in it. Probably stuff you have in your pantry. Once you make your own sauce, whether it is a marinara, pizza, or alfredo, you will never go back to store bought. The great thing about the crock pot is you fix it and forget it. Most of the time it is a short assembly time too. Just like this recipe. Aside from browning the meat in the skillet, everything else is dump and let cook.Keep in mind, if you like mushrooms you can add those as well.The recipe and photo came from Crock Pot.com


Slow Cooker Classic Italian Marinara Meat Sauce
1/4 pound sausage
1 pound ground beef
2 medium onions, chopped
1 green pepper, chopped
4 cloves garlic, minced
2 tablespoons sugar
1 tablespoon salt
2 teaspoons basil
1/8 teaspoon red pepper flakes
32 ounces Italian style tomatoes, canned
6 ounces tomato paste, canned
           Remove sausage from casings, brown in a skillet with the beef. Break up sausage and beef with a wooden spoon as they brown; drain well. Add to stoneware with remaining ingredients; stir well. Cook on Low for 8-10 hours or High for 4-6 hours.
Tuesday, November 8, 2011

Chex Pumpkin Pie Crunch

          Who doesn't love Chex Mix? This is a twist on a classic. The difference here is the brown sugar, pecans and pumpkin pie spice. Such a great idea for a party or just to have around as a snack. The photo and recipe are from Pillsbury.


Chex Pumpkin Pie Crunch
1/4 cup brown sugar
1 Tablespoon pumpkin pie spice
1/4 cup butter
2 teaspoons vanilla extract
2 cups Cinnamon Chex® cereal
2 cups Wheat Chex® cereal
2 cups Honey Nut Chex® cereal
8 ounces pecans

In small bowl, mix brown sugar and pumpkin pie spice; set aside. In small microwave-safe dish, microwave butter on High about 30 seconds or until melted. Stir in vanilla. In large microwavable bowl, mix all cereals and pecans. Pour butter mixture over cereal mixture, stirring until evenly distributed. Add sugar and spice mixture and stir until coated.

Microwave uncovered on High 5 minutes or until mixture begins to brown, stirring every minute. Spread on wax paper or a cookie sheet to cool. Store in airtight container.      
Monday, November 7, 2011

Baked Potato Casserole

          Looking for something different for Thanksgiving? This casserole would be something to wow peoples socks off. The photo and recipe came from Just A Pinch by way of Joelle Teague. Mmm! Thanks Joelle. I have a HUGE bag of Yukon Golds that are just itching to be devoured. This should help.


Baked Potato Casserole


Baked Potato Casserole
5 lbs potatoes (your choice, I prefer Yukon Golds)
2 stick butter
1/4 cup dried chives
4 cups shredded cheese
salt and pepper to taste
2 pkgs. REAL bacon bits (or if you are feeling energetic, cooked bacon that has been crumbled)
24 oz. sour cream (of course you can use fat free or low fat if you choose)
**Taste at the mixing step, you may want more sour cream**      
          Peel, wash, and dice potatoes. Put in large pan and cover with water. Add chives and one stick of the butter. Also add salt and pepper to your taste. Cook potatoes until fork tender and drain (usually about 45 minutes) Place in mixing bowl with remaining stick of butter and 1/2 the sour cream to start with. Add salt and pepper to taste. Mix potatoes on low speed to blend everything. Add remaining sour cream to get potatoes to your preferred consistency. After potatoes are mixed, take a 9X13 casserole dish and layer potatoes, cheese, and bacon bits. Repeat so that you have atleast 2 layers. Cook on 350 for approximately 35 minutes or until cheese is bubbly.
***CAN BE PREPARED AHEAD OF TIME AND/OR REFRIGERATED, YOU WILL JUST NEED TO INCREASE THE COOK TIME**
Saturday, November 5, 2011

Creamy Swiss Onion Soup

            The other day, I went to lunch with my sister in law to Cafe Zupas. They let me sample one of their most popular soups that is only back for a limited time. I was very skeptical. I am, by no means an "onion person". This soup was divine. Creamy, mild flavor. Mmm! Now I don't know their exact recipe but this one comes awfully close. This is a creamy delicious soup. Great to warm your bones on a cold day. The only chage I would make is..I would dice the onion. I just don't prefer the texture of long sliced onions. The photo and recipe are from Taste of Home.
Creamy Swiss Onion Soup Recipe

Creamy Swiss Onion Soup
7 tablespoons butter, divided
1-1/2 cups cubed day-old bread
3 large onions, quartered and thinly sliced
1-1/2 cups water
4-1/2 teaspoons chicken bouillon granules
1/4 cup all-purpose flour
1-3/4 cups milk, divided
1-1/2 cups (6 ounces) shredded Swiss cheese, divided
Pepper to taste
Fresh minced chives or parsley
     Melt 3 tablespoons of butter; toss with bread cubes. Place on a lightly greased baking sheet. Bake at 350° for 7 minutes; turn and bake 7 minutes longer or until toasted. Meanwhile, in a large saucepan, saute onions in remaining butter until lightly browned, about 12 minutes. Stir in water and bouillon; bring to a boil. Reduce heat; cover and simmer for 15 minutes. Combine flour and 1/2 cup milk until smooth; gradually stir into onion mixture. Stir in remaining milk. Bring to a boil; boil for 2 minutes, stirring until thickened. Reduce heat to low; stir in 3/4 cup Swiss cheese and pepper. Ladle into four ovenproof bowls; sprinkle with reserved croutons and remaining cheese. Broil 4 in. from the heat until cheese is melted and bubbly. Garnish with chives. Yield: 4 servings

Followers