Search This Blog

Monday, June 20, 2011

Chinese Spring Rolls

           In Bountiful Baskets this week we got a fantastic selection of produce. One of the things we got in our baskets this week was cabbage. I have yet to find a cabbage recipe that we absolutely love. However, I LOVE spring rolls. Especially the ones without meat. I got this recipe and picture from Steamy Kitchens. I have one in a cook book that I have used before that is quite similar. You can omit the meat or put whatever meat you have (ie. chicken, BBQ, pork chops, shrimp, crawfish,whatever). She had some great tips on her website for making spring rolls:
           
Mama’s Rule #1: Your egg roll filling ingredients must be drained of excess moisture and cooled before rolling. Soggy, hot filling makes soggy egg rolls.
Mama’s Rule #2: Use the right kind of wrapper. The size I get is 8 x 8 inches (20 x 20 cm) around and come 25 wrappers to a package. These wrappers are light, paper-thin and fry up to a shatteringly crisp crunch. Oh yes, before I forget – “spring roll” and “egg roll” are interchangeable and mean the same thing. Sometimes my regular American grocery store will have “spring roll pasta sheets” that are in the refrigerated produce section. Do not use those – they are way too thick! Let’s just say that if it has Italian writing on the package, it probably ain’t the good stuff for Chinese egg rolls.
Rule#2A. Treat the wrapper right. You also want to keep the wrappers covered with a damp towel at all times to prevent the edges from drying and cracking.
Mama’s Rule #3: Roll small and tight! Sloppy and loosely rolled egg rolls will break apart and allow oil to seep into the inside of the roll. Mama says baaaad. One time I was watching a celebrity chef on television making monster egg rolls the size of a cola can. Who in the heck can wrap their mouths around that thing? It looked hideous. Mama’s egg rolls are elegant and skinny. Don’t be too greedy and overstuff them! And roll them tight so that the filling doesn’t fall out while frying! Remember the days when you were younger and rolled your own…um…cigarette? Channel those rolling skills back.
Mama’s Rule #4: Lay the rolled egg rolls neatly with a piece of parchment, foil or wax paper in between each layer if you are stacking them on top of each other. Keep them covered with plastic wrap or a towel to prevent drying. If you are freezing, freeze them in like this first. Once frozen, you can gather them up and transfer them to a plastic freezer bag. If you roll them out and jumble them all together in a big pile, they’ll eventually stick to each other and you’ll tear the delicate skin trying to pry them apart.
            Thank you Jaden for this wonderful recipe.         

 mothers-famous-chinese-egg-rolls-recipe

Chinese Spring Rolls
FOR THE GROUND PORK
1 pound ground pork
1 tablespoon soy sauce
1 teaspoon cornstarch
1/4 teaspoon sugar
freshly ground black pepper
FOR THE VEGETABLES
2 to 3 cloves garlic, very finely minced
½ head of cabbage (about 11 ounces)
3 carrots, shredded
1 teaspoon grated fresh ginger
10 fresh shiitake mushrooms (or dried black mushrooms soaked overnight), stems discarded
1 tablespoon cooking oil (canola, vegetable, peanut)
1 tablespoon Chinese rice wine
1 tablespoon soy sauce
1/4 teaspoon sugar
1/2 teaspoon salt
1 teaspoon sesame oil
Freshly ground black pepper:
            To make the filling, combine the ingredients for the ground pork together. Marinate at least 10 minutes. In the meantime, shred the cabbage and the carrots using your food processor or by hand. Slice the mushrooms into very thin strips (or you could use your food processor and pulse a few times to get a fine dice. Heat a wok or large saute pan over high heat. Add the cooking oil and swirl to coat. Add the pork and stir-fry until no longer pink, about 2-3 minutes. Turn heat to medium-low, push the meat to one side of the pan. Add the garlic, cabbage, carrots, ginger and the mushrooms and stir-fry for 1 minute, until the vegetables are softened. Add the rice wine, soy sauce, sugar, sesame oil and black pepper. Continue to stir-fry for another minute. Scoop out the filling to a baking sheet and spread out to cool. Prop up one end of the baking sheet so that it tilts and will allow all the moisture to drain to one end. Let cool for 15 minutes.Discard all of the accumulated juices. Use paper towels to blot the filling to rid of extra oil or juice. Now, you're ready to wrap (see photos for instructions on how to wrap).
           IMPORTANT: Only use 1 heaping tablespoon of filling for each egg roll. These are slender egg rolls, the width of the egg roll should only be 1.25" diameter.Keep the rolled egg rolls in neat, single layer and covered with plastic wrap to prevent drying. If you want to stack the egg rolls, make sure you have layer of parchment paper in between the layers to prevent sticking. Keep wrappers also covered with plastic wrap to prevent drying. Refrigerate up to 4 hours until ready to fry or freeze.
        To fry the egg rolls, fill a wok or pot with 2 inches of high-heat cooking oil. Heat the oil to 350°F (175°C) or until a cube of bread will fry to golden brown within 10 seconds. Gently slide in or lower the egg rolls, frying 4 to 6 at a time, turning occasionally until golden brown about 1½ minutes. Place on wire rack to drain and cool.
Saturday, June 18, 2011

Berry Crumble Bars

           While watching my fave dessert show "Dessert First" I decided to browse the Internet looking for some tasty treat to do with my blackberries that I got from bountiful baskets this week. Once again, check and see if they  have a co-op in your area. You can't beat $15.00 for fresh produce..YUM! Anyway, this recipe popped into my head. I am going to modify it and substitute blackberries for the raspberries, but you could sub in what you have or even mix the berries. Any way you slice it..it is going to be fantastic! The recipe is of course by Anne Thornton as is the beautiful picture!

Picture of Raspberry Crumble Bars Recipe


Berry Crumble Bars
2 sticks butter, softened, plus more for the pan
2 1/4 cups all-purpose flour
1/2 cup granulated sugar
1/2 cup light brown sugar
1 cup rolled oats
1/4 teaspoon fine sea salt
1 egg, beaten
1 cup Raspberry Preserves, recipe follows

      Preheat the oven to 350 degrees F. Butter an 8-inch square baking pan.Add the flour, both sugars, oats and salt to a bowl in your stand mixer. Add in the butter and egg and beat at low speed. Stop the machine and scrape the bowl down a couple of times. Keep processing until the mixture resembles coarse crumbs. Keep 2 cups crumb mixture aside. Press the remaining crumb mixture on the bottom the prepared pan. Spread the Raspberry Preserves over top, leaving 1/2-inch border. Crumble the rest of the oat mixture over the preserves.Bake until lightly browned, 40 to 50 minutes. Cool completely before cutting into bars.
Raspberry Preserves:
1 quart raspberries
1 tablespoon lemon juice
1 3/4 cup sugar
       Put your raspberries and 1/4 cup water in a saucepan over medium heat. Once it's at a simmer, partially cover and cook 8 to 10 minutes. Pass the berry mixture through a food mill and measure the liquid that remains. You need 3 1/2 cups. Add more water if there isn't enough. Put the berry liquid into a new saucepan over medium heat and bring to a simmer again. Once it simmers, start adding your sugar in 1/2 cup increments. Give it a stir to incorporate and bring it back to a simmer before adding of the next 1/2 cup sugar. Once the last 1/2 cup is added, bring the liquid to 216 to 218 degrees F on a candy thermometer. Stir constantly. Let this cool to room temperature prior to using. If not using right away, refrigerate for up to 1 week. Yield: 2 cups.
Friday, June 17, 2011

Kansas City BBQ Nachos

            If you are like me I am always looking for something a little different for lunch. How tasty do these babies look. If you want to get some slaw mix from your produce section instead of draining the prepared slaw I am sure that would work. Have a great day! Take some time to enjoy some great food, great friends and the beautiful weather!
Kansas City BBQ Nachos
6 cups tortilla chips (8 oz)
2 cups shredded Cheddar cheese (8 oz)
1 can (16 oz) spicy chili beans, undrained
1 container (18 oz) refrigerated seasoned shredded pork in original BBQ sauce
1/4 cup Old El Paso® pickled jalapeño slices, drained, chopped (from 12-oz jar)
1 cup tangy vinaigrette-style deli coleslaw, drained (opt. I would leave it out due to picky eaters)
2 medium green onions, sliced (2 tablespoons)
          Heat oven to 400°F. Line 12-inch pizza pan or 15 x 10 x 1-inch pan with foil; spray with cooking spray. Spread half of chips evenly on pan. Sprinkle 1 cup of the cheese over chips. In medium bowl, mix chili beans, pork and jalapeños. Drop half of mixture by small spoonfuls over chips. Repeat layers with chips, cheese and pork mixture. Bake 12 to 15 minutes or until cheese is melted. Top with coleslaw and green onions. Serve immediately.
Expert Tips:
To microwave instead of bake, layer the nachos on a microwavable plate. Microwave uncovered on Medium (50%) 2 to 4 minutes or until cheese is melted.Fresh chopped jalapeño chiles can be substituted for the pickled, if you like.
 Recipe and Picture Courtesy of Betty Crocker
Wednesday, June 15, 2011

Simple, Grilled Carmelized Asparagus

            I love veggies. I could eat them all day. Grilling fruits and veggies takes the flavor to a whole different level. Asparagus on the grill is divine! Now if you have a fancy grilling pan, this recipe would be a breeze. If you are grilling them outside..be cautious or they will fall through and will meet a fiery death.
           A few words about this little green beauty. When they hit the grocery stores, it is a sure sign of spring. Asparagus spears can be thick or thin. Some people prefer one kind over another but size is not necessarily an indicator of quality. Thicker spears may have tougher, woodier ends, but these are broken off before cooking anyway. The key is to select straight, firm, uniformly sized spears with closed tips. Since asparagus deteriorates rapidly, it’s important to select bundles that are refrigerated or on ice. For the same reason, asparagus should be used within two or three days of purchase, preferably sooner. If you do need to keep it for a day or two, the best way is to place the spears upright in a bowl (or even a small vase) of cold water. Alternatively, you can wrap the ends of the spears in a damp paper towel and refrigerate them.
           Asparagus is low in calories and is very low in sodium. It is a good source of vitamin B6, calcium, magnesium and zinc, and a very good source of dietary fiber, protein, vitamin A, vitamin C, vitamin E, vitamin K, thiamin, riboflavin, rutin, niacin, folic acid, iron, phosphorus, potassium, copper, manganese and selenium], as well as chromium, a trace mineral that enhances the ability of insulin to transport glucose from the bloodstream into cells. The amino acid asparagine gets its name from asparagus, the asparagus plant being rich in this compound
         To prepare asparagus, you will need to rinse the spears and break off the tough ends. After that, how you cook asparagus is up to you.  You want to select a bundle before the blooms open or they will become woody. The picture and recipe come from a beautiful website call bell'alimento! Enjoy!.
asparagus_grilled2_wm
Simple Grilled Caramelized Asparagus
1 extra large bundle of asparagus
salt and pepper
extra virgin olive oil
3 tbsp sugar
        In a bowl coat your asparagus with olive oil. Season with salt & pepper. Toss until all are well coated. Place your asparagus onto a grill pan over a medium hot grill & cook for approx 6-8 minutes or until tender. Turning every so often. Sprinkle sugar onto asparagus about half way through cooking. Serve immediately.
Tuesday, June 14, 2011

60 Minute Rolls

           I am not really sure what to post today. I have been a grumpy woman all day. With all of the stress from the finances, the kids, my brother just to name a few, I have not been very pleasant to be around. It is my 14th wedding anniversary today, which makes me being grumpy, even worse. My husband Mike deserves a medal for putting up with me. He is truly the love of my life. He is everything that I hoped my husband would be but, doubted I would ever have. I DO love him with all my heart. He is always so thoughtful and respectful. I cannot imagine my life without him in it! Happy Anniversary baby! Thanks for putting up with me for so long!
            The recipe for the day is 60 minute Rolls. From start to finish they only take an hour. Remember my mantra...don't be afraid of making bread, you can do it! If the dough seems a little sticky add a little flour at a time until it is the right consistency. Remember when making bread, you want to be able to touch the dough and have the dough feel as if it is going to stick to your finger but it doesn't. The recipe and photo come from Just a pinch!
60 Minute Rolls


60 Minute Rolls

2/3 c white sugar
2 Tbsp white sugar
3 eggs
2 Tbsp yeast or 2 yeast packets
2 tsp salt
1/4 c warm water
1/2 c butter or oleo (1 stick)
5-7 c white flour
2 c milk
         Mix the yeast, 2T sugar and the warm water in a 2C glass measuring cup or small bowl, and set aside to proof (not only starts the yeast working, but you will know your water was not too hot or your yeast dead, as well).In a medium saucepan, heat the milk and the butter/oleo. DO NOT LET BOIL--you just want it warm. Beat the 3 eggs, 2/3 cup sugar, and the salt together with a mixer set on medium for about 2 minutes. Add the milk/oleo mixture and stir (MAKE SURE THIS IS NOT TOO HOT, OR ELSE YOU WILL END UP COOKING THE EGGS).Add the yeast mixture and stir. Attach the dough hook on your mixer, and slowly add the flour and mix until a stiff dough forms...The dough will pull away from the side of the bowl. You may or may not need all the flour. Sometimes it takes more, sometimes less (no idea why) IF MIXING BY HAND, ADD FLOUR UNTIL A STIFF STICKY DOUGH FORMS. EMPTY BOWL ONTO A FLOURED SURFACE ANDWORK/KNEAD IN FLOUR UNTIL A SMOOTH DOUGH FORMS) Grease whatever pan you will be baking in, be it a loaf pan or a 13X9 cake pan. Form your dough into either 2 loaves of bread or a bunch of rolls (depends on how big you make them)and set aside in a warm, draft-free place to rise. Cover with a damp dish towel for more draft protection.When the rolls/bread have doubled in size, bake in a 400 degree oven for 15-20 minutes until tops are brown. Bread is done when you thump the top with a knuckle and it sounds hollow.
Monday, June 13, 2011

S'more Sandwich Bar Cookies

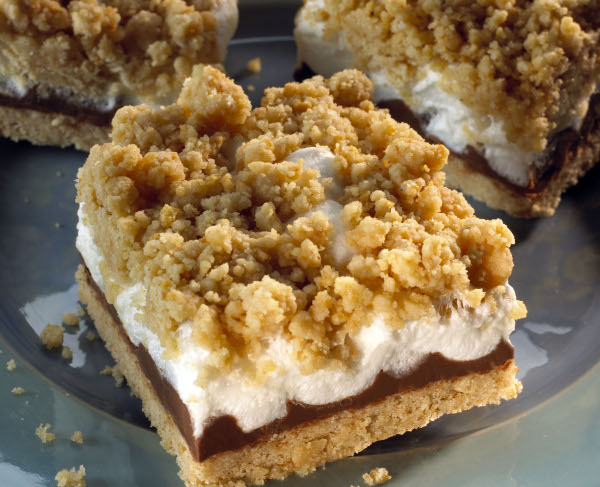
        Anyone get the coupon for free package of marshmallows if you buy the graham crackers and Hersheys chocolate bars? This lovely, yummy, ooey, gooey recipe was included. It is made with the same ingredients that a traditional s'more is made with. I may like this even more than the typical campfire s'mores. I bet your family will love them too! The picture and recipe are from Nabisco.
S'mores sandwich bar cookies

S'more Sandwich Bar Cookies
1/2 cup (1 stick) butter or margarine, softened
3/4 cup sugar
1 egg
1 teaspoon vanilla extract
1-1/3 cups all-purpose flour
3/4 cup graham cracker crumbs
1 teaspoon baking powder
1/4 teaspoon salt
1-1/3 cups (8-oz. pkg.) HERSHEY'S Mini Milk Chocolate Bars OR 5 HERSHEY'S Milk Chocolate Bars (1.55 oz. each)
3 cups miniature marshmallows
     Heat oven to 350 degree F. Grease 8-inch square baking pan.Beat butter and sugar until well blended in large bowl. Add egg and vanilla; beat well. Stir together flour, graham cracker crumbs, baking powder and salt; add to butter mixture, beating until blended. Press half of dough in prepared pan. Bake 15 minutes. Sprinkle mini chocolate bars over baked layer or arrange unwrapped chocolate bars over baked layer, breaking as needed to fit. Sprinkle with marshmallows; scatter bits of remaining dough over marshmallows, forming top layer. Bake 10 to 15 minutes or just until lightly browned. Cool completely in pan on wire rack. Cut into bars. 16 bars.
Sunday, June 12, 2011

1 full year of posts! Mini Lemon Loaves

            Today is my 365th post. A whole year worth of recipes, laughs, tears and friendships. Wow! I thank you and I appreciate your love, support, and kindness. I feel truly blessed. It has been an emotional roller coaster ride for me. It has been very therapeutic at times. The blog has given me a place to vent and put things out in the open that I just cannot put into words. It has given me a forum to learn about myself as well. The recipes, who can forget the recipes?  I hope that you have learned a few things, I know that I have. I am not sure about the direction that I am going to go with the blog at this point. I am going to have a lot of things to think about. Just know that I appreciate your time. Hopefully the next 365 posts will be just as entertaining and yummy as the last. All my love....Camie
               This recipe came from of course, Tasty Kitchens. The little beauty that submitted it was Laurens Latest. The picture is from her as well. I love anything lemon. Lemon bread is definitely one of my faves. Hope you enjoy!


Mini Lemon Loaves
FOR THE CAKES:
½ cups Butter, Softened
1 cup Granulated Sugar
2 whole Eggs
1 teaspoon Vanilla Extract
1 whole Large Lemon, Zested (about 5 Teaspoons Zest)
½ cups Sour Cream
1-½ cup All Purpose Flour, Sifted
1 teaspoon Baking Powder
¼ teaspoons Baking Soda
¼ teaspoons Salt
3 Tablespoons Milk
FOR THE GLAZE:
¼ cups Fresh Lemon Juice
½ cups Granulated Sugar
             Preheat oven to 350ºF. Spray mini pans with nonstick cooking spray and set aside.In a large bowl, cream butter and sugar until light and fluffy. Stir in eggs, vanilla, lemon zest and sour cream. Scrape the sides and mix again. With the mixer on low speed, incorporate all dry ingredients until just combined, then stir in the milk. Scrape the sides and mix a few more times by hand. Spoon batter equally into prepared pans. Bake 15-20 minutes or until edges are golden brown and are baked thoroughly. Use the toothpick method to see if they are done. Mine were done at 18 minutes.
While lemon loaves are baking, mix ingredients together for the glaze and microwave on high for 2 minutes, stirring every 20 seconds or so to dissolve the sugar into the lemon juice. The glaze is done once the sugar has dissolved.Once loaves come out of the oven, cool at least 15 minutes before removing from the pans. Spoon glaze over the loaves and continue to cool completely. Store in airtight containers until ready to serve.
          

Followers