Search This Blog

Monday, May 23, 2011

Kool-Aid Slushies

             So todays post is more for the kids, I suppose or at least a kid at heart. I had never had this little concoction until I met my husband.. about 20 years ago. Yeah, that does make me feel old. Anyway, moving on! The only place to get a drink like this one was usually 7-11. However, there are no 7-11 stores left in our city an let's be honest, they were mostly air anyway. So if it is beginning to feel like summer where you are, number one count your blessings, we may never reach 80 this year and number two, your kids  will love these and to be honest so does my hubby..my biggest kid! Enjoy!


slushie
Kool-Aid Slushies
1 packet of Kool-Aid any flavor
1/2-1 cup of sugar
ice water
       In a blender add sugar, and drink packet. Fill blender with ice. Next add, water. Enough to almost filll blender. Blend until smooth. That's it!
 ***Note if you want a Coca-cola or Mountain Dew (or any soda flavored slushie), simply add to blender with enough ice to cover!
Sunday, May 22, 2011

Salted Caramel Milk Chocolate Cake

           I know I have professed my love for Anne Thornton many, many, times before. Her show on Food Network, Dessert First is one of my faves. This week she made a dessert with one of my very favorite ingredients...salted caramel. Salted Caramel Milk Chocolate Cake....sigh! Heavens I may have to grease the doors to get me out. I may eat the whole thing! Take a moment and savor the sight...YUMMY! Start with the Chocolate Caramel frosting first, as it has to cool before you add the powdered sugar.
 

Salted Caramel Milk Chocolate Cake
Frosting:
18 ounces milk chocolate, finely chopped
10 ounces semisweet or bittersweet chocolate, finely chopped
 1/2 cup water
1 1/2 cups sugar
2 1/4 cups heavy cream
1/2 tablespoon fine sea salt
1 1/2 sticks room temperature unsalted butter, cut into cubes
1 Chocolate Cake recipe, recipe follows
Sea salt flakes (recommended: Maldon
          Put your chocolates in a big bowl. Put the sugar and 1/2 cup water in a saucepan and place over medium heat. Stir until the sugar dissolves and bring up to a boil. As soon that happens, stop stirring and let it boil until it turns an amber color, 8 to 10 minutes or so. (If you think that it needs another stir, brush down the sides of the pan with a wet pastry brush, and stir the entire mixture, picking up the pot itself by the handle, being careful not to touch the caramel or else it could crystallize.) Once the mixture reaches that dark amber color, turn the heat down. Stand back from the pot and add the cream very slowly, stirring with a heatproof spatula. (If you are nervous about the steam, wear a kitchen glove to protect your hand.) Continue to stir until all is incorporated. Once the mixture is smooth, stir in the fine salt. Take off the heat and pour the caramel over the bowl of chocolate. Whisk to combine, making sure all the chocolate melts. Pop in the fridge for about 1 hour until completely chilled.

Take the frosting out of the fridge and beat it with a hand mixer just until it becomes spreadable. Add the butter in pieces and mix until it's all combined. Pop back into the refrigerator for another hour.

Place 1 cake layer on a cake platter, flat-side up. (You want the cake flat-side up so when you get into it you'll have nice and even layers.) Evenly spread 2 cups of the frosting over the top. Sprinkle with sea salt flakes, then put the other cake layer on top, flat-side up. Spread the rest of the frosting over the top and on the sides of the cake. Sprinkle the top with more salt flakes.

Chocolate Cake:

2 sticks unsalted butter, softened, plus more for greasing pan
2 cups all-purpose flour
3/4 cup unsweetened cocoa powder
1 1/2 teaspoons baking soda
1/2 teaspoon sea salt
1 1/4 cup packed light brown sugar
1/2 cup granulated sugar
4 eggs, at room temperature for 30 minutes
1/3 cup semisweet chocolate, melted and cooled
2 teaspoons pure vanilla extract
1 1/2 cups well-shaken buttermilk (or 1 cup milk plus 1 tablespoon lemon juice)
          Put a rack in the middle of the oven and preheat the oven to 350 degrees F. Butter 2 (9 by 2-inch) nonstick round cake pans. Line the bottom of each with a round of parchment paper, and then butter the paper.Sift the flour, cocoa, baking soda and salt together onto parchment paper. With an electric mixer on medium-high speed, cream the butter and sugars until light and fluffy, 4 or 5 minutes. Add your eggs, 1 at a time, mixing until completely incorporated before adding each additional egg. Mix in the chocolate and vanilla, making sure to combine really well. Turn the mixer to low and slowly add the dry ingredients, alternating with the buttermilk, in 3 batches, starting and ending with the flour mixture. Make sure to let it mix thoroughly. Pour half the batter in each pan and spread it evenly with a spatula or butter knife. Bake until a toothpick comes out clean, 25 minutes. Remove the pans to racks and allow the cakes to cool for 10 minutes or so. Loosen the edges of the cake from the pan with a knife, then turn them onto the racks. Remove the paper and let the cakes completely cool. Yield: 2 (9-inch) cake layers
Saturday, May 21, 2011

Mango Cobbler

             We got eight mangoes in our bountiful basket. Wondering what to do with them, I stumbled on this divine recipe from Just a Pinch. The picture is from there as well. This is one way I might could get my hubby to eat mangoes. Enjoy!
 MANGO COBBLER

Mango Cobbler

1/4 c margarine
1 c white sugar
1 c all purpose flour
2 tsp baking powder
1/8 tsp salt
1/2 c milk
 1 tsp vanilla extract                
 2 can(s) mangoes or peach
 1 c juice of the canned fruit
             Cream together softened margarine and sugar. Sift flour, baking powder and salt.  Add alternately dry ingredients with milk and vanilla extract. Beat well until smooth. Pour batter into 9x9 inch cake pan. Place the mangoes over batter. Pour juice. Bake at 375 F for 45 minutes or until tester comes out clean. Serve with whipped cream or ice cream. Note: For fresh mangoes - Peel skin of 4 mangoes (halved) and simmer for a few minutes with 1 cup water and 1/4 cup sugar. Use it's liquid for juice. Fresh mangoes that were simmered are juicier than the canned ones. Canned peaches are also great for this recipe. I prefer to use fresh mango, though.
Friday, May 20, 2011

Grilled Sticky Ribs

             My blog has been a mess for most of the day today...sorry! Trying to get everything rearranged as well as getting the summer background up. By doing so I am hoping against hope that the weather here in Utah will change a bit. So what are your plans for this weekend? Hoping to get some baking in as well as some yard work. I would love to get our garden in but it has just been too wet to plant. Tomatoes are going to have a short ripening season I am afraid. I am also picking up my bountiful basket tomorrow. If you haven't heard of them or aren't sure if they are in your area check out their website www.bountifulbaskets.org. Great produce co- op and the best thing is, you get produce that you may have never bought or may have never used before so it makes you think outside of the box a bit. Makes weekly menu planning a bit of an adventure. I have to admit I was nervous my first time participating. I thought that maybe the produce would be less than fresh but that hasn't been the case. Check them out. You won't be sorry.
          Todays recipe comes from recipe goldmine. I love that site. Great recipes over there. Grilled Sticky Ribs. What a great way to kick off summer! Break out the grill, dust off the tongs! Let's get grilling!


Grilled Sticky Ribs
 Yields 5 to 6 servings
Aluminum foil
2 racks (about 4 pounds total) baby back ribs
Garlic salt
Ground black pepper
1 tablespoon vegetable oil
1/4 cup finely chopped red onion
1 teaspoon finely chopped garlic
1 teaspoon grated fresh ginger
3/4 cup MAGGI TASTE OF ASIA Sweet Chili Sauce
1/2 cup Apple NESTLÉ® JUICY JUICE® All Natural 100% Juice
1 tablespoon rice wine (mirin)

            Preheat oven to 300°F. Using knife, remove membrane from bone side of ribs (this step is very important for tender ribs). Pat ribs dry with paper towel; season both sides liberally with garlic salt and pepper. Place ribs in a large roasting pan, overlapping as needed. Add about 1/2 cup water to pan. Cover tightly with foil. Bake for about 3 hours or until meat is very tender but not quite falling off the bones.Heat oil in small saucepan over medium-high heat. Add onion; cook, stirring occasionally, for 2 to 3 minutes or until soft. Stir in garlic and ginger; cook for 1 minute. Stir in sweet chili sauce, Juicy Juice and rice wine. Reduce heat to low; cook for 8 minutes or until sauce is reduced to about 1 cup (it should be thick and sticky).Preheat grill or broiler. Brush glaze over tops of ribs. Grill over medium flame for 4 to 5 minutes or broil about 4 inches from heat for 3 to 5 minutes or until sauce caramelizes. Serve with any remaining glaze.

Recipe and photograph provided courtesy of Nestle and meals.com. Used with permission.
Thursday, May 19, 2011

Mexican Lasagna

           So, yesterday on Facebook, I shared a recipe for mexican lasagna. Instead of re posting the same recipe, I decided to research a few more and low and behold Ree Drummond has one. I have yet to find a recipe from her that hasn't turned out FANTASTIC. This recipe has quite a few ingredients but it is simple and delicious. If you are looking to shake things up a bit for dinner...I highly recommend this one! The picture is from Ree Dummond as well! Ooohh  Yummy!


Mexican Lasagna
4 cups Unprepared Rice
6 cups (to 8 Cups) Low Sodium Chicken Broth/stock
4 whole (to 8) Tomatoes (up To You)
2 whole (to 3) Onions (up To You)
8 cloves (to 14 Cloves) Of Garlic (up To You)
Butter
Taco Seasoning (or Chili Powder, Paprika, And Cumin) To Taste
1 can (to 2 Cans) Black Or Pinto Beans (up To You)
3 pounds Lean Ground Beef
2 jars (16 Ounce) Salsa Verde
Flour Tortillas
3 packages (16 Ounces) Mexican Cheese Blend
1 jar (16 Ounce) Enchilada Sauce
3 cans Corn, Drained
Sour Cream, to taste
Cilantro, to taste
        Begin by preparing rice with chicken broth/stock. Once prepared, salt to taste. Chop up tomatoes, onions, and garlic as small as you prefer. Saute in pan with a tablespoon or so of butter. Add approximately 3 tablespoons chili powder, and 1 ½ tablespoon of both paprika and cumin. Stir until nicely combined.
Feel free to add beans if you like them… no need to drain. Mix cooked rice together with tomato/onion/garlic mixture. Brown the ground beef using about 3 tablespoons chili powder, 1 ½ tablespoon, paprika and 1 ½ tablespoon of cumin and salt to taste with about 4-6 ounces of water to create the taco beef.Spread one container of salsa verde in the bottom of a large casserole or baking dish. Layer on tortillas covering salsa verde. Some overlapping is expected. Divide your rice mixture in half and spread it over the layer of tortillas. Divide cheese in half and layer it on top of the rice layer. Approximately 24 ounces of cheese per layer. Add another layer of tortillas on top of your cheese layer. Pour enchilada sauce over the tortillas and spread it out evenly. Add layer of browned ground beef. Add 3 cans of corn (drained) on top of beef layer. Then the remaining amount of rice mixture on top of corn layer followed by the remaining jar of salsa verde, on top of which you will add the remaining cheese (approximately 24ounces) to the top…this is our final layer of ingredients. Sprinkle top with some taco seasoning or cayenne pepper.
Bake at 375º for 25-35 minutes until cheese has melted and begins to brown a bit.
Enjoy!

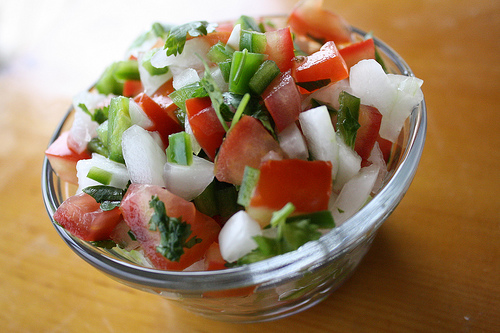
Pico De Gallo~ Round two

          I love any kind of salsa. My brother in law Brad makes a kickin' salsa. This Pico de Gallo Salsa is the bomb. I don't have many foods that I could eat every day but salsa....is one of them. Think outside the box. Don't just use for tacos or dipping chips (which is divine). The recipe makes a few suggestions..let your imagination run wild! The recipe came your way by Cooks.com. A must try..in my book anyway.


PICO DE GALLO

Read more about it at www.cooks.com/rec/view/0,196,143163-227203,00.html
Content Copyright © 2011 Cooks.com - All rights reserved.
6 fresh tomatoes, seeded and diced
1/2 to 1 sweet onion, diced
1 green pepper, diced
1 red pepper, diced
1 orange pepper, diced
2 jalapenos, seeded and minced
2 avocados, cut into small cubes
4 - 6 cloves garlic, minced (I love garlic!)
1/4 cup fresh cilantro, chopped
juice from 2 limes
1 tbsp ground cumin
sea salt and crushed black pepper, to taste

Mix all the ingredients in a big old bowl, as this recipe makes a lot. Remove the seeds and juicy parts of the tomato for better consistency. Add the avocados last and immediately cover with lime juice so they don't brown. Cover and refrigerate for a couple hours. Serve with tortillas, on top of a juicy steak, or on burgers with a slice of grilled pineapple.

Wednesday, May 18, 2011

Ultimate Spaghetti and Meat Sauce

           For those of you that know me, you know that I don't prefer meat. I will cook it but I don't prefer it.What I love about this recipe is that is has a couple different cooking variations. Stove top, crock pot...whatever you have time for. In my opinion if you didn't like sausage you could leave it out and to be honest you could probably leave out the ground beef if you really wanted but this is MEAT Sauce and so...give it a try!Don't let all of the ingredients fool you, the recipe is simple and straight forward and besides... Who doesn't like spaghetti? If you are doing your weekly meal planning like me, this would be a great variation for Italian night. If not...why haven't you started planning meals yet? I promise it is going to save you time and money. And who wouldn't like more time and money? Chop Chop!!! This recipe is from you guessed it..Tasty Kitchens as is the photo.


Ultimate Spaghetti and Meat Sauce
1 pound Lean Ground Beef
1 pound Italian Sausages (aproximately 5 Links)
1 Tablespoon Olive Oil
1 cup Red Onion, Diced
1 cup Green Pepper, Diced
4 cloves Garlic, Minced
1 Tablespoon Dried Basil
1 Tablespoon Dried Oregano
1 Tablespoon Dried Marjoram
½ teaspoons Dried Red Pepper Flakes
2 leaves Bay Leaves
1 teaspoon Salt
½ teaspoons Black Pepper
1 Tablespoon Sugar
1 can Tomato Sauce (28 Ounce Cans)
2 cans Diced Tomatoes (15 Ounce Cans)
1 can Tomato Paste (8 Ounce Can)
1 cup Water Or Red Wine
8 ounces, weight Grated Parmesan Cheese
       Heat oil in a large ovenproof pot or cast iron Dutch oven over medium heat. Remove casings from Italian sausage. Brown hamburger and sausage in the pot, breaking up the meat into small pieces as it cooks.As meat is browning, place onion, bell pepper and garlic cloves in a food processor and pulse until chopped. Add vegetable mixture to meat and cook until onion becomes translucent. Add the basil, oregano, marjoram, pepper flakes, bay leaves, salt, pepper and sugar. Mix well to incorporate flavors.When meat is entirely browned and vegetables are cooked add the tomato sauce, stewed tomatoes, tomato paste and wine. Heat the mixture until just barely boiling and reduce heat to simmer. Add the grated parmesan and stir to mix thoroughly into sauce.
Method 1 – Continue to cook on stove, uncovered for 2-3 hours stirring occasionally to prevent sticking to the bottom of the pot. This is the the method I typically use.
Method 2 – Heat oven to 200 degrees F. Cover pot or Dutch oven leaving lid slightly ajar to allow excess steam to escape. Bake sauce in oven for 2-3 hours.
Method 3 – Transfer sauce to an electric crock pot or slow cooker. Keep lid slightly ajar with a toothpick in order to allow excess steam to escape. Cook on low for 4-6 hours. This method results in a slightly runnier sauce, but is great if you don’t have the time to monitor a pot on the stove or in the oven.
Serve sauce with your favorite cooked pasta.

Followers