Search This Blog

Saturday, April 23, 2011

Strawberry Mousse Pie

  I got this recipe from recipe goldmine. Cute and easy! Just in time to celebrate your Easter holiday! Happy Easter to you and your loved ones!

Strawberry Mousse Pie recipe

Strawberry Mousse Pie

1 1/2 cups (about 1/2 pound) sliced, fresh strawberries
1 cup granulated sugar
1 can (12 fl. ounces) NESTLÉ® CARNATION® Evaporated Milk, divided
1 envelope (7 grams) unflavored gelatin
1 cup thawed, frozen whipped topping
3 3 to 4 drops red food coloring (optional)
1 (6 oz.) prepared 9-inch shortbread crumb crust
Green food coloring
1/2 cup sweetened flaked coconut
24 (about 1/2 cup) jelly beans

PLACE strawberries, sugar and 1/2 cup evaporated milk in blender or food processor; cover. Puree for 20 seconds or until smooth.
Heat remaining 1 cup evaporated milk in small saucepan over medium heat until simmering. Remove from heat. Sprinkle gelatin over milk mixture; stir until completely dissolved. Whisk in strawberry mixture; pour into a medium bowl. Refrigerate uncovered for 20 minutes or until cool to touch. Gently whisk in whipped topping and red food coloring to color desired. Pour mixture into crust.

REFRIGERATE for 2 hours until set.

DISSOLVE 2 to 4 drops of food coloring in 1/2 teaspoon water in small, resealable food storage plastic bag. Add coconut. Seal bag and shake evenly to coat coconut. Spoon coconut around edge of pie to form 8 "nests." Place 3 jelly beans in center of nests.

Recipe and photograph provided courtesy of Nestle and meals.com. Used with permission
Friday, April 22, 2011

Funeral Potatoes~ A quirky thing that comes with living in Utah

             If you are not from Utah..I am sure you ar looking at this post wondering just what in the world ARE funeral potatoes. It seems to be tradition around these parts to make this potato casserole whenever there is a grieving family of sorts..at least that is how it got it's name. There are a ton of different recipes around Utah and you could add or substitute your fave. ingredients but they all use basically the same ingredients. You could add green onion in place of the grated onion, maybe add bacon. Make no mistake though that this rich side dish will accompany any meal well. Especially Easter dinner. If you haven't tried this type of casserole before...give it a whirl.


 Funeral Potatoes
6 c. diced potatoes
1 can (10 3/4 oz.) condensed cream of chicken soup
1 stick butter, melted
1 c. sour cream
2 c. cheddar cheese, grated, divided
1/4 c. grated onion (optional)
Salt and pepper to taste
          Ingredient notes: For the potatoes, it's best to bake russet potatoes wrapped in foil, then cool, peel and dice them. If you want, you can substitute plain frozen diced (not shredded) potatoes. Let the potatoes thaw before using them in the recipe.
         To make reduced fat funeral potatoes, replace the melted butter with 1/2 soup can milk. Use reduced fat sour cream, or replace the sour cream with nonfat, plain Greek yogurt. Reduced fat cheddar cheese also works well.
        Combine soup, butter, sour cream, 1 c. cheese, onion, salt and pepper. Mix well. Add the potatoes and stir gently until combined. Place potato mixture in a 2-3 quart casserole dish or 9 x 13-inch baking pan. Top with the remaining 1 c. cheese. Bake uncovered at 350 degrees for 30-45 minutes or until hot and bubbly.
     A lot of people put crushed corn flakes on top of the funeral potatoes. This recipe doesn't do this, but I've eaten them that way and it does add a nice crunch. If you want to use the corn flake topping, mix 3 tablespoons butter with 3/4 cup crushed corn flakes and sprinkle over the potato mixture before baking. If you're planning to use a crumb topping, mix all the cheese in with the sauce and don't reserve any to sprinkle on top.
Thursday, April 21, 2011

Orange Cream Cheesecake

            This recipe came across my FB yesterday! How Yummy does this look? If you like Orange Creamsicles then this would be a guilty pleasure for you! Sounds simple too! Give it a try and let me know what you think!

            Orange Cream Cheesecake

Orange Cream Cheesecake

When we were kids, we had these orange and vanilla ice cream treats on a stick. The combination was divine. Why not do the same with a cheesecake?

The following recipe uses orange juice concentrate for the orange and a smooth vanilla filling. It is easy to make.

For the crust:
2 cups crushed graham crackers
4 tablespoons sugar
5 tablespoons butter, melted

For the filling:
3 (8-ounce) packages cream cheese, softened
3 large eggs
1 cup granulated sugar
2 tablespoon flour
1/4 teaspoon salt
2 teaspoons vanilla
1/4 cup frozen orange juice concentrate
orange extract or liqueur
a drop or two of both yellow and red food coloring to make an
orange color
2 tablespoons whipping cream
whipped cream for garnish
        Crush the graham crackers. Mix the crumbs with the sugar and melted butter in a nine or ten-inch springform pan. Press the mixture into a crust across the bottom of the pan and up the sides. Put the crust in the refrigerator to set up while you prepare the filling.
 Preheat the oven to 325 degrees. Mix the cream cheese with the paddle attachment of your stand-type mixer set at medium speed until smooth and creamy, about five minutes. Add the eggs, granulated sugar, flour, salt, vanilla, and gently cream together until smooth. Do not over beat. Too much air in the filling will cause the cake to sink and crack.
 Remove two cups of the filling and add the orange juice concentrate, extract, and coloring to the removed filling. Set aside. Add the whipping cream to the remaining vanilla filling. Spread the vanilla filling in the on the crust. Carefully spoon the orange filling around the edge of the cheesecake letting the orange filling flow to the center. Smooth if necessary.
         Bake for 40 to 50 minutes or until the top starts to turn golden and the center of the cake is just slightly jiggly. Because it is not as thick, a ten-inch cheesecake will bake more quickly than a nine.
       Let the cheesecake cool in the pan on a wire rack for ten minutes. Run a knife around the edge of the pan to loosen. Remove the ring and let the cheesecake cool completely. Refrigerate for several hours. Garnish with whipped cream.
Recipe and photograph provided courtesy ofPreparedPantry.

Wednesday, April 20, 2011

Chocolate Mascarpone Stuffed French Toast with Strawberry Syrup

          While this recipe sounds complicated it is not. It is so easy. Rich, decadent. Sure you couldn't eat this every day or you would have to have someone you love come grease the door to get you out but, what a wonderful thing to make for brunch. For all of the locals (Utah) Harmons grocery carries the Mascarpone. I love Harmons, not just because I worked there but they carry a ton of things that other grocery stores don't. I always check there first. Back to the mascarpone...It can be expensive, I have included a "substitute"recipe for it. However, nothing matches the flavor of the mascarpone. Treat yourself..you are worth it!
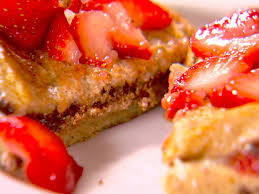

Chocolate Mascarpone Stuffed French Toast with Strawberry Syrup
1/2 cup mascarpone, at room temperature
1 tablespoon heavy cream
1 tablespoon orange zest
1 tablespoon granulated sugar
1 ounce semisweet chocolate, melted and cooled, plus more for grating
12 slices day-old brioche, about 3/4-inch thick (I used thick cut french bread)
3 large eggs
1 1/2 cups half-and-half
2 tablespoons unsalted butter, divided, plus more if needed
Confectioners' sugar, for dusting
Strawberry Syrup, warmed, recipe follows
      Cook's Note: Mascarpone is similar to cream cheese in flavor (but better) and has the consistency to match. It makes a great base for this super-easy yummy filling.

***If you are having troubles finding Mascarpone ( it can also be expensive) here is a substitute for it
1 (8 ounce) package cream cheese, softened
1/4 cup heavy cream
2 tablespoons butter, softened
       In a medium bowl, mix together the cream cheese, cream and butter until well blended. Use in place of mascarpone in any recipe
.
     Combine the mascarpone, heavy cream, orange zest and sugar in a bowl. Add the melted chocolate and mix until all the ingredients are incorporated. Using an offset spatula or butter knife, take a generous scoop of the chocolate-mascarpone filling, about 2 tablespoons, and slather it on 1 slice of the brioche, and then top with another slice of brioche. Repeat with the remaining slices and filling; you will make 6 sandwiches.
     In a shallow dish, whisk together the eggs and half-and-half to make an egg bath. (If you don't have half-and-half, milk or heavy cream will work just fine.)
    Preheat the oven to 200 degrees F.  Preheat a nonstick griddle or large skillet over medium heat. Add 1 tablespoon butter to the skillet, moving it around to coat the surface. Dip each sandwich in the egg bath, turning over to coat and soak both sides. Place the sandwich on the hot griddle. (Place only as many sandwiches as will fit easily on the griddle, don't overcrowd.) Cook, in batches, until golden, 2 to 3 minutes per side. Transfer the sandwiches to an oven-safe platter and cover loosely with foil. Place in the oven to keep warm. Add more butter to the griddle, as necessary, and cook the remaining sandwiches.
    Cut the sandwiches diagonally in half, and serve 2 to 3 halves per person. Dust the sandwich with confectioners' sugar and grate chocolate over the top. Ladle a generous portion of the Strawberry Syrup over the sandwiches, or serve alongside for your guests to serve themselves.


Strawberry Syrup:
2 pints whole fresh or frozen strawberries, hulled 
2/3 cup sugar, plus more if needed
1/4 cup corn syrup 
Pinch sea salt
1 tablespoon lemon juice
       In a large saucepan over high heat, add the strawberries and sugar. (A large saucepan is needed just in case the strawberry syrup starts to boil up the sides.) If the strawberries are not as ripe or sweet as you like, add 1/3 cup more sugar. Add 2/3 cup water, the corn syrup and sea salt to the pan. Stir together until the sugar dissolves. Bring to a boil and cook for about 5 minutes, stirring occasionally.
    Strain out the strawberries and continue to boil the liquid until the mixture has thickened to a syrupy consistency, another 8 to 10 minutes. Stir in the lemon juice and add the strawberries back to the saucepan. Gently stir to coat the strawberries in the syrup. (The syrup can be stored in an air-tight container in the refrigerator for up to 1 week, or cooled and frozen.)
         Cook's Note: For an orange-lover's option, use fresh orange juice instead of the lemon juice to finish the syrup. Alternately, for a rich, adult-friendly sauce, add a splash of orange liqueur, like Grand Marnier, to the sauce. Although the alcohol won't completely cook out, most will if cooked a few minutes longer. Yield: 3 1/2 cups

Bumble Berry Fool

             What exactly is a "bumbleberry"? Well there is no berry that is named bumbleberry. It simply means some different berries that have been mixed together. Of you google bumbleberry you will get a silly explanation but honestly it is a group of mixed berries,,,And, what is a fool? Well, I could post many pictures of fools per say but we are speaking of food today! A fool is a traditional English dessert. It is a mixture of fresh fruit puree and whipping cream layered together. Usually made when the fruits are in season. No matter what you call it...it is light,delicious and easy to make! Top it with some granola for texture if you would like! Once again I got this recipe from Dessert First! Enjoy!


Bumbleberry Fool
4 cups mixed berries, plus more for garnish 
1 1/4 cups sugar
2 teaspoons fresh lemon juice 
6 cups heavy cream
2 teaspoons vanilla extract 
Mint, for garnish

           Place your berries in a blender and add the sugar and lemon juice. Blend until nice and smooth. Place a fine-mesh strainer over a large bowl and strain the blended berries, pressing on the solids with a spoon or spatula to get all the juices into the bowl. You only want the juice, not the seeds, so throw the solids away. Reserve about 1 cup of the berry puree in a small bowl, the rest will be for the topping. Cover and pop in the fridge until ready to assemble your parfaits.
         Whip the cream and vanilla in a large bowl until stiff peaks form. Gently fold the reserved berry puree into the whipped cream. Fill a pastry bag with this berry cream and pipe into 6 tall sundae cups. (If you're not serving right away, you can keep the cream in the pastry bag in the fridge.) Layer the parfait glasses with whole berries, more berry cream and drizzle at the end with the reserved berry puree. Garnish with a few more whole berries and some mint.
Tuesday, April 19, 2011

Lucious Lemon Squares

             I know I have professed my love for Anne Thorntons Dessert First on Food Network before. These beauties are on the menu for Easter at the in laws! If you plan on making these allow enough time for chilling. They are not too sweet and not too sour. PERFECT!


Lucious Lemon Squares
Nonstick cooking spray
2 sticks unsalted butter, at room temperature
2/3 cup granulated sugar
1/2 teaspoon almond extract
2 cups all-purpose flour
1/4 teaspoon fine sea salt
Filling:
6 eggs, at room temperature
2 2/3 cups granulated sugar
3 tablespoons grated lemon zest
3/4 cup fresh lemon juice
3/4 cup all-purpose flour
Confectioners' sugar, for dusting
Raspberries, for garnish, optional
      For the crust: Preheat the oven to 350 degrees F. Grease a 9 by 13-inch baking sheet (otherwise known as a quarter sheet pan) with some cooking spray. In a stand mixer with the paddle attachment (or you can use a food processor), cream your butter with the sugar and almond extract until light and fluffy. Whisk the flour and salt in a small bowl, making sure there are no lumps. Turn the mixer speed to low, add the flour into your butter and mix until just incorporated. (Make sure not to over-mix.) Turn the dough onto the baking sheet, flour your hands and press it out evenly on the bottom and up the sides. Pop in the fridge for an hour (or overnight) to chill. Pop the crust in the oven and bake until a light golden brown, about 20 minutes. Cool completely on a wire rack.
       For the filling: While the crust is cooling, make your filling. Crack your eggs into a large bowl and add the sugar, lemon zest, lemon juice and flour. Whisk until combined. Pour into the crust and spread evenly. Put back in the oven and bake until the filling is completely set, about 30 minutes. Let cool to room temperature before serving. Dust with confectioners' sugar and then cut into 20 to 24 squares to serve. Garnish with raspberries, if desired.
Monday, April 18, 2011

THE Best Carrot Cake Hands Down!

             
            Carrot cake is a confectionery conundrum: it seems you either love it, or you hate it. But either way, there's no denying the appeal of this rich dessert throughout history. Food historians tell us that the origins of carrot cake were likely a type of carrot pudding enjoyed during medieval times. Later, during the Middle Ages, sweetening agents were hard to come by in Britain and quite expensive, so as a result, carrots were often used in place of sweeteners. Interestingly, despite being such a longstanding mainstay in Europe, American cookbooks didn't start listing carrot cake recipes until the early 1900s. And, it was actually in the 1960s before carrot cake began becoming a more common cake in the United States, soon becoming the dessert of choice at summer family reunions picnics and Mothers Day celebrations.
           My husband is not a fan of carrot cake...but there is something that feels so comforting about this cake. Just in time for Easter. No pineapple, no bells and whistles, just carrot cake at it's finest! Of course if you wanted you could add coconut or raisins, but really this cake is good without all of that!You can of course, omit the nutmeg and allspice or sub in pecans for the walnuts. It is all about taste


THE Best Carrot Cake Hands Down
2 cups sugar
1 1/4 cup oil
4 large eggs
2 cups flour
2 tsp. baking soda
1 TBS. cinnamon
1 tsp. nutmeg
1 tsp allspice
1 tsp. salt
3 cups grated carrots                           
1 cup chopped walnuts

 FROSTING:
       Beat ingredients together.
12 oz. powdered sugar
6 0z. cream cheese softened
1 tsp. vanilla extract
2 TBS. butter
2 TBS. milk                                 
         Preheat oven to 350. In a large bowl mix oil and sugar. Add eggs and beat well. Sift dry ingredients together then add to egg mixture. Mix well. Fold in carrots and nuts. Pour into greased 9x13 pan. Bake for 40-45 minutes. Watch carefully due to oven variances. Let cool completely. Make frosting. Frost cake then enjoy!


Followers