Search This Blog

Sunday, January 16, 2011

Slow cooker Carnitas

            Happy Sunday to you all! Hope you are having a wonderful, relaxing day. I have Swiss Steak simmering away in my crock pot. Do you use a slow cooker or crock pot? Do you have one that you don't use? I challenge you to get it out and try it! It simplifies life when you are busy or on the go. You can cook so many things in it. From breakfast to dinner, desserts to beverages. Experiment a little. Get it out and use it. The first time you come home to a house filled with the aromas from dinner cooking, you will be hooked. Not to mention it gives you more time to spend with your loved ones.
           Todays recipe is: Carnitas. It is from Tasty Kitchens. If you haven't gone to that site..try it! A bunch of home ches submitting and rating recipes. Awesome! Theses babies are tasty. And, best of all it is a slow cooker recipe! It makes enough that you could make some Posole ( a Mexican soup) with the leftovers. 2 meals in one! Can't beat that!


Carnitas
•3 pounds Boneless Pork Shoulder, Cut Into Cubes
•¾ cups Fresh Squeezed Orange Juice
•½ whole Lime, Juiced
•7 cloves Garlic
•1 Tablespoon Kosher Salt
•1 Tablespoon Cumin
•¼ cups Cilantro, Chopped
•¼ cups Chicken Or Beef Stock
•1 bottle (12 Oz. Bottle) Mexican Beer (optional)
•2 Tablespoons Olive Oil
            In a slow cooker, combine all ingredients (except olive oil and beer) and stir.Sprinkle salt and black pepper. Brown up the pork in a hot frying pan on the stove. This will add flavor and make the meat taste excellent. Dust with some Cumin before adding to the pot. Arrange the pork so it sits as a single layer at the bottom of the pot. Set slow cooker to High for 4 hours or Low for 8 hours. Once the pork is done, it should be tender enough that you can shred it with a spoon. Heat a stainless steel or aluminum pan with the olive oil. Using a slotted spoon, transfer the pork from the pot to the pan in batches. Fry the pork until brown and crispy, breaking it up as you fry it. Do not crowd the pan with pork for best results. If you like, you can deglaze the pan with about 3 tablespoons of beer per batch and cook till evaporated. Serve on tortillas garnished with chopped onions, avocado, fresh cilantro and lime wedge.
Saturday, January 15, 2011

Just like Applebees Vanilla Maple Blondies

         Todays internet connection is a spotty one. So the post will have to be quick I am afraid. My husband and I used to go out to eat like once a week, now not so much. But, I digress. When we would go to our local Applebees restaurant, this would be the dessert I would pick. Most of us don't have a hot cast iron skillet to serve it on but hey a plate would be just fine! Enjoy!


Just like Applebees Vanilla Maple Blondie's
•FOR THE BLONDIE'S:
3 cups All-purpose Flour
¼ teaspoons Salt
1 teaspoon Baking Powder
10 Tablespoons Unsalted Butter, melted
2 cups Light Brown Sugar
3 whole Eggs, Lightly Beaten
1 teaspoon Vanilla Extract
½ cups Chopped Walnuts
1 cup White Chocolate Chips
•FOR THE SAUCE:
2 Tablespoons Unsalted Butter
1-½ cup Heavy Cream
6 Tablespoons Maple Syrup
3 Tablespoons Light Corn Syrup
Optional Garnish: Vanilla Ice Cream, Chopped Walnuts
            Preheat oven to 350 degrees F. In a medium bowl, sift together flour, salt & baking powder. Set aside. In another large mixing bowl, mix melted butter with brown sugar until well-blended. Add in beaten eggs and vanilla. Stir well.Slowly add flour mixture to butter/sugar/egg mixture. Stir thoroughly but take care not to overmix your batter. Fold in nuts and chocolate. Batter will be thick. Spray pan with nonstick cooking spray, then pour batter into 9 x 13 baking pan. Bake for about 25-30 minutes (until a toothpick inserted comes out clean).

For the sauce:
    Melt butter in a medium sauce pan over medium heat (do not allow butter to burn). Then add heavy cream, maple syrup and corn syrup. Allow this mixture to simmer over medium heat for about 20-30 minutes. This is the hard part: waiting for the mixture to reduce and thicken. You don’t want to bring this to a boil, just a nice, slightly bubbly simmer. Stir it occasionally. Once it has reduced by about a 1/3, it’s ready.
       To serve: you can heat up blondie on a cast iron skillet and serve with a scoop of vanilla ice cream or if you are like the rest of us, you can just heat a slice of blondie on a plate in your microwave for about 25 seconds. Add a scoop of ice cream on top then pour the warm maple butter sauce on top and sprinkle with chopped walnuts.
Cook’s note: if using a glass pan, adjust heat to 325 degrees F. You may have to bake slightly longer than given time. Also, you may want to double up the maple butter sauce recipe. It really is the best part. We love a lot of sauce on ours (as you can tell from the picture!).
Friday, January 14, 2011

Lasagna Soup

           I have a busy day today. Shopping at a couple different places. Nothing fun though. As well as washing sheets. AKA the job that takes all day! Have a great day all!  
           This recipe is from Tasty Kitchens as well. It is on my menu this time. Lasagna Soup. Now you could make a few changes...as I plan to. I will be using ground beef or you could use no meat at all or a combo of the two. As for the noodles you could get the mini lasagna noodles or bow tie. A lady said she used tortellini. You could use any pasta you choose. Add some olives. Whatever you would like. Recipes are just guidelines. Try it and let me know how you like it!


Lasagna Soup
•4 ounces, weight Italian Sausage
•1 whole Onion, Diced
•4 stalks Celery, Diced
•1 clove Garlic, Minced
•28 ounces, weight Canned Tomatoes, Chopped
•15 ounces, weight Tomato Purèe
•3 cans (14 Oz. Can) Chicken Broth
•1 can (14 Oz. Can) Beef Broth
•1 teaspoon Basil
•1 teaspoon Oregano
•½ teaspoons Thyme
•½ teaspoons Crushed Red Pepper
•8 whole Lasagna Noodles
•2 cups Ricotta Cheese
•½ cups Mozzarella Cheese, Shredded
•¼ cups Parmesan
          Remove casing from the sausage, crumble into a 4-quart stock pot and brown. (Feel free to add more meat to make it heartier … if ya like that sort of thing.) Add the onion, celery, and garlic and saute for 5 minutes. Add the chopped tomatoes, tomato puree, chicken broth, beef broth, basil, oregano, thyme, and crushed red pepper. Bring to a boil, reduce heat, and simmer, uncovered for 30 minutes. Break the lasagna noodles into pieces and add to the soup (I also use bow tie pasta). Cook over medium heat until the noodles are tender (about 15 minutes). To serve, top with ricotta, mozzarella, and Parmesan cheese.
Thursday, January 13, 2011

Have you started planning your meals yet?~Mongolian Beef

           My baby FINALLY slept through the night on his own. Maddox, my three year old, slept until 6 this morning. He is usually up before 5 am. A good nights sleep after a couple of years, feels fantastic. Maybe today won't be so emotional for any of us. I have some shopping to do today, so the less I have to worry about meltdowns, the better.
               How are you doing on your meal planning? I promise you, a little planning ahead goes a very long way in your pocketbook. Do you plan your menu by types of food? For instance, Meatless Monday, Beef, Chicken, Pork etc. Or do you plan by things like Italian on Tuesday, Mexican Thursday, Soup Friday? I  do a combination. It works well for me. I can look at my calender and say "Today is crockpot Wednesday and know what I will be cooking." I also schedule a free night once every two weeks, since I do my meal planning for two weeks. That is a night we go out or get take out. That way we don't feel deprived. So,What is on your menu tonight?
            Todays recipe comes from Food.com. Mongolian Beef. I however would add a few items to this. I absolutely LOVE bamboo. A few thinly sliced carrots and some onion pieces as well.I love the veggies and Mike loves the beef, so it works out rather well. I would also add some dried chili flakes for heat. A must have on chinese night at our house. At least for my hubby and I. This recipe just may get you through until your next "free night".
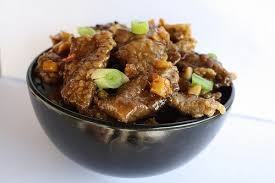

Mongolian Beef
2 teaspoons vegetable oil
1/2 teaspoon ginger, minced
1 tablespoon garlic, chopped
1/2 cup soy sauce
1/2 cup water
3/4 cup dark brown sugar
vegetable oil, for frying (about 1 cup) 1 lb flank steak
1/4 cup cornstarch
2 large green onions
          Make the sauce by heating 2 tsp of vegetable oil in a medium saucepan over med/low heat. Don't get the oil too hot.Add ginger and garlic to the pan and quickly add the soy sauce and water before the garlic scorches. Dissolve the brown sugar in the sauce, then raise the heat to about medium and boil the sauce for 2-3 minutes or until the sauce thickens. Remove it from the heat. Slice the flank steak against the grain into 1/4" thick bite-size slices. Tilt the blade of your knife at about a forty five degree angle to the top of the steak so that you get wider cuts. Dip the steak pieces into the cornstarch to apply a very thin dusting to both sides of each piece of beef. Let the beef sit for about 10 minutes so that the cornstarch sticks. As the beef sits, heat up one cup of oil in a wok (you may also use a skillet for this step as long as the beef will be mostly covered with oil). Heat the oil over medium heat until it's nice and hot, but not smoking. Add the beef to the oil and sauté for just two minutes, or until the beef just begins to darken on the edges. You don't need a thorough cooking here since the beef is going to go back on the heat later.
     Stir the meat around a little so that it cooks evenly. After a couple minutes, use a large slotted spoon to take the meat out and onto paper towels, then pour the oil out of the wok or skillet. Put the pan back over the heat, dump the meat back into it and simmer for one minute. Add the sauce, cook for one minute while stirring, then add all the green onions. Cook for one more minute, then remove the beef and onions with tongs or a slotted spoon to a serving plate. Leave the excess sauce behind in the pan.
Tuesday, January 11, 2011

Peanut Butter Pretzel Chocolate Chip Cookies

            So, my three year old doesn't have preschool this week and given the temps. here in Utah are well below freezing, he is going stir crazy as am I. I know it is winter but it hasn't really snowed a whole bunch this year and it is bitter cold out. I do love winter but I am getting a little bit of spring fever.
             I am working towards my goal of putting me first. It is a difficult task as a woman and a mother. Finding time to work out or enjoy the silence is few and far between. But when I do get those golden minutes of reflection, I am trying to figure out exactly who I am and where I lost myself along the way.I seemed to have submerged myself into motherhood, which is not a bad thing. It is truly a blessing. Somewhere, along the way though,I lost track of me. What I like, what interests me, what I like to do. I am pretty sure that the Backyardigans don't fit into that equation anywhere. I do love to cook but can't find time to do a whole lot of it. I know that with small children time is limited. I suppose what I need to learn is contentment. I need to be content with where I am in life. No matter where that is.
     "Whatever relationships you have attracted in your life at this moment, are precisely the ones you need in your life at this moment. There is a hidden meaning behind all events, and this hidden meaning is serving your own evolution.” ~ Deepak Chopra

         Todays recipe is from Tasty Kitchens. A combination of salty, sweet and chocolate. Leave the pretzels a little chunkier though. It gives a better texture.


Peanut Butter Pretzel Chocolate Chip Cookies
•1 cup Butter, Softened
•1 cup Creamy Peanut Butter
•1 cup Sugar
•1 cup Brown Sugar
•1 teaspoon Pure Vanilla Extract
•2 whole Eggs
•3 cups Flour
•1 teaspoon Baking Powder
•1 teaspoon Baking Soda
•1-¾ cup Crushed Pretzel Pieces
•11-½ ounces, weight Chocolate Chunk Pieces
       Preheat oven to 350°F. Beat butter, peanut butter and sugars until creamed. Add vanilla and eggs and mix well. Add flour, baking powder and baking soda and mix. Finally add crushed pretzel pieces and chocolate chunks, mix until combined. Using a small cookie scoop, place cookie dough on ungreased cookie sheets, making sure they are 2 inches apart from each other. Bake in a 350°F for 8-10 minutes. Cool on a wire rack and store in an air tight container.

Heavenly Yeast Rolls

         I made these light as air dinner rolls last night. If you are a novice at bread making these are so simple. The key is to not add too much flour or knead them too much! Try them they are super easy and taste great! I got the recipe from tasty kitchen. Mine required about 4 1/2 cups flour to get the texture right. The only other change I made was, I used 1 cup warm water and 1/2 cup milk. I just like the texture that milk gives bread. Please try them they are delicious...you won't be disappointed!


Heavenly Yeast Rolls
•1-½ cup Warm Water
•1 Tablespoon Yeast
•3 Tablespoons Sugar
•2 teaspoons Salt
•4 Tablespoons Butter
•4 cups Bread Flour
        In a large mixing bowl, dissolve yeast in warm water with the sugar. Add the salt, butter, and 3 cups of the flour. Mix until smooth. Add in enough remaining flour to make a soft dough, adding more flour if needed. Push your fingers into the dough; the dough should feel like it’s going to stick to your fingers as you pull them away, but doesn’t. That’s how you know the consistency is just right.Turn onto a floured surface; knead until smooth and elastic, about 10 to 20 minutes. Place in a lightly greased bowl, turning once to grease the top. Cover and let rise in a warm place until doubled, about 1 hour.
Punch dough down. Using a 1/3 cup measuring cup, measure out the dough for 12 rolls. Shape each into a ball. You may have a little bit of dough left over, so make whatever you want with that. Place the rolls into a greased 9″x13″ pan. Cover and let rise until they are at least double in size, about 30 to 45 minutes. You can let them rise longer to get even larger rolls, but you need to watch them carefully so they don’t over-rise and then deflate when they bake. I always let them rise to their maximum capacity. Also, note if you are using regular yeast or rapid rise yeast; this will change the rising times, as will the temperature in your house.
Bake at 375 degrees for 20 to 25 minutes or until golden brown. After I take them out of the oven, I always spread butter over the tops of the rolls.
Note: the dough can also be done in a bread machine on the dough cycle if you have that, but just be sure to still test the dough midway through the kneading cycle to make sure the consistency is correct. After the dough is done rising, proceed with the recipe as directed.
Monday, January 10, 2011

Back to meal planning~ Easy Tasty Garlic Bread

            Since the New Year has begun I have been struggling keeping on my weekly meal planner. I mean, I fill it out and I shop for the ingredients but I just can't seem to stay on schedule. I know that it isn't really big deal but I do much better when I am able to stay on a schedule. I make a 2 week meal plan and I shop once, except for the fresh ingredients or the usual milk and bread I am constantly running out of. It saves me time and it saves me money. The less often I go to the store, the less I spend. Also, I tend to repeat my meals less, so it helps me stay out of a rut. This week is a payday week, so I am committed to getting back on track. How about you? How often do you go to the store? How much do you spend on things that weren't ON the list? Try planning your meals weekly at least. See if it saves you time and money. I think you will be surprised at the results.
             Todays recipe is: Easy Garlic Bread. So easy and a great compliment to any Italian dish. You could use a loaf of french bread in place of the Italian of course. The only thing I changed was I add some Parmesan cheese. Maybe a sprinkling of paprika. If you have any chopped fresh garlic, you could sub that in as well!Yummy!


Easy, Tasty Garlic Bread
1/2 cup butter
1 1/2 tablespoons garlic powder
1 tablespoon dried parsley
1 (1 pound) loaf Italian bread, cut into 1/2 inch slices
1 (8 ounce) package shredded mozzarella cheese

       Preheat oven to 350 degrees F.In a small saucepan over medium heat, melt butter and mix with garlic powder and dried parsley. Place Italian bread on a medium baking sheet. Using a basting brush, brush generously with the butter mixture. Bake in the preheated oven approximately 10 minutes, until lightly toasted. Remove from heat. Sprinkle with mozzarella cheese and any remaining butter mixture. Return to oven approximately 5 minutes, or until cheese is melted and bread is lightly browned.

Followers