Search This Blog

Sunday, December 19, 2010

Grace---Tasty Breadsticks

             This recipe is a repost. My husband said that I should repost some of my favorites because I have posted so many some of the first ones/favorites get lost. This week I will be doing just that...

         Well my next in line is Grace. Actually her first name is Michaela but she prefers to go by her middle name Grace. My husband and I struggled with infertility for about 7 years until in the middle of my husband in Police Academy we found out we were going to be blessed with a baby. She is by far my spunkiest. She loves to dance and sing as well as give love to everyone she meets. She is a sweet little girl. Although she can be stubborn. She starts Kindergarten in a few weeks and is very excited about that. She wants to learn to read. She is a picky eater but is getting better. She has a couple of favorites but I figure her MOST favorite you already know how to make--peanut butter sandwich. Her next in line is Tasty Bread sticks. They are easy to make and a favorite amongst friends. They are great with Lasagne or Spaghetti.


Tasty Bread sticks
1 Tbs.yeast
2 Tbs. sugar
1 1/2 C. warm water

Stir gently and let rest for 5 minutes
Add:
1 tsp salt
3 1/2 C flour (one at a time)

Mix well in kitchenaid or bread machine for 3-5 minutes. Or knead by hand. Let rise 30 minutes or until double in size. Roll into a large rectangle Spread with melted butter Sprinkle over the surface: (Although I don't really measure I just sprinkle them evenly)

1 tsp italian seasoning ( I prefer the McCormick grinder)
1/3 C. dried onion flakes
1 tsp. garlic powder
1/2 C. grated cheddar cheese

Press ingredients down into the dough. Fold over.. then over again. Roll out into a rectangle( Not as big as before.) Cut into strips. Melt 1/4 c butter and put in bottom of 9x13 baking dish. Dip breadsticks in the butter pinch ends closed, and twist. Place them side by side in dish. Sprinkle with parmesan and parsley. Let Rise about 10 minutes until puffy. Bake at 375 for about 15 min or until browned.
**Note to simplify this recipe you can cut out the four seasonings

The monster within~ Traditional Baked Beans

         It has been a rough week. No, not with the kids. I have been in pain for the better part of the week. I have varicose veins around my uterus (which getting pregnant made worse) AND I have endometriosis (which having children temporarily made better). Which one of these ailments is the culprit this week I don't know but...enough already. Endometriosis is a condition where instead of a woman shedding her lining ever month outward for some reason, it backs up into her tubes and into her abdominal cavity. It causes scar tissue to for and causes adhesion's to form.Endometrial tissue has been found in some people, on their kidneys, livers, stomachs and as far away as knees and lungs. etc. There is no cure and not enough research is done to know why it happens. But it is painful, Very very painful.
           Years ago long before Mike and I got married, I was in severe pain. I went from Doctor to Doctor. Every single one had the same solution...birth control pills. I knew there was something not right. I think the Dr.s just thought I was having cramps and being a baby. Finally, I found a doctor who took the time to run some tests and find out what was wrong. He diagnosed me with varicose veins and endometriosis. I have had a few surgeries to burn off the scar tissue that has attached itself to various parts of my organs like my tubes as well as my intestines. I have been on Depot Luperon which costed at the time $1000.00 dollars per shot. I had to have 1 a month for 6 months. These shots are painful. It is powder and liquid that foams up while having the shot. This shot is designed to put you through menopause for the 6 months you are on it.This may have worked for some but not for me. I was still in pain and miserable. From there I went to birth control pills. Just the estrogen no placebo pills. I did that for 5 years. Which was silly. I wanted to get pregnant but was on birth control. It may have controlled the pain a bit but I gained weight and was a bear. My husband may agree if he weren't scared.
         Finally, I decided I was done with the birth control. I had fooled around with my hormones enough. My husband,  not enjoying the sight of me writhing in pain wanted me to have my hysterectomy. The next and final step. He was concerned for me. I didn't want to jump the gun on such a final decision. As I layed in bed for many nights contemplating my dilemma, I swear to you I heard a voice in my ear that kept saying "Not yet, don't do it." Now I was in severe pain. There were days that I couldn't stand up straight or I would be chopping veggies or vacuuming and I would get such a sharp pain that it would double me over and take my breath away. But, I chose to listen to that voice and put off surgery. A few months later, something happened that we had been dreaming about but never thought possible, I was pregnant. Endometriosis can cause infertility and I had stage 3 endometriosis. Almost immediately my pain was gone. And let me tell you, I was concerned about the pain of child birth, but it has nothing on endometriosis. I am serious.
          Grace is now 6 and I have carried successfully two handsome boys. In the last 4 years, between nursing babies and pregnancies the endometriosis hasn't had a chance to grow. But, Peyton is more than likely my last child and the pain is coming back. Not severe, yet but it is letting it's presence be known. I am trying to put off a hysterectomy. I am close to mid 30s and would like to go through menopause on my own. I have had dear friends and family have hysterectomies due to endometriosis and I would like to put it off as long as possible. So I will continue to put my game face on and continue on.
             Todays recipe is: Baked Beans. I know traditionally this is made for bar-b-ques but with all of the parties for the holiday..why not?
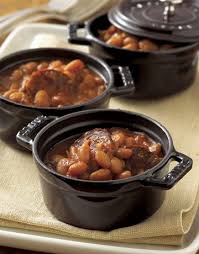


Baked Beans
1/2 pound ground beef
1/2 pound bacon, diced and browned
1 medium onion, chopped
1/3 cup sugar
3 Tbs. packed brown sugar
1/4 cup ketchup
1/4 cup barbecue sauce
1 tablespoon prepared mustard
1/2 teaspoon pepper
1/2 teaspoon chili powder
1 (16 ounce) can pork and beans, undrained
1 (16 ounce) can kidney beans, rinsed and drained
1 (16 ounce) can Great Northern beans, rinsed and drained
           Brown bacon. Set aside.In same large skillet, cook beef and onion until meat is done and onion is tender. Drain any fat. Combine all remaining ingredients except beans. Add to meat mixture; mix well. Stir in beans. Place in a greased 2-1/2-qt. casserole. Bake, covered, at 350 degrees F for 1 hour or until heated through. Or you could put in crock pot on low for 4 hours.
Saturday, December 18, 2010

Salted Caramels

         Ok if it came down to chocolate or caramel which would you choose? I would choose caramel 90% of the time but not just any caramel~salted caramel. The combination of salty and sweet Yummy. I have had many homemade caramels that really don't have a good flavor--to me at least. So, here is a version of salted caramel candies. I am convinced that if you try it, you will be hooked. If you prefer chocolate? Well then dip them in some melted chocolate! Now a word to all who are going to make this or any candy...assemble everything before hand. NEVER leave this boiling. Use a heavy bottom pan, larger than what you would think. Once it starts to really boil, things go pretty quickly.Hope this will help you Mandy!

Salted Caramels
1 cup heavy cream (not ultra-pasteurized)
5 tablespoons unsalted butter, cut into pieces
2 teaspoons sea salt*
1-1/2 cups sugar
1/4 cup light corn syrup
1/4 cup water
*You can use any sea salt, which is available at fine supermarkets and specialty food stores.
Equipment
8” square baking pan
Parchment paper
Candy thermometer (or a deep-fat thermometer)
Wax paper for wrapping or paper candy cups

Yield: About 40 caramels.
Line the bottom and sides of the pan with parchment paper and lightly oil the paper.
Bring the cream, butter and sea salt to a boil in a small saucepan; remove from heat and set aside.
Boil the sugar, corn syrup and water in a heavy saucepan, stirring until sugar is dissolved. Bring to a boil, without stirring but gently swirling pan; then cook without stirring until the mixture reaches 248°F, the firm-ball stage. Carefully stir in the cream mixture—the mixture will bubble up. Simmer, stirring frequently, about 15 minutes. The temperature should not go higher than 250°F.

CANDYMAKER TIP: To get the caramel consistency you want, test by dropping a spoonful of caramel into a bowl of cold water. It will form a ball, which you can test with your fingers. Stop cooking when the ball is the consistency that you want. Pour the mixture into the baking pan and cool 2 hours.

OPTIONAL: You can enrobe your caramels in tempered melted chocolate; sprinkle the top with some grains of sea salt (pretty salts make a difference)
Cut into 1-inch pieces, then wrap each piece in a 4-inch square of wax paper, folding ends or twisting to close like taffy.

NOTE: Before you start this project you will also need find out what your elevation is and adjust the temperatures accordingly. For every 1,000 feet above sea level, you will need to subtract 2 degrees. For example, I live at 5,000 ft. above sea level, so I subtract a total of 10 degrees from the temperature indicated in the recipe.
Friday, December 17, 2010

Cinnamon Pretzels

            Well my post is late today. I got this recipe from my dear friend to Kristine. She swears these are to die for. She got the recipe from local royalty... one of the Osmonds. Salty and sweet all at the same time. Great to snack on or to give as neighbor gifts. This recipe is simple and delicious. You probably have all the ingredients in your pantry right now.


Cinnamon Pretzels
1 lb. pretzels
2/3 c. oil
1/3 c. sugar
1-2 Tbs cinnamon
     Mix together cinnamon and sugar and set aside. Pour oil in a large bowl and toss pretzels in the oil. Add cinnamon sugar and mix well. Microwave 2 minutes. Shake and microwave 1 minute. Shake and microwave again for 1 minute. Dump out onto a few baking sheets and drizzzle with melted white chocolate or milk chocolate. Yummy!
Thursday, December 16, 2010

Blue Ridge Mountain Chocolate Chip Cookies

           Well kids we are about a week out from the Christmas holiday. Ready or not..it's coming! I hope all of your crazy running around is done and you are enjoying the important things like family and friends. Love and joy. We should appreciate it all year but really start counting our blessings at this time of year. I am truly blessed and thankful for all of my blessings, all of my trials, for my life!
            Todays recipe is, Blue Ridge Mountain Chocolate Chip Cookies. I know that there are a ton  of chocolate chip cookie recipes out there. What sets this apart is that it calls for butter which is great for flavor and shortening which makes for a tender cookie that is soft in the middle.


Blue Ridge Mountain Chocolate Chip Cookies
1/2 cup shortening
1/2 cup butter
3/4 cup white sugar
3/4 cup packed brown sugar
1 teaspoon vanilla
1/2 teaspoon almond extract
1 teaspoon baking soda
2 eggs
2 3/4 cups bleached all purpose flour (see note below)
1 teaspoon salt
2 cups chocolate chips (I use Ghirardelli brand)
        Note: The recipe initially calls for 2 1/2 cups flour, but with the added note if you want them more softer and rounder cookie to add 1/4 cup flour. I add the 1/4 cup making it 2 3/4 cups total. Cream shortening, butter, sugars, then eggs and vanilla and almond extracts. Blend dry ingredients and add to mixture. Stir in Chocolate chips. Drop by large tablespoons (I use cookie scoop) onto ungreased cookie sheet, leaving 2-inches room in between to allow cookies to spread. I press down lightly with a measuring cup to bake more uniform cookies). Bake at 375° for 10 minutes until lightly brown. Makes 2-3 dozen cookies depending on size
Monday, December 13, 2010

Deacadent Mashed Potatoes~ Keep your cardiologist and Jenny Craig on the speed dial

           Alright I know, I know white potatoes are considered a "Bad" carb. But who doesn't love a good potato? And a good mashed potato at that? Mashed potatoes are my husbands favorite side. This recipe makes a lot and requires s lot of indulgent ingredients. Keep in mind the title of this post. You can't eat this everyday or you may explode..but yummy and tasty. The recipe calls for Yukon Gold potatoes. These potatoes are buttery and so delicious. If you haven't tried a Yukon do it. We got a 50 lb.bag from a friend in Idaho this fall. The bag is gone. Thanks Sina! Yummy! You could of course use Russett or Reds whatever you have on hand. Of course you could sub in milk and cut out a few ingredients but..splurging is ok once in a while..right?! Give it a try but remember..I told you so! Just keep Jenny Craig on the speed dial you should be alright.


mashed pot 080


Decadent Mashed Potatoes
5 lbs Yukon Gold Potatoes
12 Tbs. butter, softened
One 8 oz. pkg softened cream cheese
1/2-3/4 cup half and half
1/2 tsp. seasoned salt
salt to taste
black pepper to taste
            Boil potatoes until soft. Drain the potatoes. Return to pot and mash until all lumps are gone. Add butter. Add cream cheese. Mash together then add half and half. Add seasonings. Spread into  a 2 qt baking dish. If you are worried that you haven't added enough butter you can dot the top with additional butter if desired...just don't tell your cardiologist. If you are going to eat this immediately skip the next and final step. However you can make in advance and refrigerate then go on to the next step.When ready to eat, preheat oven to 350. Cover with a lid and bake until warmed through.
Sunday, December 12, 2010

Team Max Forever~Fudge Crinkles

           Filling out Christmas cards today. Uggh! December is going way too fast for me. I am getting down to business this week and wrapping presents before school is out for 2 whole weeks! OH BOY! Say a prayer for me. Christmas is for children and while filling out your cards this year I would ask you to keep a special family in mind this year. Max Nunn passed away from cancer on Thanksgiving this year and he was only 7 years old. In his short life he accomplished more than more adults do in their lifetime. He became a warrior against children's cancer. His family has vowed to continue his fight. They are asking for donations to be made to St. Baldricks Hospital in Max's name or you may send the family a Christmas card. Just $2.00 in the card can help so many. Please don't let this little boy down. It could be my child or your child next time. Let's help Max and the Nunn family beat this ugly disease. Team Max forever. The Nunns Address is:
Nunn Family
4800 230th Ave.
Morley, MI
49336
Or if you would feel more comfortable I will include a link to the hospital:http://www.stbaldricks.org/participants/mypage/participantid/411709


Todays recipe is: Fudge Crinkles

Fudge Crinkles (A Great 4 Ingredient Cake Mix Cookie)


Fudge Crinkles
1 (18 1/4 ounce) box devil's food cake mix (Betty Crocker Super Moist suggested)
1/2 cup vegetable oil
2 large eggs
confectioners' sugar or granulated sugar, for rolling cookies
        Preheat oven to 350°. Stir (by hand) dry cake mix, oil and eggs in a large bowl until dough forms. Dust hands with confectioners' sugar and shape dough into 1" balls. Roll balls in confectioners' sugar and place 2 inches apart on ungreased cookie sheets. Bake for 8-10 minutes or until center is JUST SET. Remove from pans after a minute or so and cool on wire racks.
 *My Notes*:.I have tried these with several different cake mix brands. They all come out good, but the Betty Crocker does come out the best. I was having a problem with my cookies flattening while baking. This usually happens with the generic cake mix brands. You can play with your oven temp and try them on 375 to keep them from spreading. Adding more oil than called for will also cause the cookies to spread -- I wouldn't suggest it, they really don't need extra oil. Another way to keep them nice and thick and to get the most "crinkled" or "crackled" look is to make them bigger. When I roll them at about 1.5 inches they look prettier.
** And my best tip: My confectioners' sugar was consistently being absorbed by the dough. The last time I baked them, I rolled them into balls without rolling in the sugar and let them "dry" for a few minutes. Then I rolled them in sugar and baked. These came out with a nice coating of sugar that didn't disappear.

Followers